HOWTO: Create a New Patient Record - OpenEMR v7
Introduction
This document is all about creating a complete new patient record in in OpenEMR v7. That complete process can be much more involved than simply clicking the 'New/Patient' main menu item and filling in the demographics. We will look at all the places a new patient's information might be entered, discuss how to properly enter it and how to customize the parts that are accessible to users who do not have developer skills.
This workflow was last documented for OPenEMR v5 and the application has been significantly upgraded since then so really needs an update. This document was made using the OpenEMR v7.0.1 public demo. Some controls in older versions of OpenEMR may behave differently.
OpenEMR has three places to enter and display patient information. We will cover them in this order:
Patient Dashboard
1. This is the summary display of all patient record information; for discussion see below on this page. Most of the widgets will present content that has been previously entered into the other two input locations. In many cases one may add to the initial patient record from the dashboard.
If you do not want the overview you can get straight to the data entry tools on the following pages.
New/ Search
2. The primary tool to create a new patient record is on the main menu: the New/Search page, AKA 'Search or Add Patient'. All of a patient’s personal information may be initially recorded here, and much of that can be accessed through other displays in the EMR.
Dashboard Links
3. The Dashboard Links are access points to the patient’s treatment, history, and financial information. Some of these are places to initially enter information to build the patient record; others are intended to be added to after treatment begins.
The Patient Dashboard
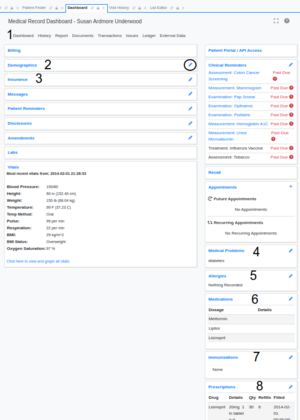
Refer to the thumbnailed image.
The dashboard is the centralized access point for practically all of a patient's information. It presents summaries of different features and allows most of them to be edited. In many cases the screens linked to by the Dashboard Links (see that page next) will display summaries of their information here. Note that the sections which are displayed will vary depending on the system configurations, the logged-in user's access permissions and their preference settings.
Each collection of patient data is localized in its own widget panel which, if the user viewing it is permitted to edit it, has an edit tool pencil icon (as circled in Demographics in the big image). When the pencil is clicked it displays the interface of the module that handles that function. For example, editing the Allergies widget will display the Allergies section in the patient's Medical Issues. Editing Prescriptions will open the native OpenEMR Prescription module's interface.
Some of the information collections in the widgets are also found in the 'New Patient' feature; when information is entered for a new patient it will also appear here. One implication of this is that a new patient workflow might be as simple as opening the 'New Patient' menu item, filling out only the few required demographics, and clicking 'Create New Patient'. Then at a later time more data can be entered through the Dashboard widgets.
The Demographics/ Insurance section consists of what are called 'Layout Based Visit Forms' AKA 'LBFs' (and sometimes 'LBVs'). They can be customized by an OpenEMR admin user; see the 'Customization' section below for details. The other widgets are hard- coded to retrieve information from the database. and display them here.
Keep in mind that because this tutorial is limited to creating the new patient record, not all of the dashboard items will be discussed. Most of the widgets monitor activities that will be conducted after the patient record is created and treatment begun, but not as part of creating that new record. For example, the 'Billing' widget displays a running summary of the patient's account, as they accrue charges and make payments. 'Appointments' will show this patient's upcoming appointments from the calendar as they are made.
The New Patient- Relevant Items
Left column:
1. The Dashboard Links - see Dashboard Links
2. Demographics - the demographics shown here have the exact same data as is collected in the 'New/ Search' screens; refer to New/Search
3. Insurance - described with Demographics
Right column:
See: Dashboard Links - Issues
4. Medical Problems - displays the title of each Medical Problem entered into the 'Medical Issues' list. Click the pencil opens the 'Medical Problems' section
5. Allergies - displays the title of each allergy entered into the 'Medical Issues' list of allergies. Click the pencil opens the 'Allergies' section
6. Medications - displays the title of each Medication entered into the 'Medical Issues' list of medications. Note that these are medications which are treatment issues, not necessarily the list of current medications. Click the pencil opens the 'Medications' section
7. Immunizations - opens data input form for recording immunizations
8. Prescriptions - integrated with OpenEMR's native Prescriptions module, if used. It is the interface for entering prescriptions for new patient's current meds. Some 3d party e-prescription applications transfer their current medication list to this widget.
Customization
A few of the dashboard controls are customizable without OpenEMR developer skills.
Layout Based Forms
The New/ Search page, and several other displays in OpenEMR, is built on what is called an ‘LBF’ (sometimes ‘LBV’) or ‘Layout Based Form’. LBFs contain different types of data entry controls which can be modified by a user (with Administrator privileges) from their default state to suit the needs of a particular practice.
While LBF form building does not require coding skills it is not a trivial endeavor. For more information on customizing LBFs search the forum and the wiki for 'LBF', or 'Layout', and this wiki page is a good place to start:
User Defined fields
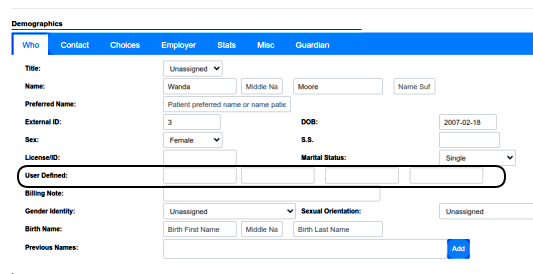
OpenEMR provides four data fields in the Demographics widget that can contain any arbitrary data, that is stored in the OpenEMR database. They can be accessed in the Demographics display (while editing) but not in the New/Search ‘Who’ panel so cannot be filled while adding a new patient record.
They can be customized as described here: HOWTO:_Customize_A_Demographics_User_Defined_Field]
and if desired, added to the ‘Patient Finder’ search tool:
HOWTO:_Change_Search_Columns_in_Patient_Finder]
OpenEMR system lists
System lists are any of the dropdown lists that contain pre- coded options to select as responses. For example, the ‘Title’ dropdown in the previous image. Their contents can be edited by OpenEMR Administrator users.
Virtually every dropdown list in this New Patient workflow (and for that matter, in all of OpenEMR!) can be edited to suit particular needs. And in virtually every case, the name of the dropdown is the name of the list you are going to edit.
‘Add button’ lists
The dropdown lists to which most users can add items.
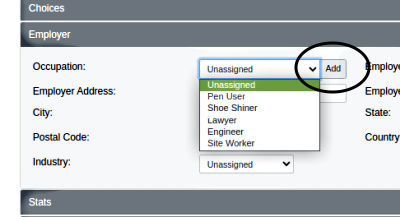
Here we are adding a new job title to the ‘Occupation’ list:
1. Click ‘Add’ button next to dropdown (oval at right, above)
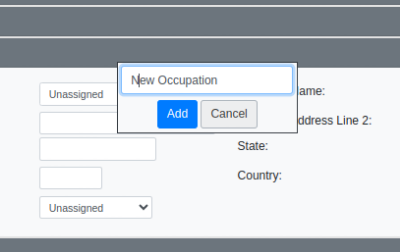
2. Enter the new item
3. Click blue ‘Add’ button
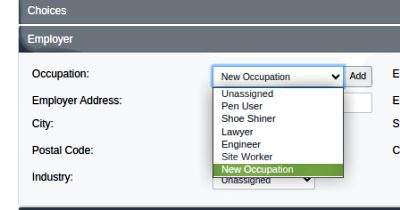
… and see the new item added to the list...
… which will now appear in the ‘Occupation’ system list and all the ‘Occupation’ list displays in OpenEMR.
Next page: New/Search page.
