A Generic Medical Encounter Workflow in OpenEMR 6.1
Introduction
OpenEMR's purpose is to collect and manipulate the healthcare data that is generated in the process of delivering patient care. To make it as generally useful as possible, OpenEMR is organized to be used in a generic clinical 'encounter'. An 'encounter' is simply the sequence of events which occur when a patient presents at a health facility for an appointment to receive any sort of care. It consists of different clinic staff in turn doing with the patient whatever it is they do, until the encounter is completed. Specific tasks and the data collected may be different between healthcare specialties but the overall workflow of an encounter is generally consistent.
OpenEMR 6.1 has retained nearly all the clinical functionalities of earlier versions of the EMR. If the display and control objects are analyzed, it's clear that they function in almost the same manner as they always have. However, enough capability upgrades and interface changes have accumulated that it now seems useful to make a fresh survey of the current state of the EMR.
This document is a walk- though of a generic medical encounter, which contains these fundamental stages:
- Appointment Creation - Receptionist
- Patient Check-in - Receptionist
- Interview and History - Clinician
- Exam and Treatment - Provider
- Checkout and Payment - Accountant
Note:
- This encounter only shows the clinical activities of a basic medical patient-care visit. It includes no activities such as inter-staff communications, billing, referrals or report generation, labs or medications.
- The user roles that are shown performing the tasks are simply the roles that are allowed to do the work by OpenEMR's default ACL settings. Individual practices may elect to assign those ACLs to other user roles to suit their routines.
- This is the same encounter shown in the companion video, A Generic Medical Encounter Workflow in OpenEMR 6.1. But here we have the additional OpenEMR wiki resources mentioned in the video, provided in the Conclusion at the end of this document. For example, '[See links- portal appointment]' in this page means to see the 'portal appointment' wiki content linked to in the Conclusion.
EMR Preparation
In order to properly conduct this basic encounter, several aspects of the OpenEMR instance need to be configured from their default installation state. You'll need to locate in the OpenEMR wiki the instructions for that, which will mostly be found in documentation of the various setup workflows.
- Various Globals settings
- External codesets imported
- User profiles created
- Facilities configured
- Patient records created
- The practice calendar and the provider's schedule configured
1. Appointment Creation - Receptionist
An appointment may be initiated in any of 3 ways:
- Requested by the patient through the Patient Portal (if operational)
- If made through the portal the responsible staff will approve it, which places it on the provider's calendar. [See links- portal appointment]
- Called in to the clinic
- Face to face while at the clinic
If made in person the responsible staff places it directly into the calendar, thusly:
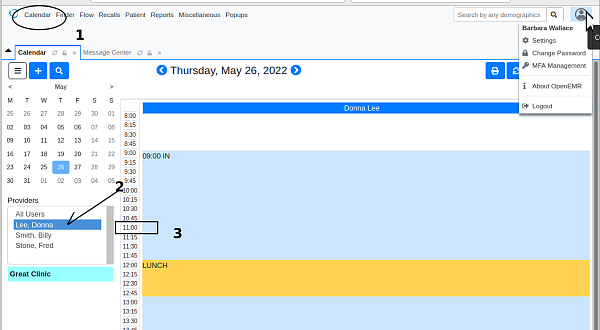
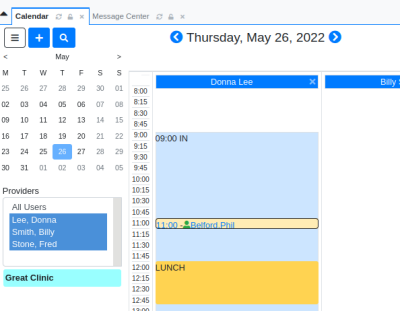
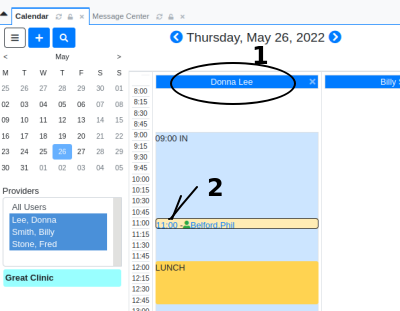
Steps are numbered in the pictures
- 1. The clinic's receptionist (here, Barbara Wallace) clicks on the Main Menu 'Calendar' item (oval top left)
- 2. Click on the provider's name in the list at the left (arrow)
- 3. Click on the time in the date column to open the appointment scheduler dialog
- * Time may be selected by being clicked in calendar (rectangle above)
- or by 'finding available' time-- see below
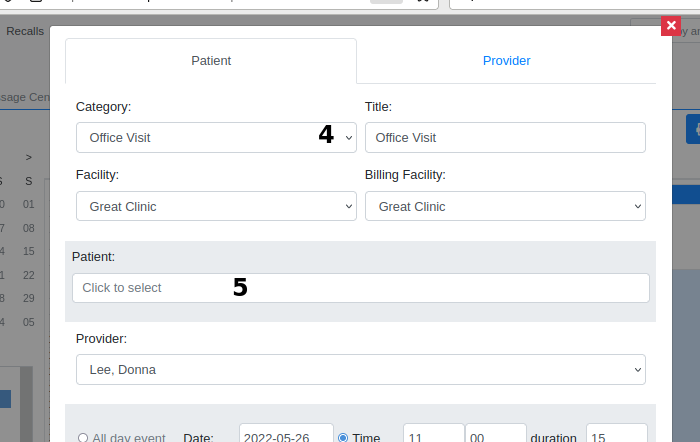
Appointments are made on the 'Patient' tab
4. Select the visit category
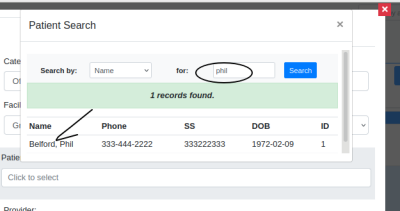
5. Search on patient name (oval below) and select (arrow)
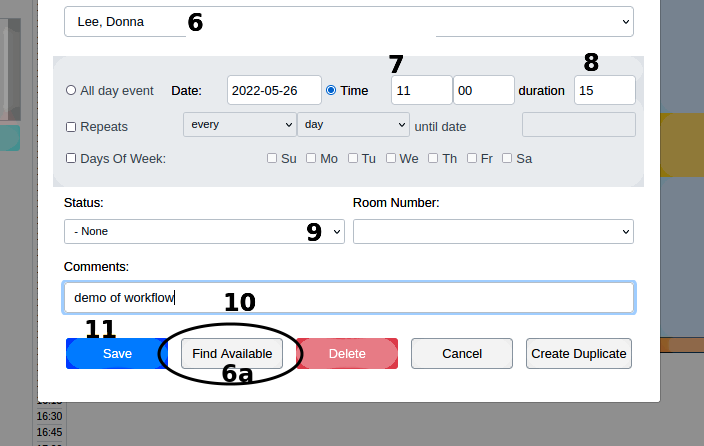
6. Confirm the provider's name (second picture below)
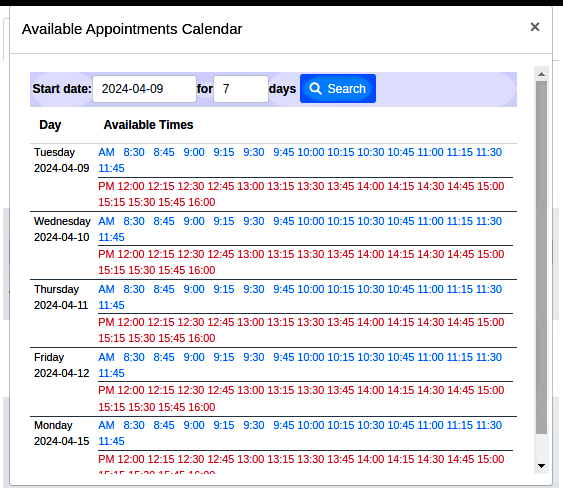
6a. If using this, click 'Find Available' button (same pic at bottom (oval)
6b. In listing (image at right) click on best available time
Times/ dates do not match; image added to doc much later
7. The time shown here (image below) should be what you clicked on the calendar or selected in 'Find Available' display
8. The default appointment duration is configurable in the globals [See links- globals]
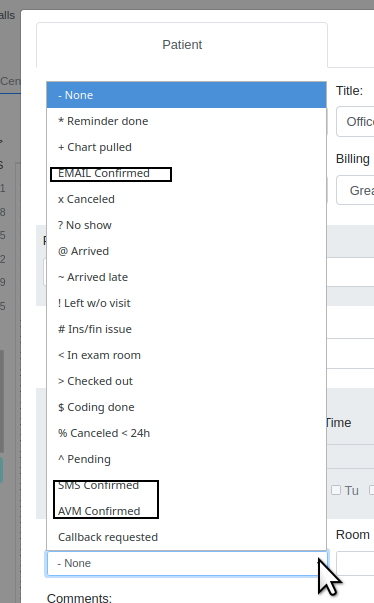
9. Set the appointment status
- The status of an encounter will change throughout its duration. At this point, when creating the appointment, its status may not need to be set. So I will leave this as NONE, until they arrive.
- These statuses are customizable with a few restrictions
- If the patient requested the appointment through the portal you could use any of the rectangle- enclosed statuses to indicate confirmation of the appointment request
10. (previous image above) Put in 'Comment' the reason for the appointment
11. Click 'Save'
... and now receptionist Barbara goes on about her other work with the new appointment on the calendar.
2. Patient Check-in - Receptionist
When the patient arrives at the front desk
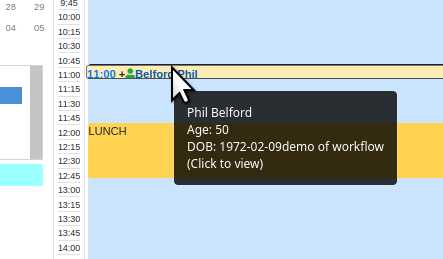
- 1. Front desk staff locates the patient's appointment on the Doctor's calendar (Donna lee)
- 2. Clicks on the time to open the appointment dialog
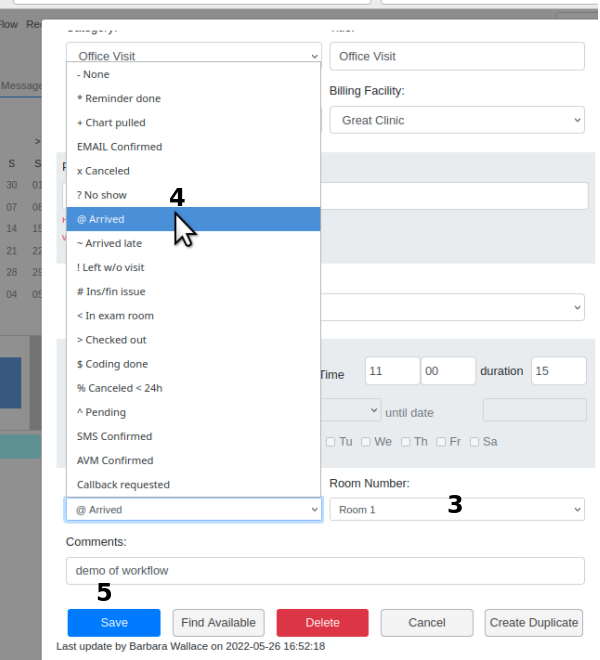
- 3. Clicks 'Room Number' dropdown (below) and assigns the patient to a (customizable) room number [See links- room number]
- 4. Sets status at '@Arrived'
- 5. Click 'save'
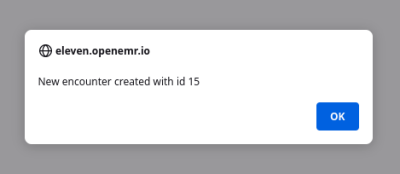
- This clinic has the global option set to automatically create an encounter when the patient is marked as having 'arrived' for the appointment
...and now the next staff takes up the encounter.
3. Interview and History - Clinician
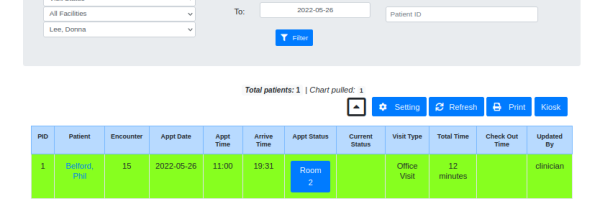
Our Clinician Fred Stone, has the flow board open (oval at top in Main Menu)
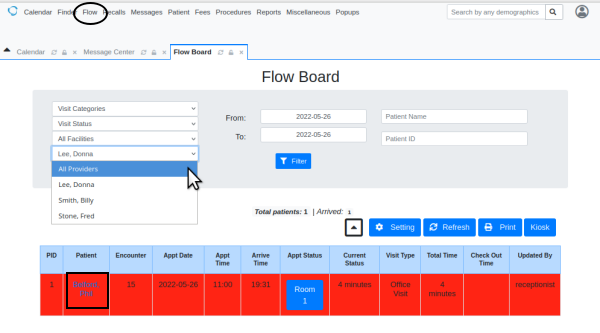
- the dropdowns in the top shaded area determine which encounters are being shown
- the bottom left dropdown shows which Providers' patients are displayed
- generally, one would want to select 'All Providers'
- Column 'Appt Status' shows a patient has been placed in Room 1
- Other information about the encounter is displayed in the column headings.
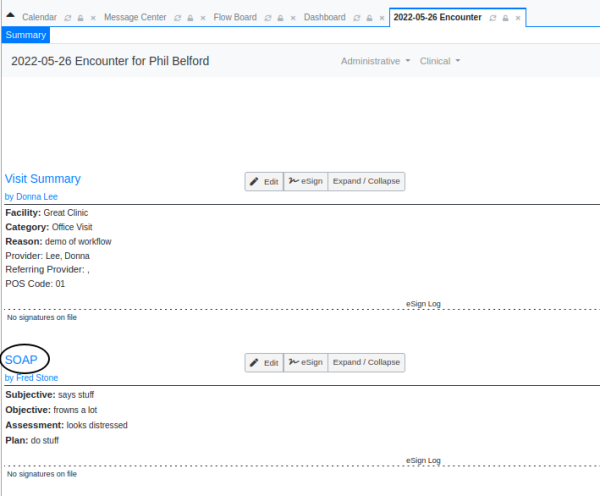
- 1. Fred clicks on the patient name (square in pic above) to open the patient's current encounter form.
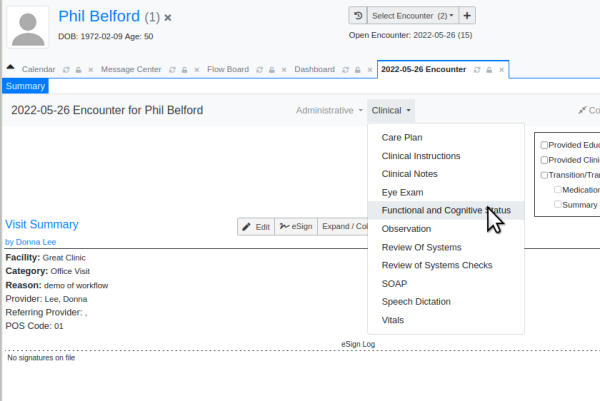
- Note the 'Visit Summary' information along left edge: 'Reason for Visit' is the 'Comment' from the appointment dialog
- 2. Fred clicks the 'Clinical' menu dropdown to show the list of clinical data entry forms
- the default forms are shown.
The list may be modified. [See links- encounter forms]
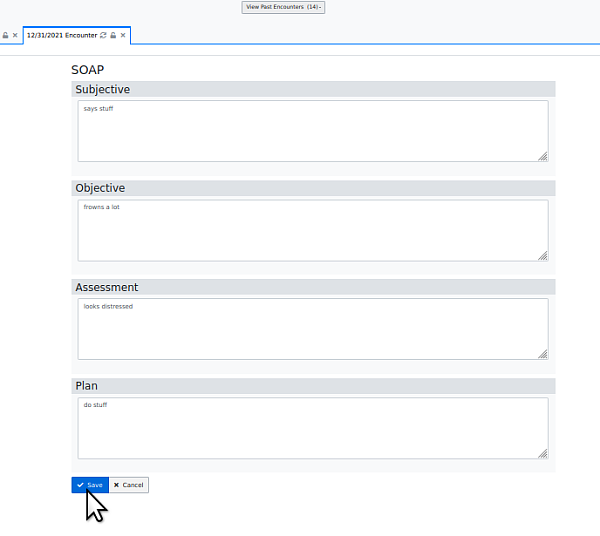
- 3. Let's say Fred does a SOAP note on how the patient presents
- which is added to the forms in the encounter summary (oval below)
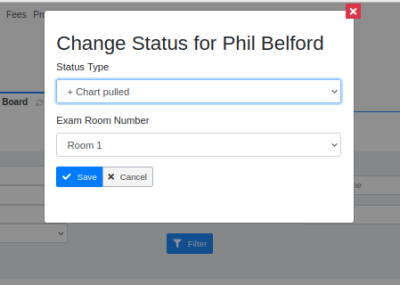
- 4. Then Fred reopens the flowboard, clicks 'Appt Status' and changes to 'Chart Pulled'
- Remember, the status that is selected is derived purely from house policy for what happens during an encounter
... and Fred can change the room number from here also.
- 5. Click 'Save'
Notice the color of the line for that patient's encounter has changed with its new status.
Those colors and much more about the statuses can be customized.
4. Exam and Treatment - Provider
The provider can open the encounter form from either their flowboard (as shown above) or the calendar.
1. In this case, in the calendar click on the patient name to open the record
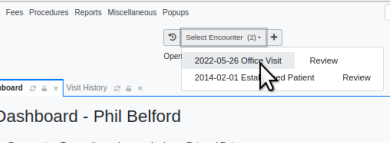
2. In the dashboard select today's encounter from the 'Select Encounter' dropdown list (cursor pointer)
3. From here the provider opens and fills out whatever clinical forms will be required for the procedures to be done in the encounter, same as Clinician's Step 2 above.
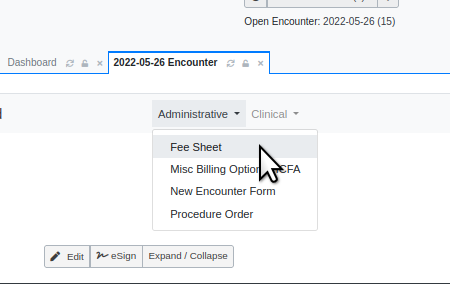
- when all exams/ procedures are completed click the Administrative menu and open the fee sheet.
- The fee sheet can be used just as it comes in a new OpenEMR installation but since it hasn't been tailored to a particular practice it will require a lot of manual entry.
- With some fairly simple configuration and customization it becomes much more simple to use. [See links- Fee Sheet]
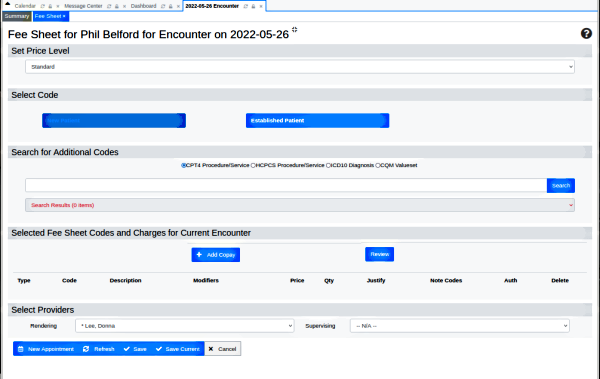
This is a view of the entire fee sheet. Portions of it will be shown below.
In the Fee Sheet do the following:
4. If the clinic has different price levels for services, select the right one
5. Select from the available CPT-4 codes
here the 'Established Patient', 'Comprehensive' appointment type is selected.
- These appointment type CPT-4 codes are pre-coded in the default fee sheet.
6. Click ICD radio button (oval in pic below)
7. Enter partial code, e.g., 'z'
8. Click 'Search'
9. Select from the yellow search results dropdown the justifying ICD code for each treatment code to be entered in next step. Repeat for as many diagnosis codes as are needed.
- Notice that as codes are selected they are added to the 'Selected Fee Sheet Codes' section (see next picture)
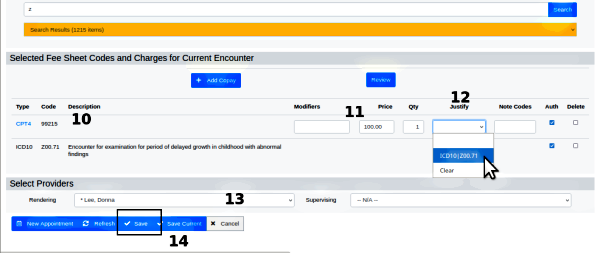
10. To each CPT-4 code that was added...
11. ...add any modifier, price, quantity,
12. ...and its justifying diagnosis
13. Make sure the providers are correct
14. Click 'Save' (rectangle)
To complete their tasks the Provider may open the flow board or click on the calendar time
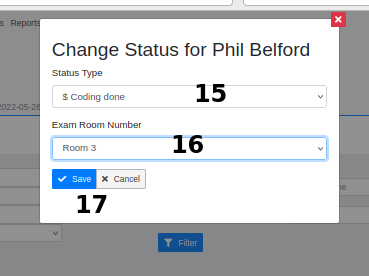
15. Change status - Flow board shown here; let's use 'coding done'
16. Maybe change room, which could be customized to 'Front Desk'?
17. Click 'Save'
5. Checkout and Payment - Accountant
From the Provider's session the patient may be directed to the front desk to check out.
- Any user role besides the accountant which has ACLs permitting access to the 'Fees' Man Menu item may check patients out.
1. Front Desk staff locates the patient checking out on the flowboard or the calendar
- Click the patient name to open their patient record (not pictured)
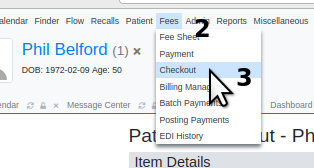
2. On the main menu click: 'Fees' (picture below)
- At this point in the workflow two menu items can be used
- 'Payment' is intended for payment on account
- 'Checkout' is to pay in full the fee for this appointment
- For this demo we'll simply have him check out
3. Click checkout
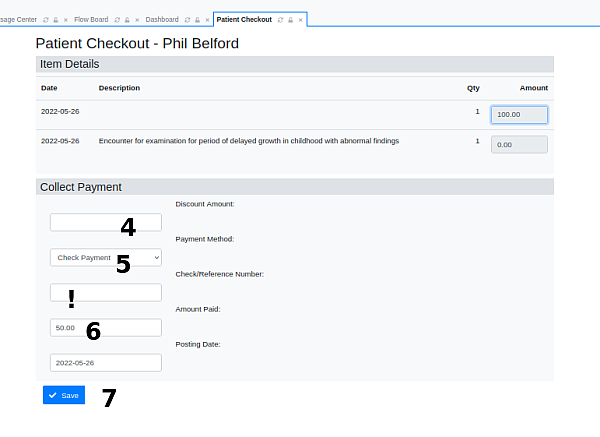
4. Enter any discounts
5. Select the payment method
! if by check a check reference number will be required!
6. Enter the amount paid
7. Click save
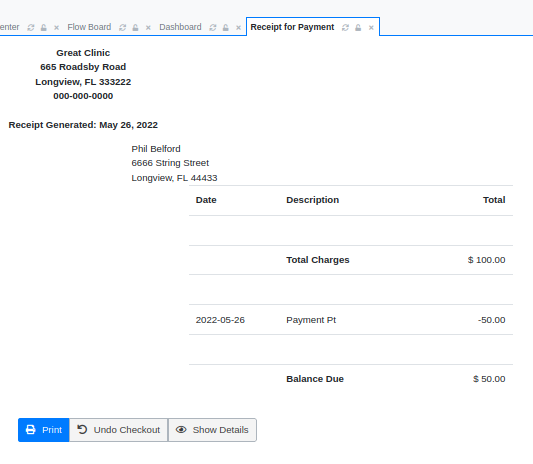
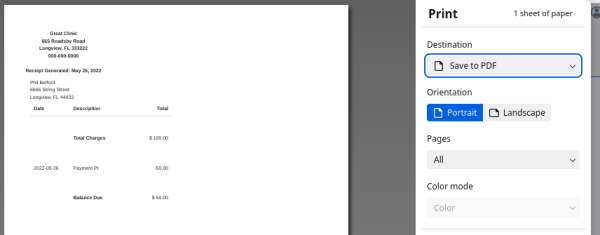
See the receipt...
- yes, the receipt and invoices are customizable by a php coder familiar with OpenEMR
...and print it, to pdf or direct to printer.
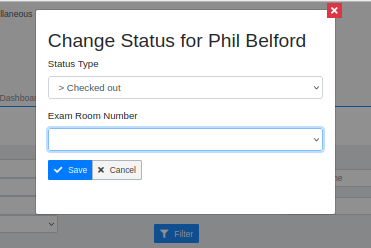
Finally, Front Desk Staff can open the Flow board or click Calendar time
Select 'Checked out' and clear the room.
Click 'save'
Conclusion
Helpful OpenEMR wiki content was suggested in the text of this tutorial and also in the companion video. As mentioned, a lot of these documents were written for earlier versions but with a little bit of study the instructions can be transliterated to OpenEMR 6.1.
Links
Portal appointment
- Patients may request appointments through the Patient Portal, if it has been activated and populated.
Statuses
- Appointment statuses may be customized
Globals
- Calendar and schedule settings are found in:
Room number
- May be completely customized to your preference. See the instructions for editing lists at the bottom.
Encounter forms
- The clinical forms available in the EMR may be modified.
- first look here: OpenEMR Contributed Forms
- then do this: HOWTO Register OpenEMR Contributed Forms
Fee Sheet
- Automatically add CPT-4, ICD and other codes with their prices etc in one click: HOWTO: Create Multiple Code Fee Sheet List Categories
Editing lists
Lists, AKA 'Dropdown Lists' are a very useful control object that are widely used in OpenEMR. Most of them are editable, though some of them do contain triggers to system actions. So editing them could result in unforseen EMR behaviors. However, editing lists comes in very handy to personalize OpenEMR to your preferences...
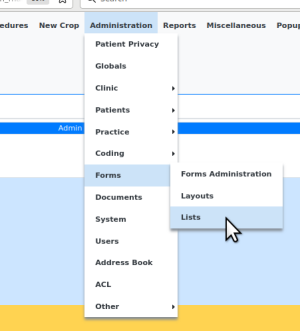
1. From the main menu, open the lists editor
2. Search for the room list (or whatever the name of the data is that the list contains)
3. Change the room names ('Title' column) as desired.
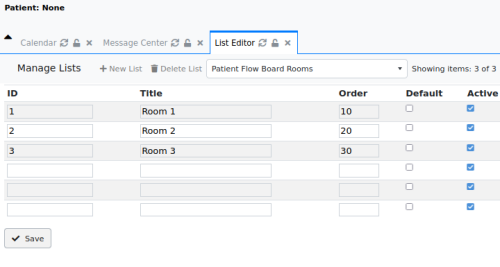
4. Be sure to
- keep ID unique to list
- make 'Order' their display in list
- be sure item is 'Active'
5. Click 'Save'
