Patient Use of the Patient Portal in OpenEMR v6+
Introduction
Immediately after self registration approval or notification by the staff that their portal credentials have been created, the patient may log in and begin using the portal.
This page shows the screens of the portal and describes the activities that can be performed through them.
However, many of the functions must be enabled by portal- authorized staff in these EMR's Global settings, at 'Administration/ Globals' - the Portal tab:
- Allow New Patient Registration Widget
- Allow Online Appointments
- Allow Online Secure Chat
- Allow Patient Ledger
- Allow Online Payments
- Allow Patients to Reset Credentials
- Enable Patient Portal Document Download
Screens
See each screen's name in the top margin of the page and in the menu down the left edge of the display
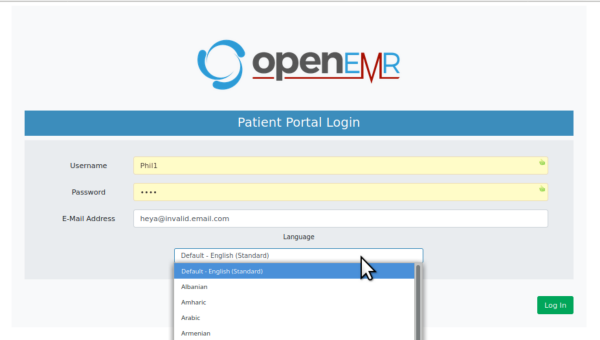
Patient Initial Login
Browsing to the portal login page specified in the portal credentials takes you to the initial login screen.
1. Enter the required credential items.
- The desired portal language may be selected here.
2. Click 'Log In'
- If permitted in Portal Globals- the login screen will have two more buttons:
- to reset portal credentals
- to self register in the portal.
- If permitted in Portal Globals- the login screen will have two more buttons:
The Home Screen
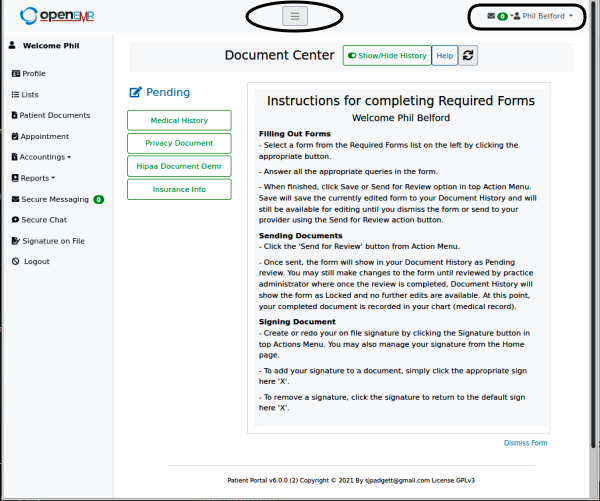
Portal v6.0
- Shows the Document Center (same screen as displayed by 'Patient Documents' in left menu)
- Patient communications widget, the round rectangle at the top right (image below)
- The navigation main menu down the left edge of the screen
- The 'hamburger' icon (oval at top center) hides or shows the main menu at left
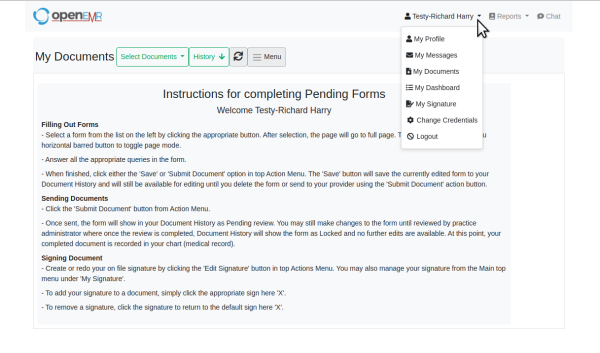
Portal 6.1 and greater
- Portal introductory instructions on the home screen
- The navigation menu is built into a dropdown menu accessed from the Patient name.
- The screens of each navigation menu item function the same as described below
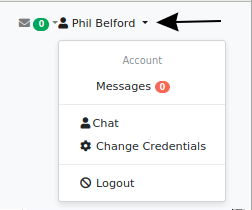
Patient Communications Widget
1. Click the envelope icon left of the name to open 'Secure Messaging' screen, the same as clicking that item on the main menu.
2. Click the triangle (arrow) to open the Communications widget.
- Click 'Messages' to open 'Secure Messaging' (same as Main Menu)
- 'Chat' opens the Main Menu 'Secure Chat'
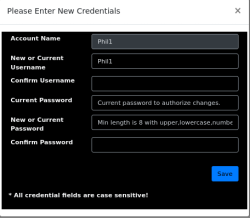
- Change 'Credentials' opens panel to do that
- And of course, 'Logout' logs the user out of the Portal.
Profile
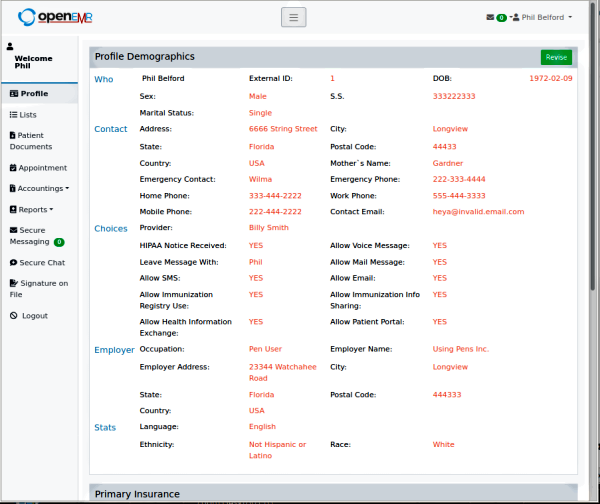
Shaded bars at each section identify the patient demographics displayed here. Scroll down to see them all, it may be a long list.
This information cannot be directly changed by the patient. However, they may click the green 'Revise' button at top right of the image above, and fill out changes in their information. These will be submitted to the practice staff to review for adding to or changing the patient record.
Lists
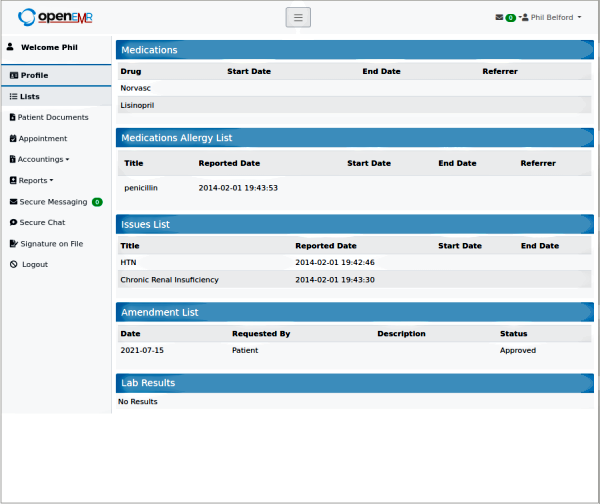
This screen shows the patient's information contained in the clinic's OpenEMR that relates to the listed topics.
The Patient may not change these items except by submitting documents to the staff.
Document Center
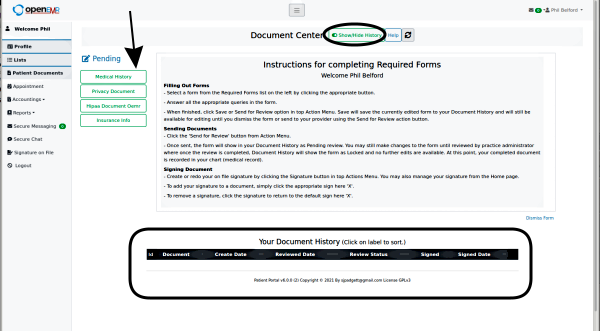
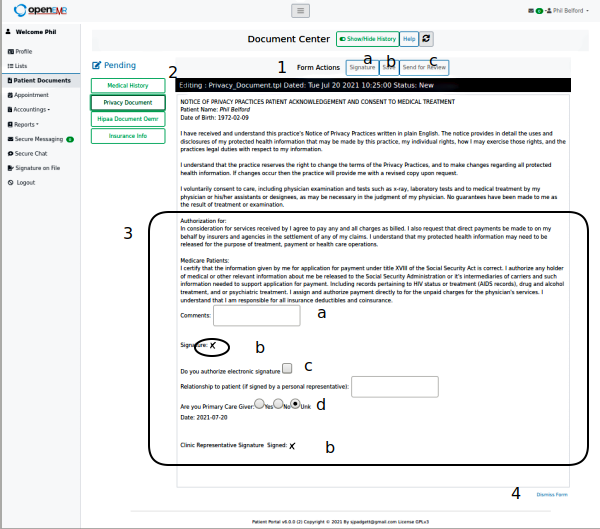
This gives access to documents for the patient to fill out or edit.
- It is a separate collection from the patient documents kept in the EMR
- Click 'Show/ Hide History' button (oval at top center) to show or hide the list of documents accessed by the patient (rectangle at bottom)
The list of documents shown down the left of this screen (arrow above) may be different for different practices.
However, generally they will all have some features in common, shown here in the Patient Privacy document.
1. Form Actions along the top of the form window
- a. 'Signature' - click to add patient's 'signature on file', same as from the menu item of that name.
- b. 'Save' - save the form for later editing, without submitting it to the practice
- c. 'Send for Review' - submit the finished form to practice staff to review and add to the patient record
2. The Editing Status bar - information about the document
3. Body of document - some documents may have controls on them that need to be used.
- a. Text boxes to fill in
- b. Signature boxes to sign
- Click the 'x' to sign the form (oval). If no patient signature is on file a red message will display to remind to provide that.
- c. Checkboxes to check
- d. Radio buttons to select
4. 'Dismiss form' at bottom right to cancel the form
Appointments
If permitted in Portal Globals-
Appointment requests made here will be passed to clinic staff for approval
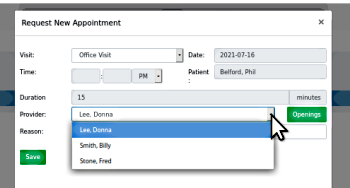
1. Click the bar, 'Schedule A New Appointment' (rectangle above) to open the 'Request New Appointment' panel.
- this bar will be at the bottom if some appointments have already been made
2. Select the desired provider
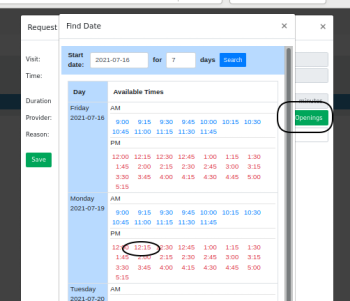
3. Click green 'Openings' button (rectangle below right) to see 'Find Date' panel with the selected provider's available appointments
4. Select one (oval)
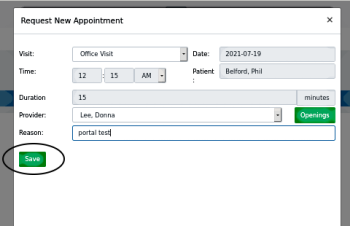
- The Request panel will reappear showing the selected appointment
5. Click 'Save' (oval)
The new appointment will be listed with 'Status: Pending' (oval below) until the staff confirms it.
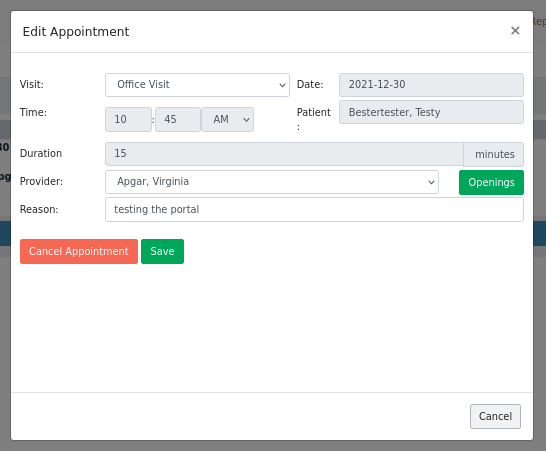
Appointment Cancellation may be done from the appointment listing.
1. Click the checkbox (oval at top right, below)
2. Click red button 'Cancel Appointment'
Accountings
If permitted in Portal Globals-
Information relating to the patient's clinic account
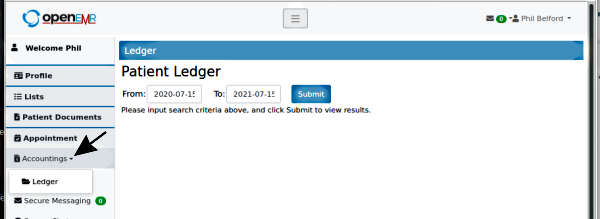
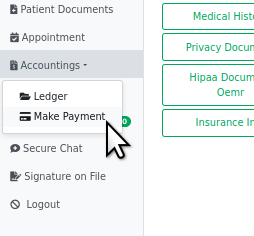
1. Click the dropdown triangle (arrow) to see the accounting displays available
- In the default OpenEMR configuration, only the patient's Ledger appears in the Accountings menu
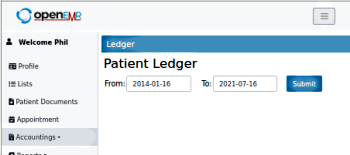
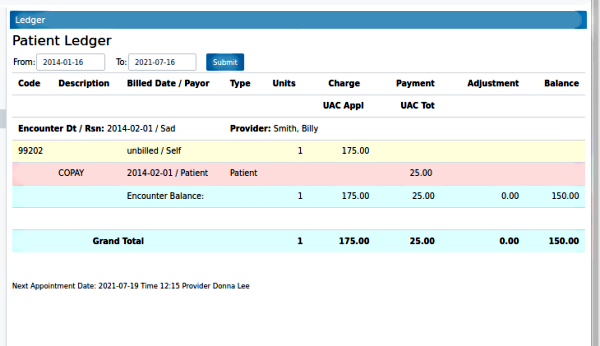
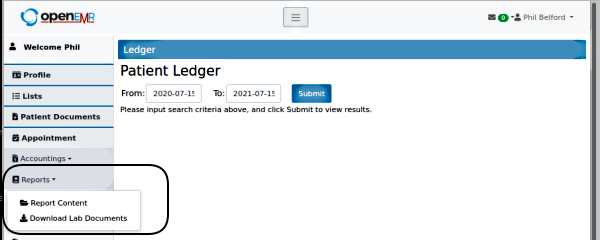
2. In 'Patient Ledger' screen select the date range of the information desired, click 'Submit'
- The patient's current account information will be displayed, with balances, payments etc.
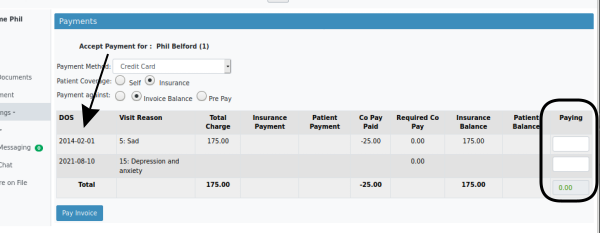
If the practice accepts online payments, the patient may use the portal to pay on their account.
- 1. In the left menu click 'Accountings/ Make Payment'
In this pic Phil has 2 'Dates of Services' (DOS) (arrow below), 2014-02-01 and 2021-08-10
- 2. Select the visit to be paid on
- 3. Enter the amount in the text area at far right
- 4. Click 'Pay Invoice'
Reports
Click dropdown triangle to see reports available (rectangle lower left)
- previously used screen will remain visible
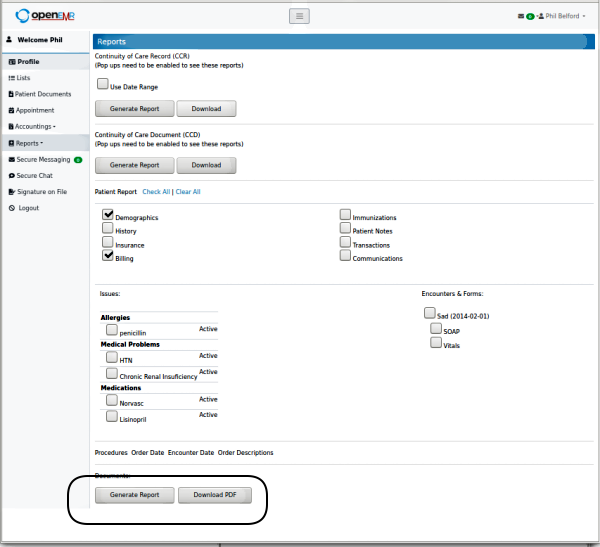
- Report Content - Select the information (below) to be included in a CCR or CCD which may be given to other healthcare providers for medical history
- click (see rectangle at bottom) 'Generate Report' to display selected information on screen or 'Download PDF' to get pdf file on local computer
- Download Lab Documents - download a .zip format file containing the patient's lab documents kept in the practice's EMR system (not pictured)
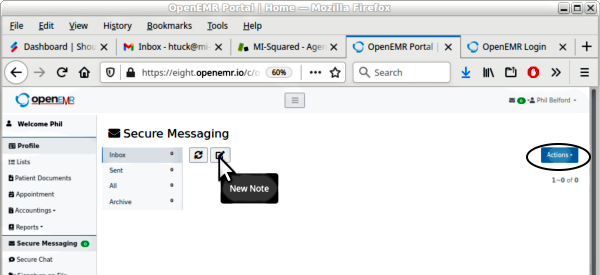
Secure Messaging
Send and receive HIPAA- compliant secure emails to any practice staff who has the 'Portal' checkbox selected in their user profile .
- 'Actions' button (oval above) provides rudimentary email management tools (not shown)
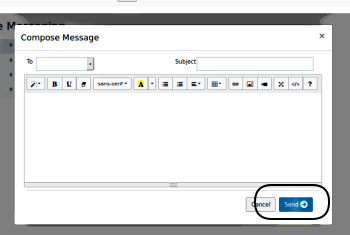
1. Click the 'New Note' icon to open a panel to compose the email (below)
2. Select recipient in 'To'; add Subject, compose note
3. Click 'Send' (rectangle at lower right) to send.
Secure Chat
If permitted in Portal Globals-
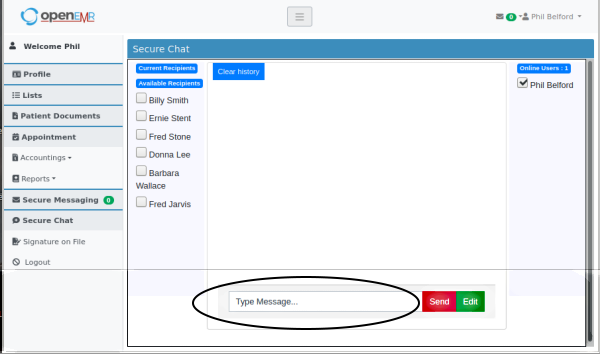
Exchange secure messages with practice staff
- Messaging history is displayed in window at top of display
1. Select the staff in checkboxes at left to send message to
2. Type chat message in bottom text area (oval)
- Click green 'Edit' button to provide special formatting or attach images (not pictured)
3. Click red 'Send' to send.
Signature On File
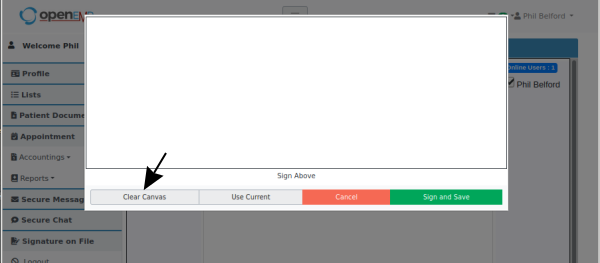
A patient must have an e-signature on file with which to sign the documents in that section above.
1. Write signature in the text area with the mouse by holding down the left mouse button.
2. Click green button 'Sign and Save' to save new sig and return to portal home page
- Click left grey button 'Clear Canvas' (arrow) to remove current sig attempt
- Click next grey button 'Use Current' to return existing sig to display
- Click red 'Cancel' to simply return to the home page leaving current sig unchanged
Related documentation
The Patient Portal has some associated functionality for patients documented elsewhere for OpenEMR v5 but still applicable to v6.
