Difference between revisions of "Patient Portal Document Templates"
Harley Tuck (talk | contribs) |
Harley Tuck (talk | contribs) m (→Conclusion: updates) |
||
| (33 intermediate revisions by 3 users not shown) | |||
| Line 1: | Line 1: | ||
= Introduction = | = Introduction = | ||
As of OpenEMR | As of OpenEMR 5.0.2, Jerry Padgett (OpenEMR forum: @sjpadgett) added some functionality to the Patient Portal documents template module. Although it was originally intended for producing documents by the patient when logged into their portal, it can also be used by clinic staff outside the portal, working in the EMR. | ||
The original 'Document Templates' functionality found at Main Menu: 'Miscellaneous / Document Templates' (OpenEMR 5) or 'Administration / Documents / Document Templates' (OpenEMR 6) does not appear to work properly any more. But since the OpenEMR 5.0.2 version of the Templates functionality includes the capabilities of the OpenEMR 4.2 version, this page will effectively supersede the OpenEMR 4.2 'Templates' page. | |||
* See this page for related portal template capabilities: [[HOWTO:_Create_Custom_Document_Template_Categories]] | |||
* See the Conclusion of this page for links to relevant OpenEMR forum posts. | |||
See the Conclusion of this | |||
= Procedure = | = Procedure = | ||
| Line 16: | Line 12: | ||
This | This page will cover the following main activities: | ||
1. Manage Patient Portal Document Templates | 1. Manage Patient Portal Document Templates | ||
| Line 55: | Line 51: | ||
1. Select from Main Menu, 'Miscellaneous/ Portal Dashboard' (cursor arrow top right | 1. Select from Main Menu, 'Miscellaneous / Portal Dashboard' (see the cursor arrow in the top right of the image below) | ||
| Line 68: | Line 64: | ||
2. On 'Portal Dashboard' tab, under 'Patient Document Templates' | 2. On 'Portal Dashboard' tab, under 'Patient Document Templates' select 'Manage Templates' (see the oval in the image above)... | ||
| Line 91: | Line 87: | ||
These templates are plain text files that have patient data inserted into the output document | These templates are plain text files that have a patient's data, derived primarily from their demographics, inserted into the output document in the same way a 'mail merge' function would. The patient data to be inserted are indicated in the template by tags of text enclosed in {curly braces}. The tags also generate control objects such as signature boxes, text areas, check boxes and radio buttons, which are displayed when the template is being used, that insert appropriate content into the finished document. | ||
Here is the list of patient data fields currently supported:* {Address} - street address only, e.g., 1224 Oakdale Rd. | Here is the list of patient data fields currently supported: | ||
* {Address} - patient street address only, e.g., 1224 Oakdale Rd. | |||
* {AdminSignature} - box to input signature of the staff person administering the form | * {AdminSignature} - box to input signature of the staff person administering the form | ||
* {AcknowledgePdf:pdf name or id:title} - (Available as of version 6.0.1) Link to open a pdf file and acknowledge its contents. | |||
* {Allergies} - allergies list from patient's Issues tab | * {Allergies} - allergies list from patient's Issues tab | ||
* {CheckMark} - checkbox next to a list item | * {CheckMark} - checkbox next to a list item | ||
* {ChiefComplaint} - [data origin unknown] | * {ChiefComplaint} - [data origin unknown] | ||
* {City} - from patient's demographics | * {City} - patient city from patient's demographics | ||
* {CurrentDate:"global"} - (v6.0.1) Enters the server's current date. User cannot modify this date. | |||
* {CurrentTime} - (v6.0.1) Enters the server's current time. User cannot modify this time. | |||
* {DatePicker} - (v6.0.1) Date selector, allows user to select a date. | |||
* {DateTimePicker} - (v6.0.1) Date/time selector, allows user to select a date/time. | |||
* {DEM:fieldid} - data from the specified field of patient demographics; get field ID from the Demographics LBV form | * {DEM:fieldid} - data from the specified field of patient demographics; get field ID from the Demographics LBV form | ||
* {DOS} - date of service in the format yyyy-mm-dd | * {DOS} - date of service in the format yyyy-mm-dd | ||
* {EncounterForm:LBF} - (v5.2) Link a layout based form. | |||
* {GRP}{/GRP} - (<=5.2) groups together other fields labeling as referenced by its original form. For example see below | |||
* {HIS:fieldid} - data from the specified field of patient history LBV form | * {HIS:fieldid} - data from the specified field of patient history LBV form | ||
* {LBFxxx:fieldid} - data from the specified field of a LBF (LBV) instance, from list in 'Administration/ Layouts' | * {LBFxxx:fieldid} - data from the specified field of a LBF (LBV) instance, from list in 'Administration/ Layouts' | ||
* {Medications} - ? from patient's Issues: Medications list? | * {Medications} - ? from patient's Issues: Medications list? | ||
* {ParseAsHTML} - (v6.0.1) Parse as HTML text | |||
* {PatientDOB} - format yyyy-mm-dd | * {PatientDOB} - format yyyy-mm-dd | ||
* {PatientID} - external ID as distinct from the database's internal pid though may be the same | * {PatientID} - external ID as distinct from the database's internal pid though may be the same | ||
| Line 113: | Line 118: | ||
* {ProblemList} - from Patient record's 'Issues' screen | * {ProblemList} - from Patient record's 'Issues' screen | ||
* {ReferringDOC} - Name of Referring Provider from Demographics/ Choices | * {ReferringDOC} - Name of Referring Provider from Demographics/ Choices | ||
* {SignaturesRequired} - (v6.0.1) Redirects user to sign prior to submission. | |||
* {sizedTextInput:120px} - (v6.0.1) Text input in 120 px size | |||
* {smTextInput} - (v6.0.1) Smaller text input field | |||
* {StandardDatePicker} - (v6.0.1) Standard date picker, allows user to select date. | |||
* {State} - full state name from Demographics/ Contact | * {State} - full state name from Demographics/ Contact | ||
* {TextInput} - text area to input plain text | * {TextBox:03x080} - text box which allows for much longer text than textinput | ||
* {TextInput} - text area to input plain text limited | |||
* {TrueFalseRadioGroup} - (v6.0.1) True or false radio group | |||
* {WitnessSignature} - (v6.0.1) Opens up a signature box for a witness. | |||
* {ynRadioGroup} - set of radio buttons for 'Yes / No/ Unk' | * {ynRadioGroup} - set of radio buttons for 'Yes / No/ Unk' | ||
* {Zip} - Patient's demographics 'Contact/ Postal Code' field | * {Zip} - Patient's demographics 'Contact/ Postal Code' field | ||
'''''NOTE: In the OpenEMR 4.2 documentation they provide a template named 'woc.doc'. That is a binary .doc file and will not work in an OpenEMR version >= 5 of the Patient Template function.''''' | |||
All this being said, to make your own template you can either copy an existing template to a new text file, modify it as desired, then save it with a different template file name, or compose your own from scratch. | |||
This is how to use the grouping function: | |||
| Line 128: | Line 140: | ||
Remember, the template file is a plain text file | Remember, the template file is a plain text file that may have a .txt filename extension. | ||
'''This template file contents''' (dashed lines not included): | '''This template file contents''' (dashed lines not included): | ||
| Line 156: | Line 168: | ||
Who to notify in emergency (nearest relative or friend)? | Who to notify in an emergency (nearest relative or friend)? | ||
Name{TextInput} Relationship{TextInput} | Name{TextInput} Relationship{TextInput} | ||
| Line 176: | Line 188: | ||
== Add Images to a Template == | |||
It is possible to include images in a template by referencing their storage location in an <img src> reference or a <nowiki><div></div></nowiki> block . | |||
The only place images may be stored where they are accessible by a browser is on the server, in ./../openemr/sites/default/images/ . | |||
You can get them there by direct upload with ssh or FileZilla or similar application. | |||
More conveniently, they can also be uploaded with OpenEMR's native file management utility, found from the main menu at 'Administration/ Files'. | |||
[[Image:ImgUload2Svr.png]] | |||
Note the ''''Upload image...'''' portion (in oval) of the interface helpfully gives the full path on the server to the images directory. | |||
Follow the forum post re: 'Any help understanding documents' mentioned in Conclusion below, for discussion and developments on this. | |||
For this example we have the image file, login_logo.gif placed where it needs to be. | |||
If the following code is present at the top of the template text file above, we get the template in the next picture. | |||
<nowiki> | |||
<img src="./../../sites/default/images/login_logo.gif"> | |||
INSURANCE INFORMATION | |||
{CheckMark}Medicare# {TextInput} {CheckMark}Medicaid# {TextInput} | |||
{CheckMark}Workers Compensation (job injury) to whom is bill to be sent? {TextInput} | |||
(etc) | |||
</nowiki> | |||
<br> | |||
[[Image:templ+hands.png]] | |||
Alternatively, using html is an option; see the forum article for details. | |||
This code in the template: | |||
<br> | |||
<nowiki> | |||
<div style="margin-left:0.4925in;margin-right:0in;"> | |||
</nowiki> | |||
<br> | |||
<nowiki> | |||
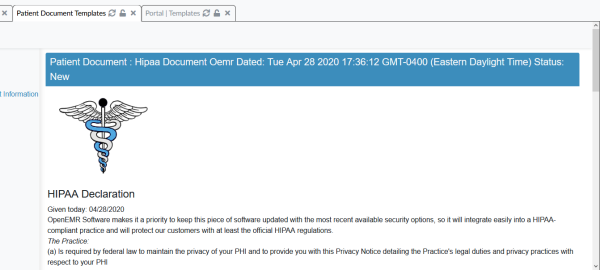
<img src="./../../sites/default/images/login_logo.gif"> <h4>HIPAA Declaration</h4>Given today: {DOS} OpenEMR Software makes it a priority to keep this piece of software updated with the most recent available security options, so it will integrate easily into a HIPAA-compliant practice and will protect our customers with at least the official HIPAA regulations. <em>The Practice:</em></div> | |||
</nowiki> | |||
<br> | |||
...produces this: | |||
[[Image:JerrysImgPic.png|top]] | |||
'''''(Thanks Jerry!)''''' | |||
== Save for general use == | |||
When your template file is complete, follow these steps: | When your template file is complete, follow these steps: | ||
| Line 204: | Line 272: | ||
'''''NOTE: the file name has been changed to woc.tpl as promised at the top of the panel.''''' | '''''NOTE: the file name has been changed to woc.tpl as promised at the top of the panel.''''' | ||
1. | |||
== Save for use by a specific patient == | |||
In the Template Manager: | |||
[[Image:tpl07.png|right|top]] | |||
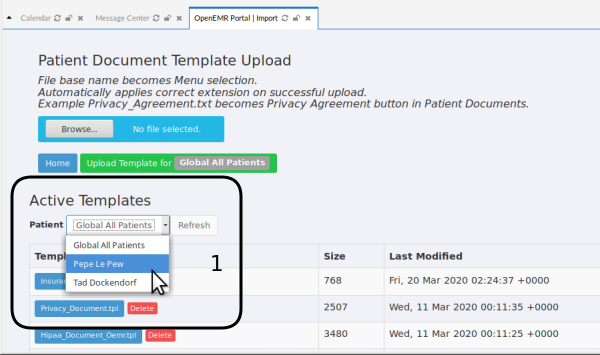
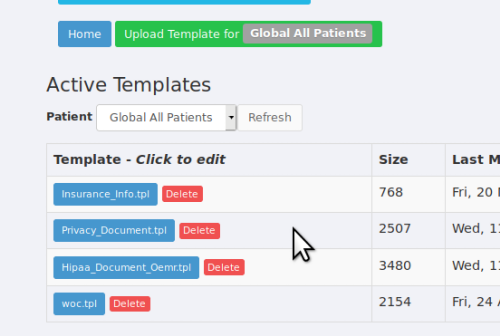
1. In 'Active Templates' section, (round rectangle) select the patient in the dropdown list. | |||
'''''See the list in the image above of templates for general use but when Pepe is selected (image below) he has nothing specifically for him''''' | |||
[[Image:tpl02.png|right|top]] | |||
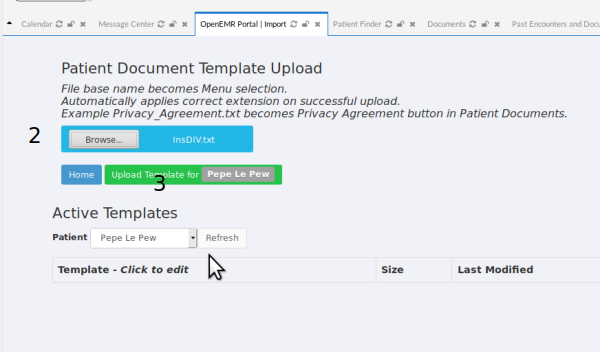
2. Browse the local filesystem for the template | |||
3. Click green area: 'Upload template for' that patient | |||
[[Image:tpl03.png|right|top]] | |||
4. Notice that now the Patient's name returns to 'Global all patients' and that the uploaded template is not there.<br> | |||
This is normal, the upload tool is returning to its original state. | |||
| Line 216: | Line 358: | ||
[[Image:tpl04.png|right|top]] | |||
| Line 256: | Line 388: | ||
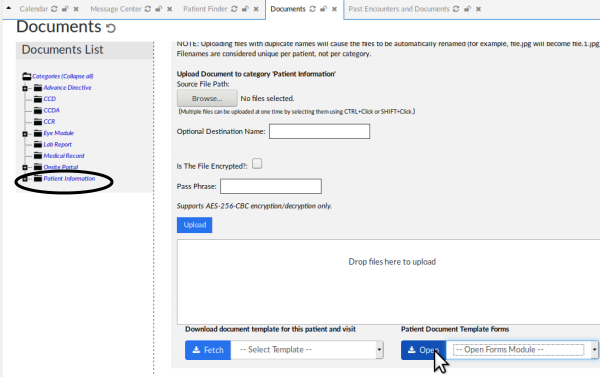
5. In patient's Documents list: select the category to put this doc into (oval on pt Info) | |||
6. Click the blue 'Open' button to view this patient's templates (cursor arrow, at lower right) | |||
| Line 283: | Line 411: | ||
7. See the new template in the menu line of templates for this patient (oval) | |||
'''''From this point use the template as described in following sections.''''' | |||
| Line 290: | Line 420: | ||
[[Image:tpl05.png]] | |||
Confirm that this template is not available to other patients | |||
[[Image:tpl06.png]] | |||
= Staff Use a Template from the EMR = | |||
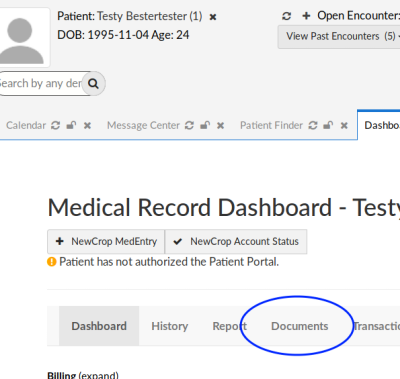
1. Open the patient's record. Click on 'Documents' tab (oval) | |||
[[Image:pdoc0.png]] | |||
| Line 304: | Line 440: | ||
... | 2. ...to open the Document Uploader/ Viewer | ||
[[Image:pdoc01.png|pdoc01.png]] | |||
'''''NOTE: the Document Uploader/ Viewer is strictly for inserting external documents to the patient record.''''' | |||
'''''Its functions are documented elsewhere.''''' | |||
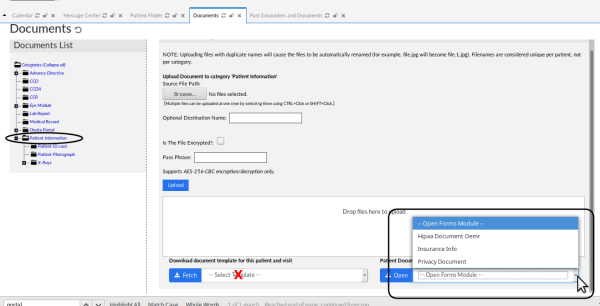
3. Select a category to put the document in | |||
here we have selected 'Patient Information' (oval, above) | |||
'''''NOTE: the dropdown list at bottom left is associated with the obsolete version of the Docs Template module (red 'X' below left)''''' | |||
4. Click on the 'Patient Document Patient Forms' dropdown list (round rectangle lower right) and select the desired template | |||
'' | Here using 'Privacy Document' | ||
'''' | '''''NOTE: these are the same templates shown in the 'manage templates' section above.''''' | ||
[[Image:pdoc05.png|top]] | |||
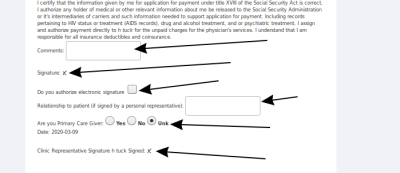
5. The form appears; can see top of form in Step 6 below. | |||
Select/ operate all appropriate controls (Arrows): | |||
... text areas, check boxes, radio buttons... | |||
[[Image:pdoc06b.png]] | |||
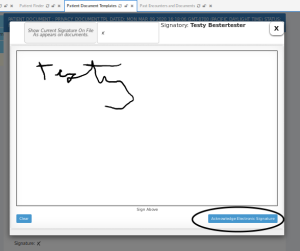
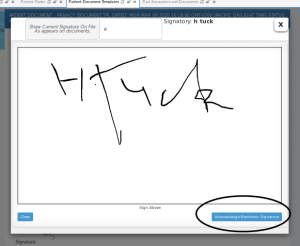
... Patient and staff click their signature 'X' and signs with mouse cursor and accepts signature (ovals) | |||
[[Image:pdoc07.png|left]] | |||
| Line 380: | Line 512: | ||
| Line 407: | Line 529: | ||
[[Image:pdoc08.png]] | |||
... everybody signs. | |||
6. Enter the document into the patient record: | |||
[[Image:pdoc06.png|center]] | |||
| Line 422: | Line 546: | ||
Menu at top left: | |||
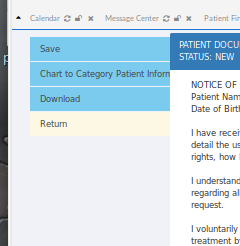
''''Save'''' - saves it to a location in the EMR server where it can be accessed by the Portal Templates Manager | |||
''''Chart to Category Patient Information'''' - sends doc to the patient's document category selected in step 3 above | |||
''''Download'''' - generates pdf to download locally | |||
''''Return'''' - back to the Documents List / Uploader/ Viewer screen | |||
7. We have clicked 'Chart to Category Patient Information'... | |||
[[Image:pdoc11.png|center]] | |||
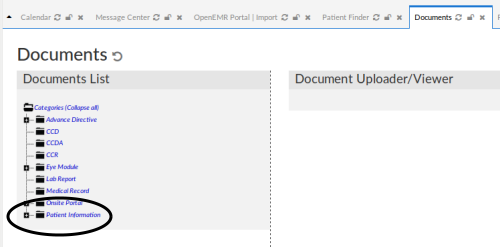
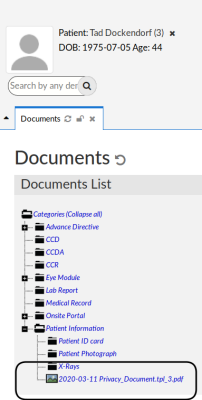
...and now, looking in the patient's 'Documents List' we see the Privacy Document there in the 'Patient Information' category | |||
= Patient Use a Template from the Portal = | |||
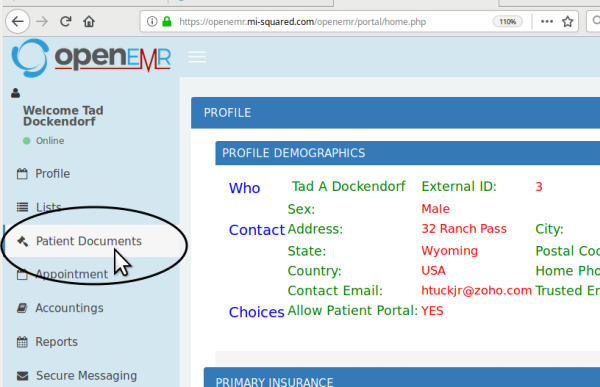
Patient is logged into portal (please note that the location of some menus have changed to improve small screen rendering): | |||
[[Image:pdocp01.png]] | |||
1. Click 'Patient Documents' in left menu | |||
The Patient Documents panel (below): | |||
* Line of tabs to right of 'Pending' (round rectangle) displays all templates available to this patient | |||
* At right end of list may 'Exit' back to portal home screen (arrow) | |||
* List below blue bar shows all current documents for this patient.<br/>'''''Note: the Patient Portal documents list is different from the patient's Documents list in the EMR!''''' | |||
[[Image:pdocp02.png]] | |||
2. Select a template from that line of tabs. | |||
3. Fill out the form. The form and steps look and work the same as above when done in the EMR. | |||
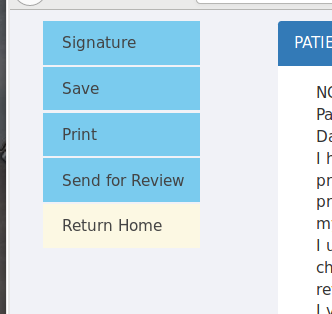
The menu at top left of the form: | |||
[[Image:pdocp08.png|center]] | |||
Depending on the form these menu items may be displayed: | |||
* 'Signature' - put a signature on file for the portal- it is separate from their EMR sig. | |||
* 'Save' - the document to patient's portal documents | |||
* 'Print' - a hard copy from the browser | |||
* 'Send for Review' - if this document needs to be co-signed by clinic staff | |||
* 'Return Home' to return to the patient's portal home screen. | |||
| Line 496: | Line 634: | ||
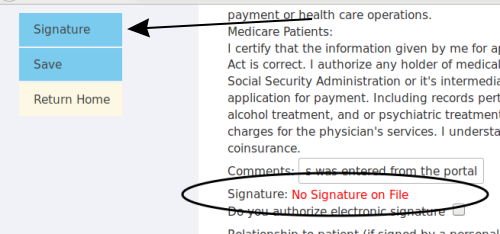
When attempting to sign the form, if the patient does not have a signature on file for the portal, they will see notification of that fact (oval below). | |||
[[Image:pdocp05.png]] | |||
| Line 507: | Line 647: | ||
4. Click the 'Signature' menu item (arrow) and file a sig, in the same manner as shown above in the EMR. | |||
5. Click 'Save' on the menu. | |||
* OR- if the document must be co-signed or reviewed by a provider, click 'Send for Review'. | |||
6. Click 'Return Home' to log out of portal | |||
That is all for the Patient to do. | |||
= Patient Portal Audit Review = | |||
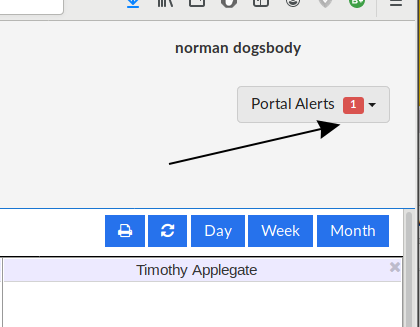
When the next user with suitable access permissions logs into the EMR after that, they will see a notification: 'Portal Alert', at the top right corner of initial EMR screen (arrow) | |||
[[Image:pdocp09.png]] | |||
| Line 532: | Line 676: | ||
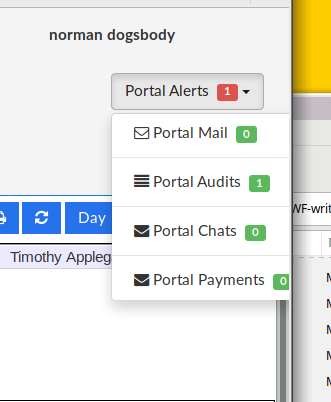
1. Open it to see what's happening: we have a Portal Audit. | |||
[[Image:pdocp10.png|center]] | |||
| Line 539: | Line 685: | ||
If the user has system access permissions to do this, | |||
2. Click on the item needing attention. | |||
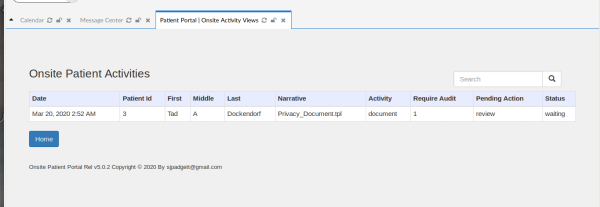
* Onsite Portal - Patient Activities tab opens.<br/> | |||
[[Image:pdocp11.png|top]] | |||
| Line 559: | Line 707: | ||
2. Click in the item's row to open the document. | |||
*Note the limited top left menu items, and an earlier Privacy Document in list at bottom. | |||
[[Image:pdocp12.png]] | |||
| Line 573: | Line 721: | ||
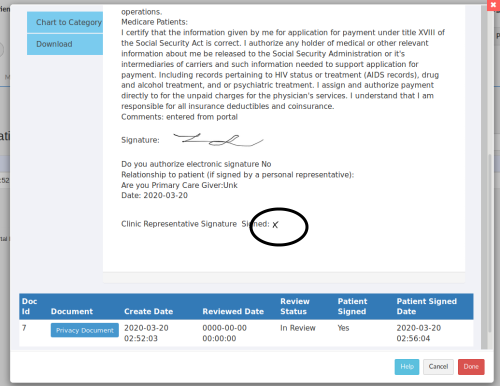
3. Click 'Clinic Representative' x in the document above (oval) | |||
4. Click 'Chart to Category' in the document's menu | |||
[[Image:pdocp13.png]] | |||
'''''Note: this does not save to a pre-selected document category. However the document may be moved to other category later if desired.''''' | |||
5. Back at the form screen Click 'Done'; the item leaves the display | |||
(At present the 'Help' button is non-functional) | |||
[[Image:pdocp12b.png|center]] | |||
6. Confirm new file in patient's 'Documents List', 'Onsite Portal/ Reviewed' category: | 6. Confirm new file in patient's 'Documents List', 'Onsite Portal/ Reviewed' category: | ||
[[Image:pdocsp15.png|center]] | |||
From here, the document may be moved (filed) to the appropriate Document Category. | |||
= Conclusion = | = Conclusion = | ||
| Line 602: | Line 760: | ||
Watch Forum posts including this one for updates: | Watch Forum posts including this one for updates: | ||
https://community.open-emr.org/t/any-help-with-understanding-documents/13798/7 | [https://community.open-emr.org/t/any-help-with-understanding-documents/13798/7 https://community.open-emr.org/t/any-help-with-understanding-documents/13798/7] | ||
* Some changes to the OpenEMR 4.2 'Templates for Patient Documents' are mentioned in a brief though illustrated discussion. | |||
* Also discussed is what Jerry has planned for its final version expected to be released in OpenEMR 5.0.3 [needs updating] | |||
* Plus he's actively soliciting wishlist items for this template functionality | |||
* And see the restrictions on using HTML in templates.<br/> | |||
More recent developments: | |||
[[HOWTO:_Create_Custom_Document_Template_Categories]] | |||
https://community.open-emr.org/t/document-folder-structures-for-different-type-of-patients/23401/3 | |||
https://community.open-emr.org/t/looking-for-input-add-document-templates-feature-to-encounters/23666 | |||
--- and searches of the forum for the latest postings on this topic: | |||
https://community.open-emr.org/search?q=document%20template%20order%3Alatest | |||
https://community.open-emr.org/search?q=patient%20categories%20order%3Alatest | |||
Latest revision as of 19:02, 7 November 2024
Introduction
As of OpenEMR 5.0.2, Jerry Padgett (OpenEMR forum: @sjpadgett) added some functionality to the Patient Portal documents template module. Although it was originally intended for producing documents by the patient when logged into their portal, it can also be used by clinic staff outside the portal, working in the EMR.
The original 'Document Templates' functionality found at Main Menu: 'Miscellaneous / Document Templates' (OpenEMR 5) or 'Administration / Documents / Document Templates' (OpenEMR 6) does not appear to work properly any more. But since the OpenEMR 5.0.2 version of the Templates functionality includes the capabilities of the OpenEMR 4.2 version, this page will effectively supersede the OpenEMR 4.2 'Templates' page.
- See this page for related portal template capabilities: HOWTO:_Create_Custom_Document_Template_Categories
- See the Conclusion of this page for links to relevant OpenEMR forum posts.
Procedure
This page will cover the following main activities:
1. Manage Patient Portal Document Templates
2. Create a new template
3. Staff use a template from the EMR
4. Patient use a template from the Portal
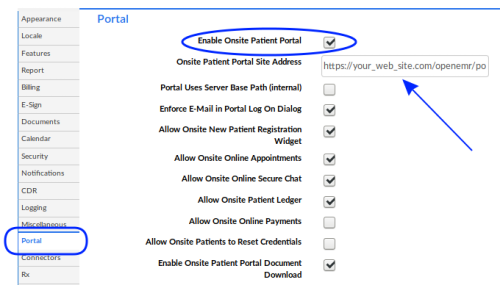
One of the requirements of this functionality is that the Onsite Patient Portal must be activated.
In 'Administration / Globals / Portal ' 'Enable Onsite Patient Portal'
(oval at top)
NOTE: If you want the template functionality but not the portal, it is possible to activate the portal and leave the dummy URL as the portal address (arrow above). However I can't advise if this is a good idea or a bad idea.
Manage Patient Portal Document Templates
When managing the patient portal document templates we can
- upload new templates
- edit existing ones
- delete unwanted templates
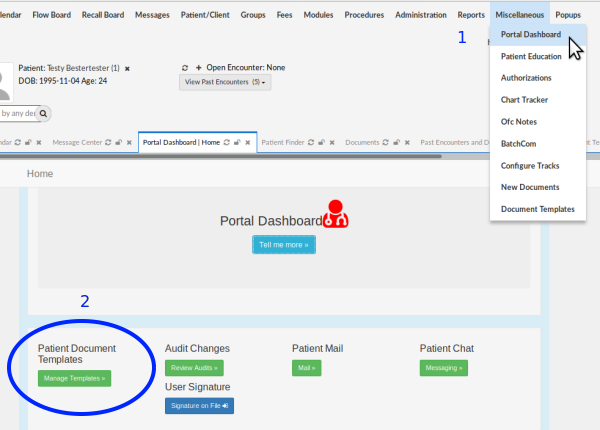
1. Select from Main Menu, 'Miscellaneous / Portal Dashboard' (see the cursor arrow in the top right of the image below)
2. On 'Portal Dashboard' tab, under 'Patient Document Templates' select 'Manage Templates' (see the oval in the image above)...
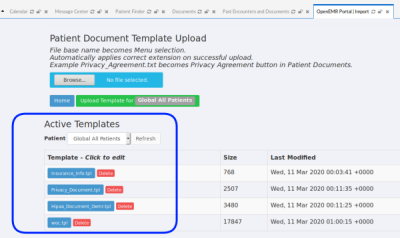
... which opens the 'Portal | Import' tab.
The top section, 'Patient Document Template Upload' is for uploading new templates discussed below, see section '2. Create a new template' for details.
In the lower half of the panel, "Active Templates" (round rectangle) you may select a stock template, edit it to suit your facility needs (see next section) and save it back to the system for general use. Or click the red button next to it to delete an unwanted template.
Create A New Template
These templates are plain text files that have a patient's data, derived primarily from their demographics, inserted into the output document in the same way a 'mail merge' function would. The patient data to be inserted are indicated in the template by tags of text enclosed in {curly braces}. The tags also generate control objects such as signature boxes, text areas, check boxes and radio buttons, which are displayed when the template is being used, that insert appropriate content into the finished document.
Here is the list of patient data fields currently supported:
- {Address} - patient street address only, e.g., 1224 Oakdale Rd.
- {AdminSignature} - box to input signature of the staff person administering the form
- {AcknowledgePdf:pdf name or id:title} - (Available as of version 6.0.1) Link to open a pdf file and acknowledge its contents.
- {Allergies} - allergies list from patient's Issues tab
- {CheckMark} - checkbox next to a list item
- {ChiefComplaint} - [data origin unknown]
- {City} - patient city from patient's demographics
- {CurrentDate:"global"} - (v6.0.1) Enters the server's current date. User cannot modify this date.
- {CurrentTime} - (v6.0.1) Enters the server's current time. User cannot modify this time.
- {DatePicker} - (v6.0.1) Date selector, allows user to select a date.
- {DateTimePicker} - (v6.0.1) Date/time selector, allows user to select a date/time.
- {DEM:fieldid} - data from the specified field of patient demographics; get field ID from the Demographics LBV form
- {DOS} - date of service in the format yyyy-mm-dd
- {EncounterForm:LBF} - (v5.2) Link a layout based form.
- {GRP}{/GRP} - (<=5.2) groups together other fields labeling as referenced by its original form. For example see below
- {HIS:fieldid} - data from the specified field of patient history LBV form
- {LBFxxx:fieldid} - data from the specified field of a LBF (LBV) instance, from list in 'Administration/ Layouts'
- {Medications} - ? from patient's Issues: Medications list?
- {ParseAsHTML} - (v6.0.1) Parse as HTML text
- {PatientDOB} - format yyyy-mm-dd
- {PatientID} - external ID as distinct from the database's internal pid though may be the same
- {PatientName} - in format 'FirstName Middle Lastname' from Demographics
- {PatientPhone} - output in this form: (000)000-0000
- {PatientSex} - 'Male' / 'Female/ 'Unassigned' from Demographics
- {PatientSignature} - box to input patient signature
- {ProblemList} - from Patient record's 'Issues' screen
- {ReferringDOC} - Name of Referring Provider from Demographics/ Choices
- {SignaturesRequired} - (v6.0.1) Redirects user to sign prior to submission.
- {sizedTextInput:120px} - (v6.0.1) Text input in 120 px size
- {smTextInput} - (v6.0.1) Smaller text input field
- {StandardDatePicker} - (v6.0.1) Standard date picker, allows user to select date.
- {State} - full state name from Demographics/ Contact
- {TextBox:03x080} - text box which allows for much longer text than textinput
- {TextInput} - text area to input plain text limited
- {TrueFalseRadioGroup} - (v6.0.1) True or false radio group
- {WitnessSignature} - (v6.0.1) Opens up a signature box for a witness.
- {ynRadioGroup} - set of radio buttons for 'Yes / No/ Unk'
- {Zip} - Patient's demographics 'Contact/ Postal Code' field
NOTE: In the OpenEMR 4.2 documentation they provide a template named 'woc.doc'. That is a binary .doc file and will not work in an OpenEMR version >= 5 of the Patient Template function.
All this being said, to make your own template you can either copy an existing template to a new text file, modify it as desired, then save it with a different template file name, or compose your own from scratch.
This is how to use the grouping function:
These next examples may be helpful.
Remember, the template file is a plain text file that may have a .txt filename extension.
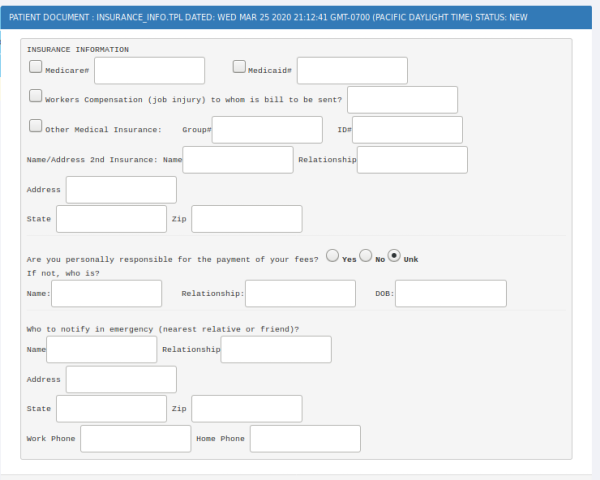
This template file contents (dashed lines not included):
--------------------------------------------------------------------------------------------
INSURANCE INFORMATION
{CheckMark}Medicare# {TextInput} {CheckMark}Medicaid# {TextInput}
{CheckMark}Workers Compensation (job injury) to whom is bill to be sent? {TextInput}
{CheckMark}Other Medical Insurance:Group#{TextInput} ID#{TextInput}
Name/Address 2nd Insurance: Name{TextInput} Relationship{TextInput}
Address {TextInput}
State {TextInput} Zip {TextInput}
Are you personally responsible for the payment of your fees? {ynRadioGroup}
If not, who is?
Name:{TextInput} Relationship:{TextInput} DOB:{TextInput}
Who to notify in an emergency (nearest relative or friend)?
Name{TextInput} Relationship{TextInput}
Address {TextInput}
State {TextInput} Zip {TextInput}
Work Phone {TextInput} Home Phone {TextInput}
--------------------------------------------------------------------------------------------
...produces this template form:
Add Images to a Template
It is possible to include images in a template by referencing their storage location in an <img src> reference or a <div></div> block .
The only place images may be stored where they are accessible by a browser is on the server, in ./../openemr/sites/default/images/ . You can get them there by direct upload with ssh or FileZilla or similar application.
More conveniently, they can also be uploaded with OpenEMR's native file management utility, found from the main menu at 'Administration/ Files'.
Note the 'Upload image...' portion (in oval) of the interface helpfully gives the full path on the server to the images directory.
Follow the forum post re: 'Any help understanding documents' mentioned in Conclusion below, for discussion and developments on this.
For this example we have the image file, login_logo.gif placed where it needs to be.
If the following code is present at the top of the template text file above, we get the template in the next picture.
<img src="./../../sites/default/images/login_logo.gif">
INSURANCE INFORMATION
{CheckMark}Medicare# {TextInput} {CheckMark}Medicaid# {TextInput}
{CheckMark}Workers Compensation (job injury) to whom is bill to be sent? {TextInput}
(etc)
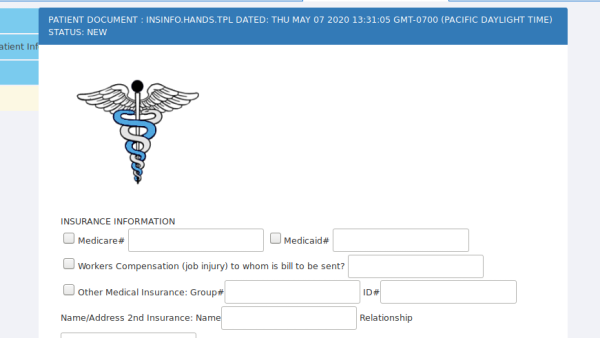
Alternatively, using html is an option; see the forum article for details.
This code in the template:
<div style="margin-left:0.4925in;margin-right:0in;">
<img src="./../../sites/default/images/login_logo.gif"> <h4>HIPAA Declaration</h4>Given today: {DOS} OpenEMR Software makes it a priority to keep this piece of software updated with the most recent available security options, so it will integrate easily into a HIPAA-compliant practice and will protect our customers with at least the official HIPAA regulations. <em>The Practice:</em></div>
...produces this:
(Thanks Jerry!)
Save for general use
When your template file is complete, follow these steps:
1. Save it as [filename].txt (I'm using the 'woc' filename for my own purposes)
2. From Main Menu: Miscellaneous/ Portal Dashboard (back to third pic above)
3. Click 'Manage Templates' (oval above) to open the Patient Document Templates
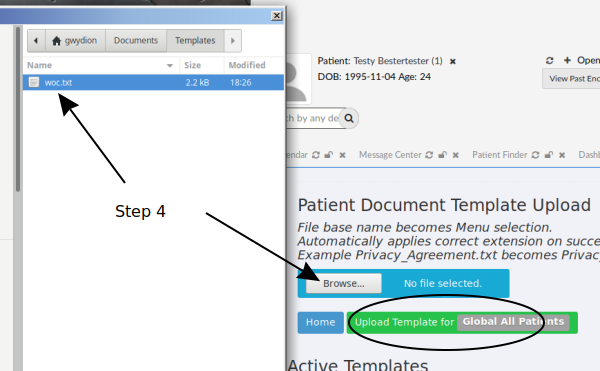
4. Browse to the template file
5. Click 'Upload Template for Global All Patients' (oval)
...and see it added to the 'Active Templates' list for global use of all patients.
NOTE: the file name has been changed to woc.tpl as promised at the top of the panel.
Save for use by a specific patient
In the Template Manager:
1. In 'Active Templates' section, (round rectangle) select the patient in the dropdown list.
See the list in the image above of templates for general use but when Pepe is selected (image below) he has nothing specifically for him
2. Browse the local filesystem for the template
3. Click green area: 'Upload template for' that patient
4. Notice that now the Patient's name returns to 'Global all patients' and that the uploaded template is not there.
This is normal, the upload tool is returning to its original state.
5. In patient's Documents list: select the category to put this doc into (oval on pt Info)
6. Click the blue 'Open' button to view this patient's templates (cursor arrow, at lower right)
7. See the new template in the menu line of templates for this patient (oval)
From this point use the template as described in following sections.
Confirm that this template is not available to other patients
Staff Use a Template from the EMR
1. Open the patient's record. Click on 'Documents' tab (oval)
2. ...to open the Document Uploader/ Viewer
NOTE: the Document Uploader/ Viewer is strictly for inserting external documents to the patient record.
Its functions are documented elsewhere.
3. Select a category to put the document in
here we have selected 'Patient Information' (oval, above)
NOTE: the dropdown list at bottom left is associated with the obsolete version of the Docs Template module (red 'X' below left)
4. Click on the 'Patient Document Patient Forms' dropdown list (round rectangle lower right) and select the desired template
Here using 'Privacy Document'
NOTE: these are the same templates shown in the 'manage templates' section above.
5. The form appears; can see top of form in Step 6 below.
Select/ operate all appropriate controls (Arrows):
... text areas, check boxes, radio buttons...
... Patient and staff click their signature 'X' and signs with mouse cursor and accepts signature (ovals)
... everybody signs.
6. Enter the document into the patient record:
Menu at top left:
'Save' - saves it to a location in the EMR server where it can be accessed by the Portal Templates Manager
'Chart to Category Patient Information' - sends doc to the patient's document category selected in step 3 above
'Download' - generates pdf to download locally
'Return' - back to the Documents List / Uploader/ Viewer screen
7. We have clicked 'Chart to Category Patient Information'...
...and now, looking in the patient's 'Documents List' we see the Privacy Document there in the 'Patient Information' category
Patient Use a Template from the Portal
Patient is logged into portal (please note that the location of some menus have changed to improve small screen rendering):
1. Click 'Patient Documents' in left menu
The Patient Documents panel (below):
- Line of tabs to right of 'Pending' (round rectangle) displays all templates available to this patient
- At right end of list may 'Exit' back to portal home screen (arrow)
- List below blue bar shows all current documents for this patient.
Note: the Patient Portal documents list is different from the patient's Documents list in the EMR!
2. Select a template from that line of tabs.
3. Fill out the form. The form and steps look and work the same as above when done in the EMR.
The menu at top left of the form:
Depending on the form these menu items may be displayed:
- 'Signature' - put a signature on file for the portal- it is separate from their EMR sig.
- 'Save' - the document to patient's portal documents
- 'Print' - a hard copy from the browser
- 'Send for Review' - if this document needs to be co-signed by clinic staff
- 'Return Home' to return to the patient's portal home screen.
When attempting to sign the form, if the patient does not have a signature on file for the portal, they will see notification of that fact (oval below).
4. Click the 'Signature' menu item (arrow) and file a sig, in the same manner as shown above in the EMR.
5. Click 'Save' on the menu.
- OR- if the document must be co-signed or reviewed by a provider, click 'Send for Review'.
6. Click 'Return Home' to log out of portal
That is all for the Patient to do.
Patient Portal Audit Review
When the next user with suitable access permissions logs into the EMR after that, they will see a notification: 'Portal Alert', at the top right corner of initial EMR screen (arrow)
1. Open it to see what's happening: we have a Portal Audit.
If the user has system access permissions to do this,
2. Click on the item needing attention.
- Onsite Portal - Patient Activities tab opens.
2. Click in the item's row to open the document.
- Note the limited top left menu items, and an earlier Privacy Document in list at bottom.
3. Click 'Clinic Representative' x in the document above (oval)
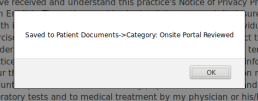
4. Click 'Chart to Category' in the document's menu
Note: this does not save to a pre-selected document category. However the document may be moved to other category later if desired.
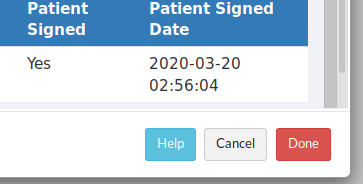
5. Back at the form screen Click 'Done'; the item leaves the display
(At present the 'Help' button is non-functional)
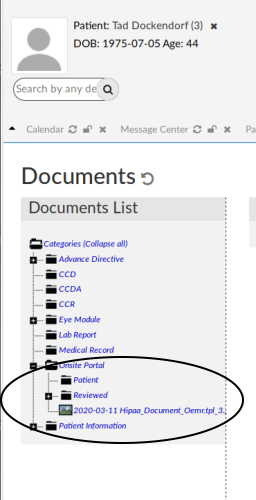
6. Confirm new file in patient's 'Documents List', 'Onsite Portal/ Reviewed' category:
From here, the document may be moved (filed) to the appropriate Document Category.
Conclusion
The 'new ' Patent Portal Document Template has added considerable functionality to the document- producing capability of OpenEMR, with more to come.
Jerry's brief illustrated summary of the project is in the OpenEMR forum here:
Watch Forum posts including this one for updates:
https://community.open-emr.org/t/any-help-with-understanding-documents/13798/7
- Some changes to the OpenEMR 4.2 'Templates for Patient Documents' are mentioned in a brief though illustrated discussion.
- Also discussed is what Jerry has planned for its final version expected to be released in OpenEMR 5.0.3 [needs updating]
- Plus he's actively soliciting wishlist items for this template functionality
- And see the restrictions on using HTML in templates.
More recent developments:
HOWTO:_Create_Custom_Document_Template_Categories
https://community.open-emr.org/t/document-folder-structures-for-different-type-of-patients/23401/3
--- and searches of the forum for the latest postings on this topic:
https://community.open-emr.org/search?q=document%20template%20order%3Alatest
https://community.open-emr.org/search?q=patient%20categories%20order%3Alatest
