HOWTO: Create Custom Document Template Categories
(and assign templates to them)
Introduction
Jerry Padgett (@sjpadgett in OpenEMR forum) has created document template categories for OpenEMR (v6.0.2+) as a useful way to organize your document templates. Template categories are simply directories in the OpenEMR server where both the EMR and the portal document templates are physically stored. But now you can manage them through the OpenEMR interface.
OpenEMR comes with two default template categories: 'General' and 'Repository'. You may add any number of your own.* 'General' - a hard-coded category which serves as the fundamental category for all legacy categories. It does not appear as a category in the portal's document template listing.
- 'Repository' - also hard-coded; is a location to stash templates in development or that are rarely used.
- HTuck - MI-Squared
Procedure
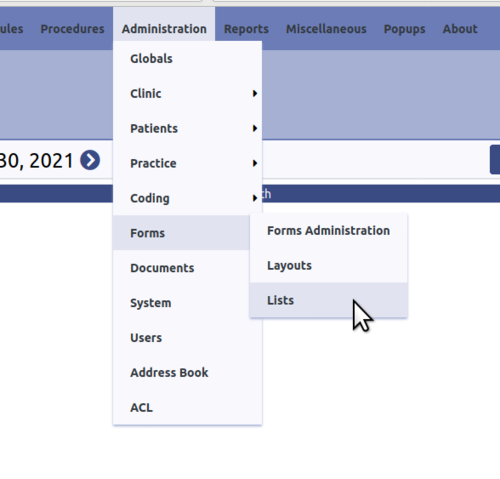
1. As Administrator- priviledged user, open the List Editor.
From the main menu: 'Administration/ Forms/ Lists'
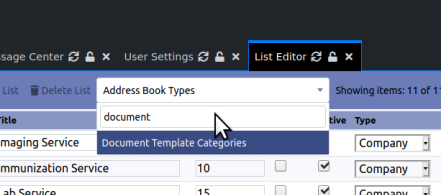
Locate the 'Document Template Categories' list.
2. Add your new category.
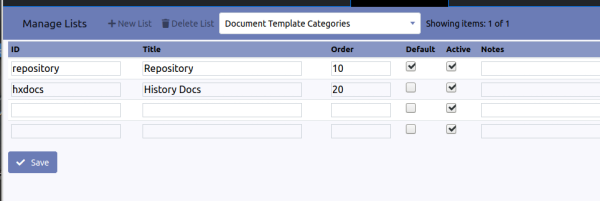
By default the list consists of 'Repository'.
I'm adding a category titled, 'History Docs' (seen in pic above)
Note the column values:
- ID - all one word, no spaces though underscores are ok
- Title - free text
- Order - its value should be enough greater than the one before it to allow later insertion of an item between the two
- Active - is checked for new item
Click 'Save'
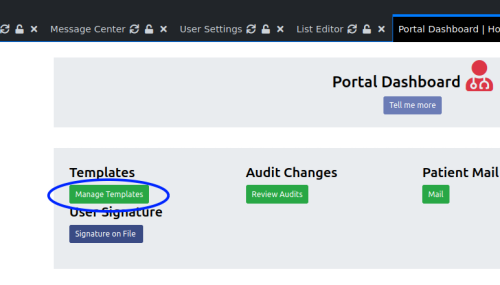
3. To assign a template to a category, open from main menu: 'Miscellaneous/ Portal Dashboard'
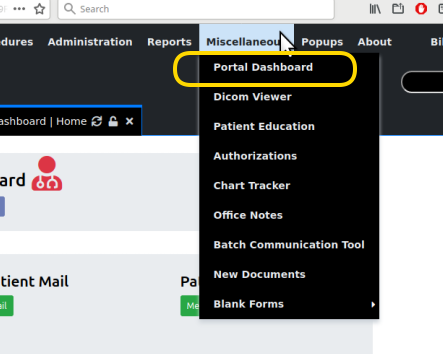
4. Under 'Templates' click on 'Manage Templates' (oval below).
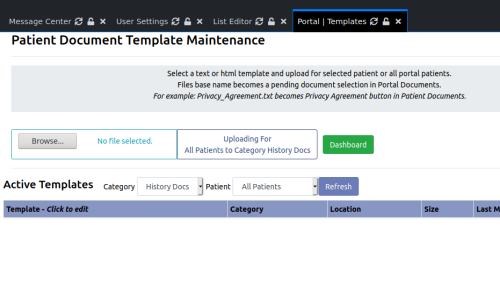
5. In section, 'Active Templates', the 'Category' dropdown (at mouse pointer below), select the category that you want to assign the template to.
In this case it's 'History Docs', the new one I just made.
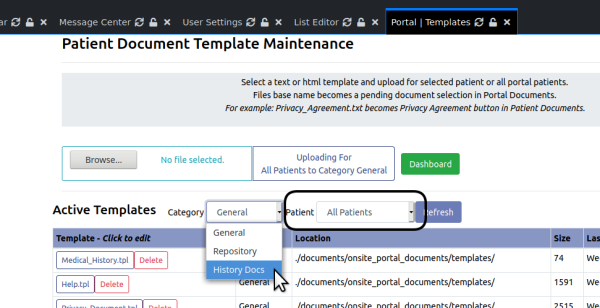
Select the patient the template is being uploaded for, if it is not for 'All Patients' (dropdown in black round rectangle above)
This will show all templates currently in the selected category. In this case, there are none.
6. Click 'Browse...' (oval in picture below) and locate the .tpl file-- not pictured; your upload dialog will look different.
7. Click the area which will become highlighted, 'Uploading For All Patients to Category History Docs', (mouse pointer below).
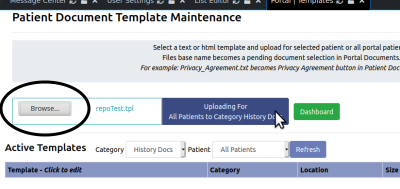
See the template join the list of templates, in its assigned category (oval below).
Note that the display also shows the directory on the server where the template is stored (rectangle)
- For those inclined to work directly in the server, per Jerry Padgett 'the best way to move a template would be to select category and upload from the sites template directory where they reside i.e. sites/default/documents/onsite_portal_documents/templates then the category sub directory etc. Or maintain on your system.'
- Otherwise one might consider deleting it from its location in the list then re- uploading it to a new category.
Template Display in the Portal
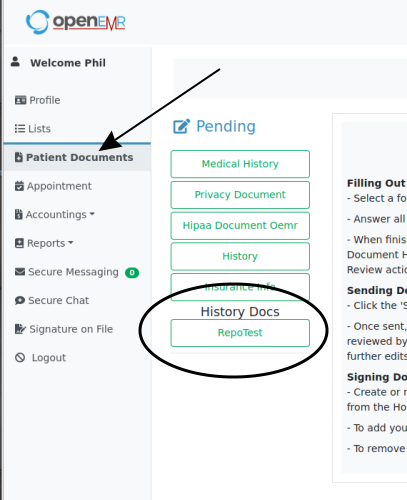
Since this is in fact a patient portal document template, and these custom categories are intended for Patient Documents in the portal...
...looking in the portal under the 'Patient Documents' menu item (arrow below) we do indeed see the new category, 'History Docs' (oval) with the template 'RepoTest' stored in it (oval).
Conclusion
This wiki tutorial is significantly different from the original forum post, because Jerry Padgett has been busy and 'new stuff has come to light' since that was written.
https://community.open-emr.org/t/patient-documents-for-portal-and-staff-rework/16303/8
The forum post has some other interesting content but like I say, is not the latest version of editing the categories.
See this link for related info: OpenEMR and the Patient Portal Document Templates v5.0+
