Preparing for Billing and using the Fee Sheet
== Preparing for Billing and using the Fee Sheet in OpenEMR 3.1.0 == and is almost the same for later versions(V1.2 till 20130719)
Please note: This was prepared based on version 3.0.1, so comments have been added to reflect the 3.1.0 version and later versions, which has a “tree” view by default instead of the “Radio Button” view default of 3.0.1. Either can actually be set using globals.php. The primary advantages in 3.1.0 are the ease of adding choices which were hard coded in 3.0.1, and the support for multiple language usage. Also note that some of the specific labels have been changed from the distribution version because they are more intuitive. You can do that also.
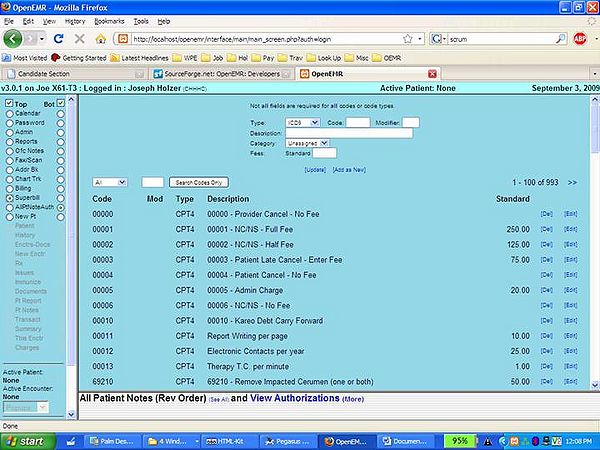
Before you can bill for services, you must enter the ICD (ICD9 or ICD10), CPT (CPT4) and HCPCS codes (or any other billing code you might use in your own setting in a different Country) you will use these codes via the “Superbill” (Administration – Services in Tree View/or Administration - Codes in V1.3 and later). All are entered and then saved using the fields at the top of the main frame shown here. We find it generally is best for the CPT and HCPCS codes to have the code repeated in the leading text in the “Description:” field. That will help in building the Fee Sheet and Issues listings to be shown later, and their usage in claims.
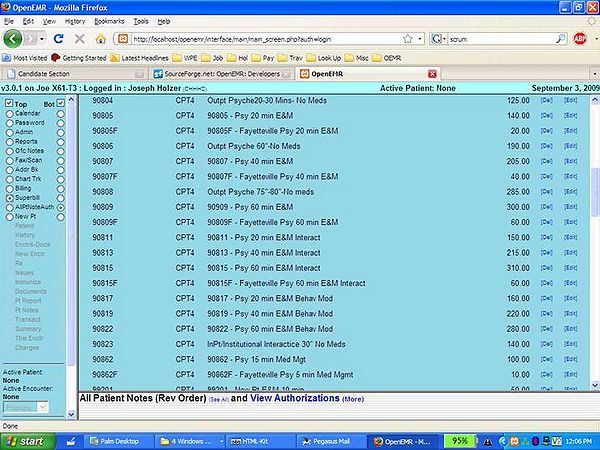
The screenshot on the next page simply shows more of the listing, but shows some special codes with their suffix (“F” in this case), since only a single price and description can be associated for an individual code. And please notice the prices are defined here, which will save a lot of effort when you prepare the bills in the Fee Sheet. Note that these “special” codes are NOT CMS compliant and so would likely reject, but they work fine where the payer has a different fee schedule or other payment process and which accepts them as for “Fayetteville” in the example here. Check with your specific payer before using them.
The full ICD code set is not distributed because of data download size. Most practices will readily populate and maintain their own listing on an “as-needed” basis. However, the Sourceforge.net forums for OpenEMR contain instructions for free downloads of such code sets.
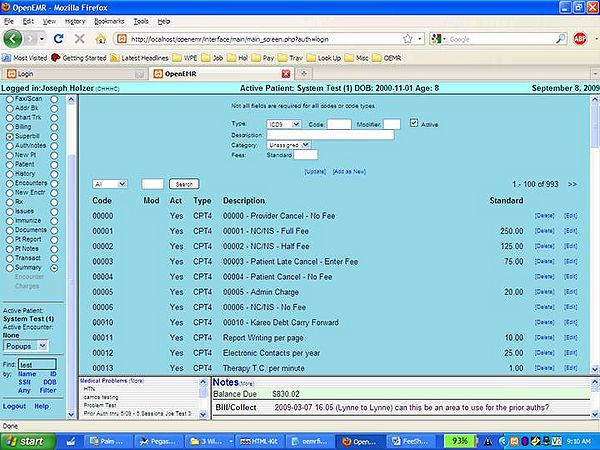
The screenshot below is from version 3.1.0 which has an added column called “Act”, which means Active, as well as a checkbox to set the code either way. However, I could not find any way in which that changes the usability of that code at the Fee Sheet, so I do not really know what the Active / Inactive status does. It may only be a required capability for a future release. If you have an entry, you can select it for “Edit” at right, and then can change any of the settings for that entry, and select the “Update” below that. Note also that the “Search” box will allow all code matches even a part of text or code of the descriptive text, so entry of 296 for example will result in a listing of all from 296 to 296.99, and will include any “special” codes you enter which contain that series of digits (like A296B). That can be useful in finding if you have already entered a value, or wish to edit one. That capability is the same in 3.0.1 as well as 3.1.0 and later versions.
Fee Sheet Preparation
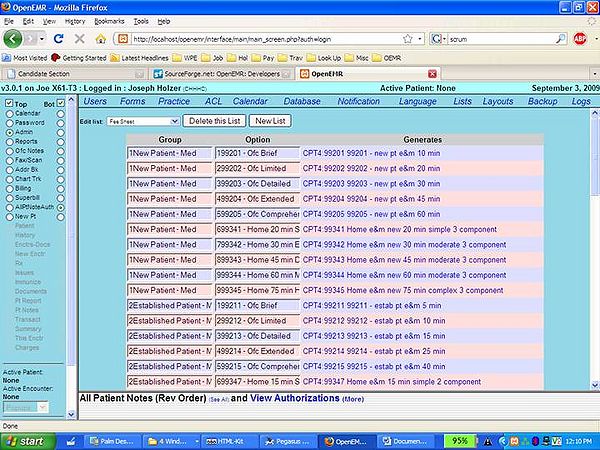
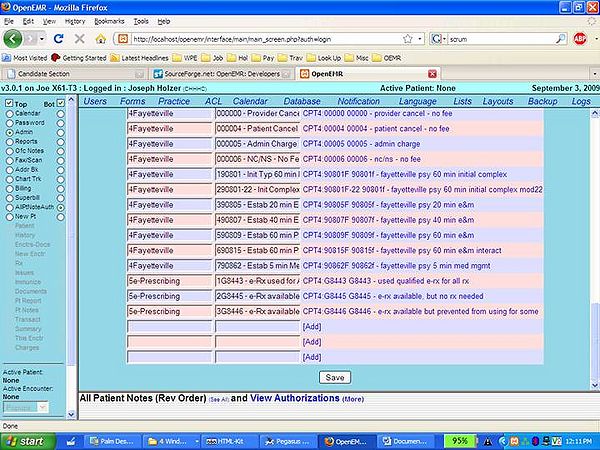
The Fee Sheet must be setup in Administration – Lists – Fee Sheet. The distribution contains two groups as shown, but you can add others depending on your practice which best meet your business needs. Again, entering the first digit with the description will define the group placement in the dropdowns, and the use of the code in the description text called “Option” will make it easiest to select the appropriate code in practice. Once the fields are populated, you select the codes to be listed therein from the Superbill (“Services” in Tree View) listing (and Codes in Version V.4.3).
To add new groups or new items to a group, you use the “Add” lines at bottom. The field under GROUP is the first line to show in Fee Sheet and can also be used as a descriptive name, Every time you save, a new set of three blanks will appear, and the entire list will be reordered according to the first count digits shown. Then, you will select the codes at right from the search function, which will copy the “Superbill” (“Services” in Tree View) selections here. Note that you can have more than one use for a single Superbill item, but not more than a single Superbill item for any single list item. And remember to save. To correct things, simply overwrite and save again. Since the Fee sheet is divides in two columns, the first group shows in the left column and the second group shows in the right column. 1->left. 2->right 3->left etc.
You are strongly advised to include the code itself in the “Option” field and in the description field as well, as these will make it far easier to select once users are accustomed to the process, saving a lot of data entry time. Note a “fluke” of the software causes the text to the right of the “chart” to always display as lowercase, no matter how you entered it in Superbill, except the leftmost character. They will also show that way in the Fee Sheet listing at bottom. However, when the bills are prepared, all text will be uppercase.
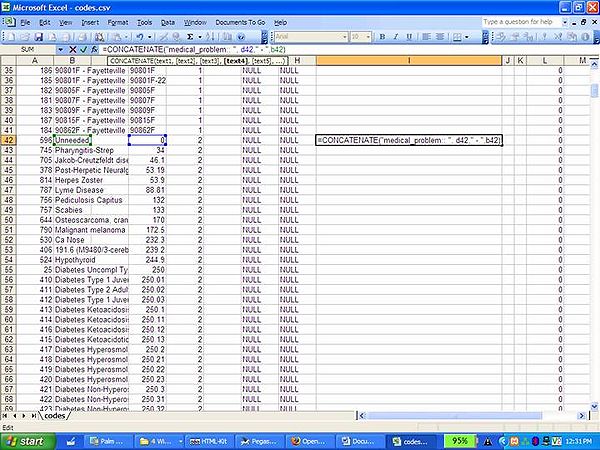
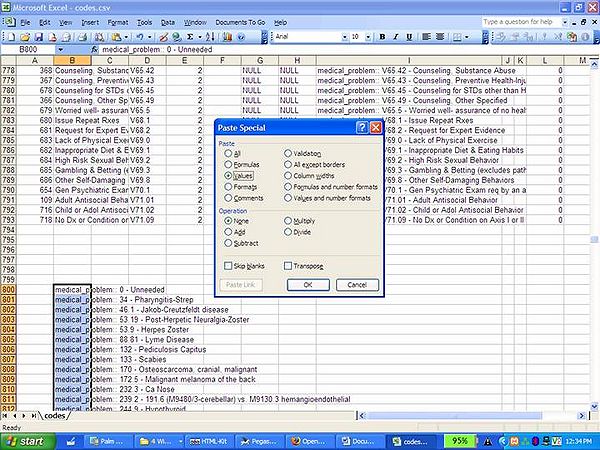
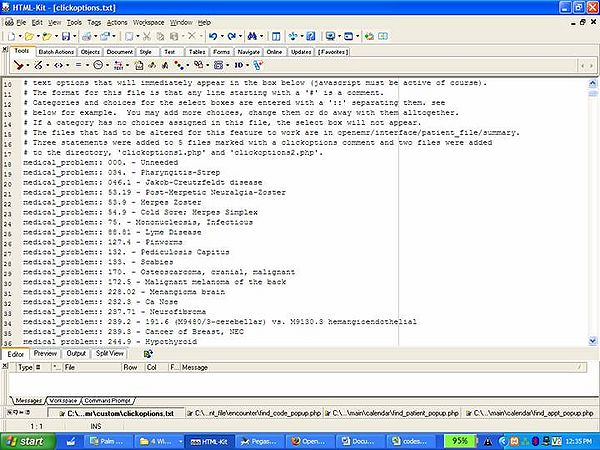
Another powerful usage for the Superbill (Service) Codes data is to export them using Admin – Database – and the Export as CSV function once you have your codes defined. By using Excel (or similar which has the capabilities), you can sort that data by code_type and secondarily by code, which will result in the screenshot below. Using the “Concatenate Function” as shown and using the “Paste Special – Values” command to copy them to a list, you can create the entire series of ICD codes as a “medical_problems” listing which can be placed directly in ../custom/clickoptions.txt for use in the “Add Issues” area. You can do the same for “Dental”, “Surgery”, “Medications” and the like. You can find the syntax required in clickoptions.txt.
When you do so, and select from that list, you can then selectably choose the appropriate codes by “ctrl click” of only those appropriate for that specific encounter, with the actual encounter shown in the lower frame, while you use it to show you the ICD codes you will want to choose in preparing the Fee Sheet in the upper frame, which greatly eliminates errors and omissions.
The syntax for the “concatenate” function, developed by Idea Man, is as shown, and it is a very powerful time saver. If you frequently add ICD codes, for example, you should run this process and swap for the existing code set in clickoptions.txt based on how soon the lack thereof slows process time.
Copy the concatenate formula to all cells for the code type 2, then select all those cells, copy, then Paste Special in another location using the Values button, which will make the text usable in clickoptions.txt Then grab all those and paste into clickoptions.txt using a decent text editor.
Note that you may wish to add zeros and decimals to the listing for readability before or after you actually post them to the clickoptions.txt file.
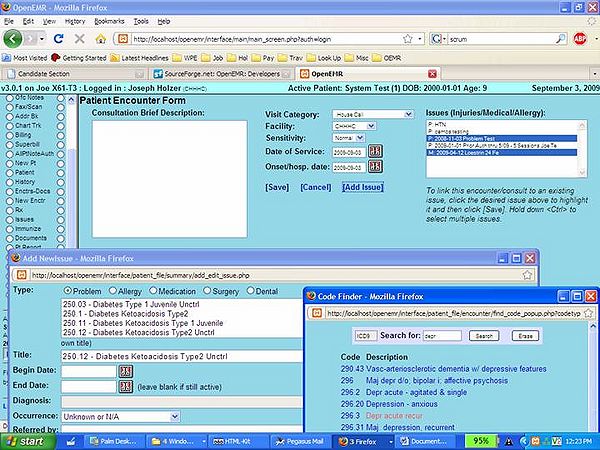
The ../custom/clickoptions.txt file is used by the program to populate the dropdown list(s) in the “Add Issues” window, and can save a lot of typing, since the distribution search has limits. When you click on the “Diagnosis” line to bring up the Code Search function, it will ONLY carry over the CODE, and not the description. Few people memorize those descriptions, so if only the code is used, remembering what it means in the Issues list box later is difficult. But by using the clickoptions.txt process developed by Idea Man, including both code and description, that will populate the top “Add Issue” line by selecting that ICD code from the dropdown list, which will be posted to the “Issues” box in the Encounter, allowing easy selection there, as well as in the Fee Sheet when that is created for that encounter. And since that Issue remains in the “Issues” list for all subsequent encounters for that patient, it is readily selected only when it applies, an especially useful capability for people with multiple chronic problems, or for psyche care.
Creating an Encounter
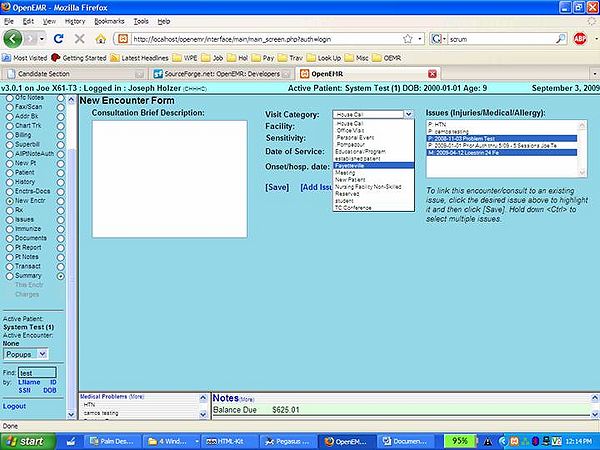
As shown in the screenshot below, each new encounter will include all prior Issues, which are shown and selectable with Ctrl-click, or others can be added per above. That leaves them highlighted in the Encounter view, which makes it simple to use them to fill out the Fee Sheet.
The screenshot above shows the window which opens with the selection of “Add Issue”, and that which opens if you click on the line labeled “Diagnosis:”, which is the Code Finder search window. If you selected the code shown in red, the Diagnosis line would only read ICD9:296.3, which is a simple way to allow selecting that code from the “Problem” listing box in the Add NewIssue window. That would put the actual code, and its description, into the “Title:” line, and saving that would post it to the Encounter Issues listing with a “P:” for problem (the Issue “Type”), plus the date added, to the left of that.
Note above that the “Visit Category” dropdown has been embellished from the distribution. These (and other) added categories can be created in the Admin - Calendar – Category, and can be used to allow rapid POS changes in the bills if properly coded within ../library/claim.class.php near line 527. For specific instructions contact Idea Man at http//www.holzerent.com or view the postings about it on the forums. The codes you should use are found at ../library/classes/POSRef.class.php.
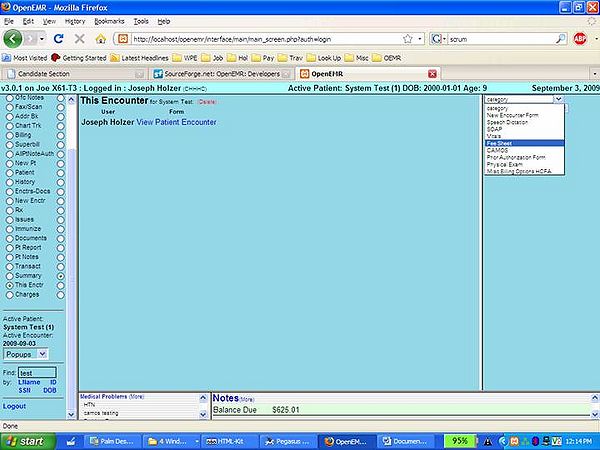
Because OpenEMR is Encounter-centric (called Visits in the 3.1.0 default Tree View listing), bills are printed on a per-encounter basis, and can only print if an encounter is created. You do not have to create an appointment to create an encounter, but can create an encounter for a patient by simply selecting the “@” in the appointment. Once you have properly filled out the Issues list and the encounter, and saved both, you are presented the screen below, with the “Category” dropdown at right, where you will select “Fee Sheet”.
Making a Fee Sheet for an Encounter
You select the Fee Sheet from the “Category” dropdown shown to the right in the screen below, which is reached by completing an encounter and saving, or by selecting an encounter from the “Encounters and Documents” listing for a patient.
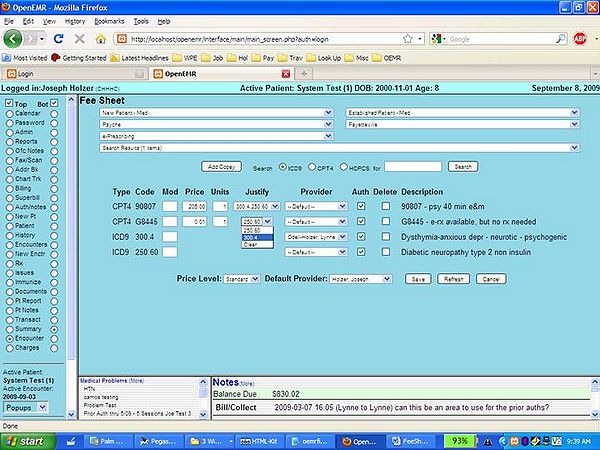
If you have properly setup your Fee Sheet in the Admin – List area, it will look like the screen below. This example is a psyche E&M visit. You would select the CPT or HCPCS codes from the Group(s), then the associated diagnosis ICD (typically) by a limited text match search, or by entering the desired code as would be shown if you displayed the encounter (visit) in the lower frame, which would occur if you simply clicked on the “View Encounter” alongside the provider name in the upper frame. This screenshot has minimized that for clarity in the Fee Sheet preparation. The search function will post a listing in the “Search Results” dropdown, where you actually select the one you want.
Note that you MUST do a “Justify” with the dropdown as shown for EACH service code. ONLY that will cause that ICD to be referenced at the “Diagnosis Pointer” at 24E on a CMS 1500. Claims without them will be rejected. You should also create the e-Rx G codes and justify them if you are billing Medicare and hope for the incentive for e-prescribing. Note that you can have up to four ICD codes for each encounter, but generally need link by the “Justify” only the most important to be paid. Also for multi units, change the “Units” from “1”.
Also note the addition in 3.1.0 of a “Provider” field for each entry, which allows selection of another user as the provider for that service or ICD. By default, the current user will be used, but that can be changed in each individual box. Doing so will replace the current user’s NPI with that of the chosen user when the bill is printed, for example in the “Rendering Provider” box 24J on the CMS 1500, or equivalent X12 location.
Note, too, that the actual provider if different from the “user” (who will be the default) can be selected here as well, as for example where the provider has a clerical staffer do the Fee Sheet preparation. Note, however, that the ACL rules will require that staffer to have full access to the encounter to do this, so planning for security and accountability is critical. And, as before, SAVE before you leave. If you mis-enter something and save it, simply select the Delete checkbox and create a new line, then save that. You can also change the fees here, but that should be a rare requirement if done right at Superbill.
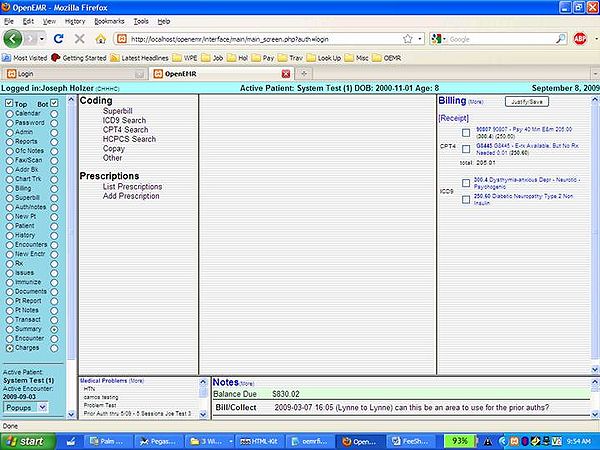
Note that an alternate way to do entry is available in “Charges”, which results in the screen below. However, selecting the codes in the first place, as well as the user selection of not the default, are not available this way, so the Fee Sheet is required, and can do all you need for billing. If, though, you choose to use the Charges approach, you would select the check boxes alongside both the service and ICD codes as shown in blue, and click on the “Justify/Save” to create the codes shown in black parentheses. The highlighted one is the “Prime” while the others (up to four total) will list in that order in the CMS 1500 box 21, and will be referenced there by the “Diagnosis Pointer” in box 24E, with similar functionality in X12 billing. But it is NOT necessary to use the Charges, as all those can be done directly at the Fee Sheet. The highlighted code will always be the first, and others are in the order selected in the “Justify” dropdown there.
