HOWTO: Create A Claim- Ready Encounter
Introduction
X-12 Claim files are sent to insurance clearing houses in order to claim payment by insurance companies for the treatments that were rendered in an encounter (appointment). The information in the claim file comes from the encounter form of the appointment; in order to generate a valid claim file the encounter must contain all the information required by the clearinghouse and insurance company. This document will step through the workflow to create an encounter that contains all the requirements.
OpenEMR v6.0+ is pictured but the steps apply to v5 and newer.
- HTuck MI-Squared
Preliminary Notes
- This workflow assumes a patient whose complete demographics and insurance information has been entered. If necessary, refer to the old but still valid wiki page: Adding_a_New_Patient_4.1
- Your system may be set in the Globals to automatically create an encounter when the patient is checked in for their appointment. If that is the case, in the normal course of an appointment the provider will simply open the patient's record and fill out the pre- created encounter form instead of later creating a new one as shown here.
- If a patient's encounter had been auto- created but not filled in during the appointment, open their record, select the encounter from the dropdown and complete it as below.
The Steps
1. Open the patient record.
2. Click on the '+' (arrow above) to create a blank new encounter
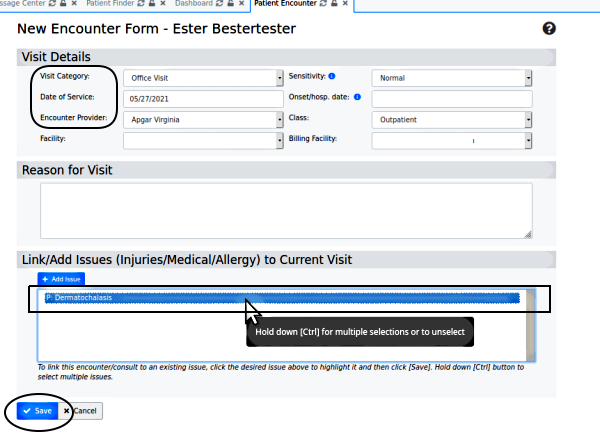
3. The Visit Category, Date of Service, Encounter Provider and Reason for Visit (below) should be automatically transferred from the appointment calendar if that is used. If not, manually select or enter them, and set any other items in that section that are different from the default values.
4. Not required for claim files but used by OpenEMR in reports: in 'Link/ Add Issues' window see the issues which have been automatically inserted from the patient's 'Issues' list. Click on the issue(s) which are being treated in this encounter. The line(s) will become highlighted.
- the patient must have their treatment issues entered into their Issues list for them to be inserted here
5. Click on 'Save' (oval lower left)
The new encounter will open in a new tab.
Note: other clinical notes may be entered into the encounter form at another time; this workflow only shows what is required to prepare the encounter for billing
6. Click on the 'Administrative' menu item and select 'Fee Sheet' (cursor arrow below)
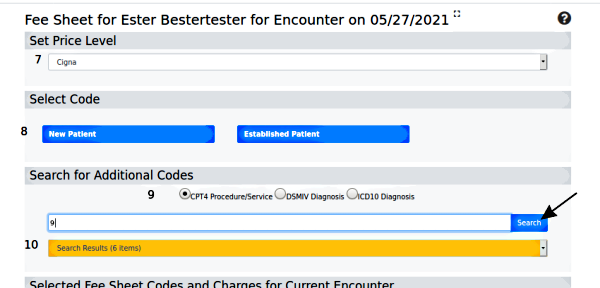
7. In the fee sheet, (below) select the Price Level if custom price levels have been configured
8. Click 'New- ' or 'Established Patient' and select the encounter type (not pictured)
9. Add a CPT4 code for the treatment(s) rendered in the encounter by entering a partial code and click 'Search' (arrow).
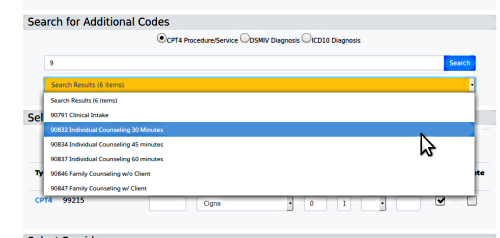
10. Click the orange 'Search Results' and choose the desired code.
11. Add a diagnosis code for each of the condition(s) that were treated in this encounter: select the ICD10 radio button, or others if configured, and search/ select as in the previous step.
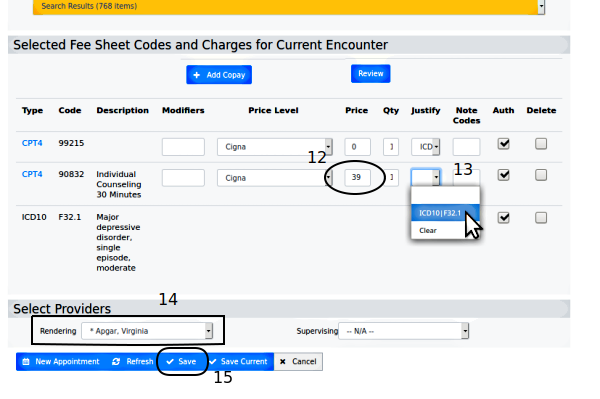
12. In 'Selected Fee Sheet Codes' section (below) be sure all CPT codes that are being billed have a price in that column (oval). Enter without dollar sign.
13. Click 'Justify' dropdown and select the justifying diagnosis for each CPT code
14. Ensure the correct Rendering Provider is selected (rectangle)
15. Click 'Save' (round rectangle at bottom)
Conclusion
The patient demographics, insurance and the encounter's fee sheet all contribute information that must be present and correct in order to generate a valid X-12 claim file that will not cause errors when processed. Any other clinical information entered into the encounter will be part of the patient's record but is not required for the claim file.


