HOWTO: Send Files To A Patient Portal Account
Background
Probably a lot of folks can piece together the steps of this workflow from the separate tutorials scattered around this wiki. However, it seems convenient to have one document with the entire procedure in one place.
OpenEMR does have a Patient_Portal_Document_Templates feature that permits practice staff to construct document templates that patients can fill out in their portal accounts and send them to their healthcare staff. However, document templates are different creatures from regular old text or .doc files, or a PDF or an image. If you want to send those via the patient’s portal account they must be handled in a slightly different way. While much of the capabilities I describe here are available in OpenEMR versions before 6.0, major renovations in the portal were made for that version. So I will not claim that you can do all these tricks in any versions before 6.0.
The EMR User Sends File
Let us begin with sending a file to the patient.
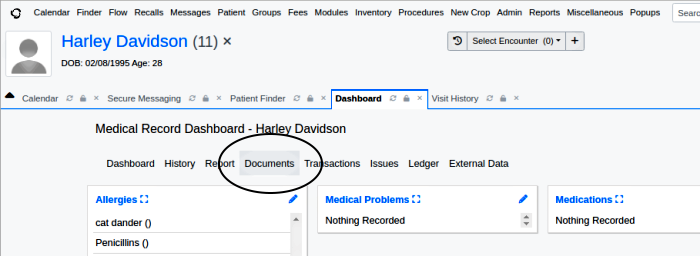
1. Open the pt record and their 'Documents' dashboard link
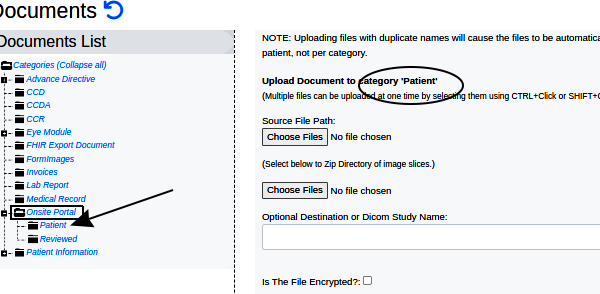
2. Click 'Onsite Portal' (rectangle below) in the Documents List tree to reveal the subdirectories.
3. Click 'Patient' folder (arrow below) which reveals various controls on the right and sets the destination directory (oval) in the EMR documents tree
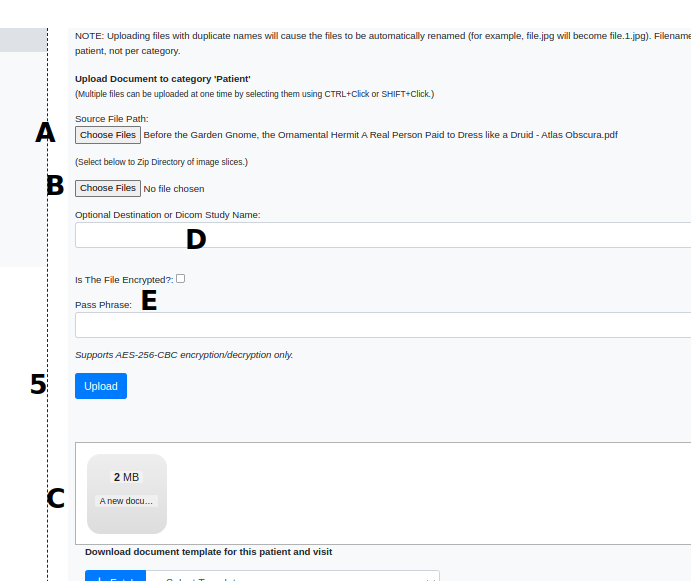
4. Select the file(s), see next image.
A. Click ‘Choose Files’ to open a browser file load dialog * you may locate and select individual files or ctrl+click multiple files
/OR/
B. You may select a folder which will be zipped for upload
/OR/
C. Rather than locating the files in the filesystem, you may drag them to the window.* (Only one method A, B or C may be used at a time)
D. You can change the name that the file will have in the documents tree.
E. You can encrypt the file if desired.
5. Click 'Upload'
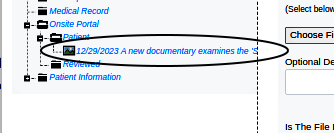
See the file appear in the Patient folder (oval)
(file names are different in these pictures)
6. The file is now accessible for the patient to download from their portal account.
Patient Gets File From The Portal
1. Patient logs into their portal account.
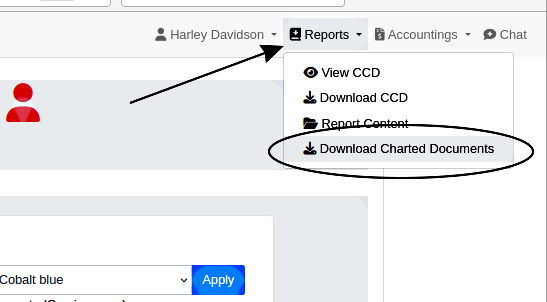
2. Open the ‘Reports’ menu dropdown and select ‘Download Charted Documents’
Note: interfaces may be different in your version of the portal!
3. Click 'Download'
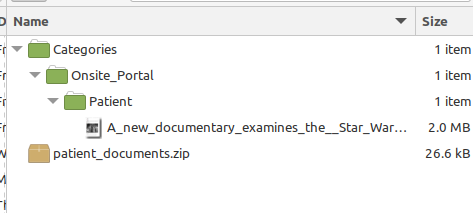
4. The file will be 'patient_documents.zip' which will be downloaded to the folder/ directory specified by the patient’s browser.
5. Patient unzips the file on their local computer to recreate the file structure (below)
- '/Categories/Onsite_Portal/Patient/'
- inside sub-folder ‘Patient' will be the file(s) that were uploaded into the Patient’s EMR Documents tree.
6. The patient can access the file(s) by navigating to their local location with their system’s file explorer.
Warnings and Gotchas
- Ask your IT staff to configure your OpenEMR server for the file types and maximum file sizes it will allow you to upload
- The documents that are in the ‘Patients’ directory in the EMR will be downloaded as a zip file to wherever the user's browser has its download directory set.
- Unfortunately, the patient can't simply view from the portal the file(s) sent them with this method, they must be downloaded to their local computer
- If you have put something in the folder 'Onsite Portal' in the patient’s document tree on the EMR it will be downloaded along with the contents of the 'Patient' directory.
- Keep in mind, the file download itself is initiated BY THE PATIENT, so any files inside the ‘Onsite Portal’ folder will be accessible to them at any time.
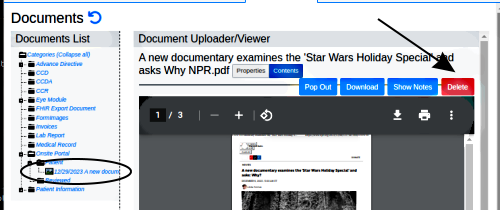
- If you want to prevent some files in the 'Onsite Portal' or 'Patient' folders from being downloaded by the patient you might want to create a different location in the EMR’s document tree to store them in. Or perhaps simply delete them by clicking on the file name then the 'Delete' button (top right below)
