OpenEMR 4.2.0 Fee Sheet Custom Service Categories
Introduction to Custom Service Categories
OpenEMR's default fee sheet has two dropdown lists, which insert onto the fee sheet charges for a few standard New Patient / Established Patient encounter types. Those fee entries only give the code type (eg, CPT4) and the code itself; code modifiers and service prices must be added manually. By creating custom Service Categories all that information can be automatically added to the fee sheet and report triggers and custom price levels can also be added.
If a clinic is a full service facility, all diagnostic and service codes would need to be available. However, if a facility offers a limited number of services (i.e., uses a superbill) it may be more convenient to create custom service and/ or diagnostic categories.
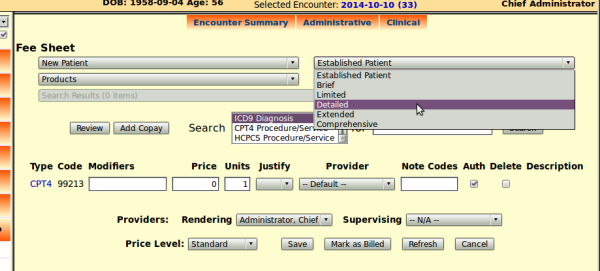
In the graphic below we see OpenEMR's default fee sheet for an encounter with one service added. As it happens, this facility has activated their inventory module, indicated by the 'Products' dropdown list in the left column.
Adding custom categories
Adding custom categories to the fee sheet is a five step process, all performed by a user with Administrator privileges.
- Configure diagnostic codes if desired
- Configure price levels if desired
- Plan the custom categories
- Create the individual categories in OpenEMR
- Fill the categories with their codes
1. Configure diagnostic codes if desired
- If you have imported an ICD9 dataset and plan to keep using it, no adjustments need to be made in your diagnostic codes. However, if you want to create custom categories for a limited set of diagnostic codes, OpenEMR needs to be set for that.
- 1. On left Nav menu go to:
- 'Administration-> Lists'
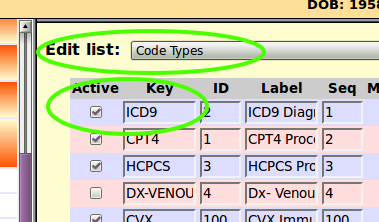
- Edit list: 'Code Types' (circled)
- 2. Ensure that in top line showing the ICD9 entry, the 'Active' checkbox in leftmost column is checked (circled)
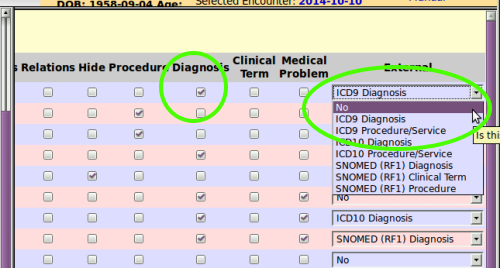
- 3. Ensure that the Diagnosis checkbox is checked (circled)
- 4. and the 'External' dropdown list at right says, 'No' = will be using INTERNAL codeset. (circled)
- 5. Click 'Save'
2. Configure for price levels if desired
- 1. On left Nav menu goto:
- 'Administration-> Lists'
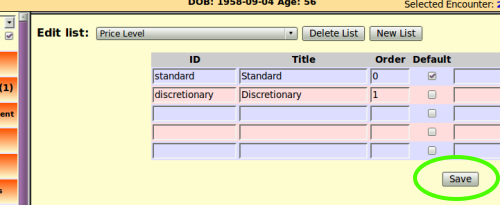
- Edit list: 'Price Level'
- 2. Enter a unique ID and a meaningful Title for each of your price levels; they may be named whatever you like.
- 3. Click 'Save' (circled)
3. Plan the custom categories.
- 1. Decide what you want to name the categories into which the procedure or diagnosis codes will be grouped.
2) Each code may be used in only one category.
- For example:
- Category:
- Immunizations
- Codes:
- 90707 MMR
- 90698IPV
- Category:
- H & P
- Codes:
- 99223Inpatient Comprehensive
- 99222Inpatient Expanded
- A sample diagnosis category might be:
- Substance Abuse
- Dx Codes:
- 291.81 Alcohol Withdrawal
- 292.81 Drug Induced Delirium
- 2. For each category create a unique ID for the computer to refer to, and a meaningful name that humans will see in the fee sheet dropdown menu.
- For example:
- ID: svc-hp
- Name: Svc – H & P
- ID: svc-imo
- Name: Svc – Immunizations
- 3. In this example we'll set up one custom diagnosis category to show how it works.
do NOT create any diagnosis categories; they will not work.
- ID: dx-subst-abuse
- Name: Dx – Substance Abuse
- You will need for each code, the code number and code modifiers if any, the price for each price level, and a brief description.
4. Create the individual categories in OpenEMR
- 1. On left Nav menu goto:
- 'Administration-> Lists'
- Edit list: 'Service Category'
- The default list will initially be empty.
- 2.Type or Copy/ Paste your category ID's and names (Titles) into the spaces.
- 3. Click 'Save' button.
5. Fill the categories with their codes
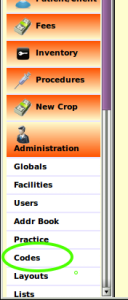
On left Nav menu goto:
'Administration-> Codes'
For no particular reason let's add the diagnosis category first.
Type or copy/ paste all content into its text areas in the top portion of the Codes panel.
Proceeding from left to right, top to bottom:
- Select the code Type from dropdown list
(CPT4 will be there to select for the CPT codes) - Enter the Code in that text area
- Enter any code Modifier in text area
- Note 'Active' checkbox is checked unless this code will not be used
- Enter code Description
- Select from dropdown the Category that was created for this code
- Check box of the report trigger: will this code be subject to Diagnosis Reporting, Service Reporting or both?
- Enter Fee for each price level ('Category' dropdown is covering the Standard price level box).
And of course, diagnoses shouldn't have prices associated with them...
- Click link, 'Add as New' (circled)
Repeat for each code; ensuring to select the correct Type and Category for each entry.
Editing Codes
The objects in the lower portion of the Codes panel are for editing existing codes or adding new ones.
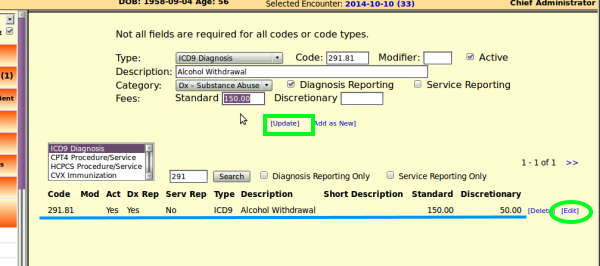
Code entries may be edited for several reasons, such as to change their categories, to change prices or to correct errors. In this sample tutorial, prices were entered into diagnosis codes so let's remove them.
- Beginning in the list box at left of bottom half of panel, select the type of the code to edit; here it's 'ICD9 Diagnosis'
- In text area to the right, enter a search term to locate the code to edit.
- The search term may be a portion of a code number or description; or simply enter the exact code.
- Click 'Search' button and search results will display below the line of headings (blue underlined)
- Click blue '[Edit]' link (circled) at right end of the target search results, which moves the code entry into the top display.
Or the entire code entry may be deleted with the '[Delete]' link next to it. - Edit as desired
In this case we've already deleted the Discretionary price and are about to remove the Standard price. - Click blue '[Update]' link (rectangle) to update the code entry with the correction.
At this point you may enter another new code, edit other existing codes or navigate away to some other activity.
Using Custom Service Categories
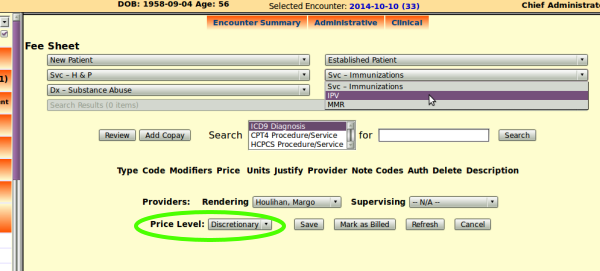
- 1. Select the fee sheet from the Administrative menu bar in an active encounter.
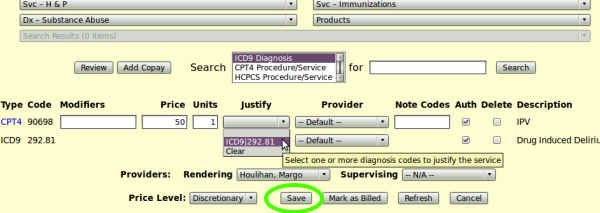
- 2. First, set the price level to be applied to this encounter (green circle)
- 3. Select service category dropdown; for e.g., 'Svc – Immunizations' and select 'IPV' (mouse pointer upper right)
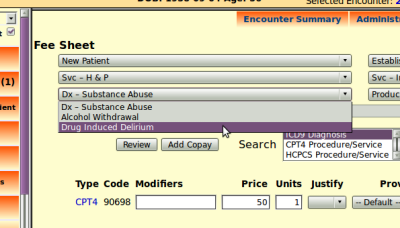
- 4. Select from the appropriate Dx category dropdown list, one or multiple diagnoses that apply to this encounter.
- 5. Select from the 'Justify' dropdown the diagnosis code(s) that justifies that service.
- 6. Be sure to select at least the encounter's Rendering Provider;
- select individual service and SupervisIng Providers if different
- 7. Click 'Save' button. (circled)
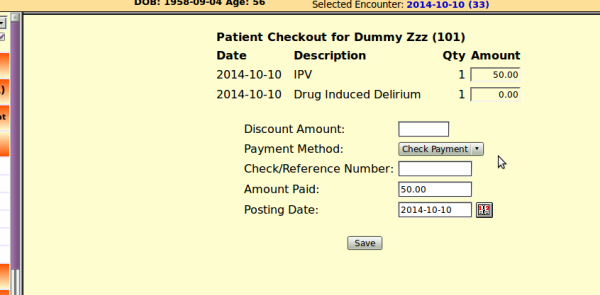
These items will appear automatically on the Checkout panel, found from the left Nav Menu at 'Fees-> Checkout'
