HOWTO: Patient self-registration in the Native Patient Portal
Introduction
OpenEMR supports multiple Patient Portals; see their description and discussion on the OpenEMR wiki page:
https://www.open-emr.org/wiki/index.php/Patient_Portal
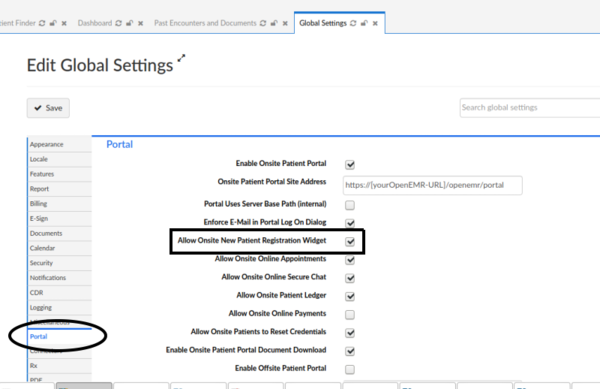
This document describes how a patient may register themself and create a patient record in a practice's EMR, by using its Onsite Patient Portal. It assumes the portal has been turned on and configured in the practice's OpenEMR Globals (oval at lower left in image below).
Please note: when test- registering in your own Onsite Portal,
you must be logged out of its OpenEMR or you may get errors and fail!
Also- this document shows the version of the portal in OpenEMR 6.0, after the patches were released to fix some self- registration and login issues.
Configuration
The other portal settings may be as desired, but be sure the OpenEMR's Globals are set to allow the self- registration: "Allow Onsite New Patient Registration' (rectangle, below),
Procedure
The patient obtains the practice's Patient Portal Login URL and surfs to it.
1. Portal Login Screen
Click the 'Register' button (oval at lower left).
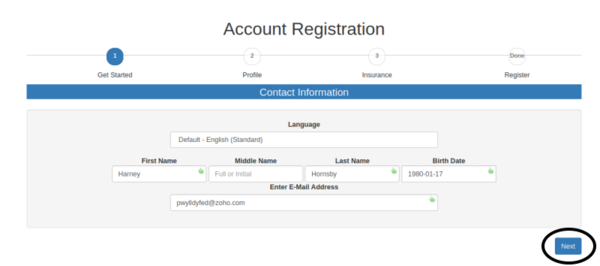
2. 'Get Started' screen.
Fill in the required blanks (image below).
- The little icon for required items (circle at right) will be used in other portal registration screens.
- This email is also used as the patient's portal login so must not be the same as other patients in the practice's EMR
Click 'Next' (oval at lower right)
3. Fill in the patient profile information
Again, the required items have the little icon in the text area.
- Most of these data are not required for registration. If any required items are missed the first time this screen appears, when the 'Next' button is clicked this screen will return showing them with a red border, as shown below.
- These fields are basically all of the demographics and history information from the patient record, and are not required to register a new patient. But any information filled in here will be transferred to the new patient's OpenEMR record.
Click 'Next'
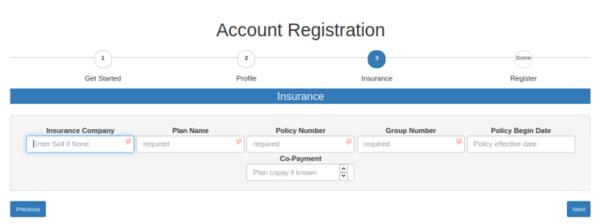
4. Enter insurance
- Enter 'Self' in 'Insurance Company' if patient has no insurance.
Click 'Next'
- If 'Self' was entered, confirm no insurance.
Click 'OK'
5. Registration Complete
- As the panel says, the user may use the step buttons along the top of the panel to return to an earlier section and change the information.
Click green 'Send Request' button at lower right.
No Email Configured
If email is not configured for the OpenEMR instance the following error message will display.
Functionally, what that means is that the patient will not receive a confirmation email.
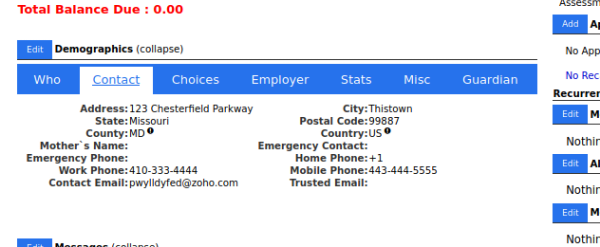
However the patient record will still be created in the OpenEMR...
...and any history items that were entered during registration will be transferred to the patient's new EMR record.
Email Configured
If the EMR has SMTP configured for use in, for example, Patient Reminders, the portal registration module will send out a patient login credentials verification email as described below for the patient to confirm their login credentials.
If you (the OpenEMR Administrator) simply want to test OpenEMR's various email functions you can refer to the instructions at the forum post linked below on how to use a gmail account's SMTP server for VERY LOW VOLUME testing.
https://community.open-emr.org/t/portal-self-registration/15866/4
But now let's assume you have configured access to some sort of email server.
Click the green 'Send Request' button at lower right...
... and see the success report:
6. Patient Confirm Credential
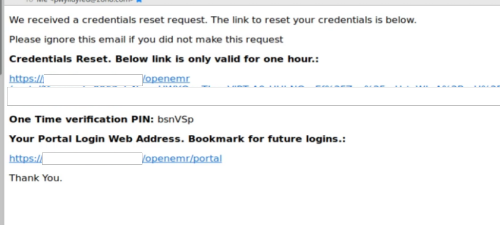
Open the confirmation email:
It has a link in it to the practice's Patient Portal and a 'One Time verification PIN'
Click the link to open the verification page in the browser:
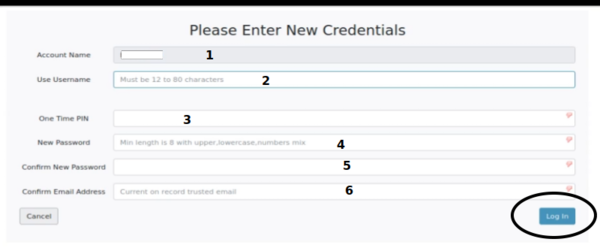
Enter Credentials
- 1. The Account Name will be filled in already with the patient's account name
- 2. Use the email for the Username
- 3. Use the One Time Pin from the confirmation email
- 4. Create a new password: 12 - 18 characters, include numbers and symbols* this MUST be secure, it's protecting personal medical information!
- 5. Re- enter the new password
- 6. Click 'Log in' button at lower right
and be logged into the patient portal.
Conclusion
Portions of this page can be slightly modified for use as a handout for the patient of individual clinics.
And even if no SMTP server has been set up self- registration can still be useful to initiate patient records in the practice's OpenEMR
