Sample Create and Use Procedure Orders 4.1-4.2
Introduction
OpenEMR can work with collections of diagnostic tests using a functionality called "Procedures". Procedures are not just for ordering lab tests and recording their results; they apply to any procedure that performs some act and records results for that act. OpenEMR's procedure orders meet the Meaningful Use requirement to store test results in the EMR as structured data.
Overview
We can build single test procedures to record results for individual tests or panel procedures containing multiple tests. In this tutorial we'll build a simple 3 tiered panel procedure, and also a 2 tiered single test procedure.
Building a procedure takes four steps:
Create dummy lab
Plan the tiers
- Create top level tier
- Create mid- level tier(s)
- Create bottom level, 'discrete results' tier(s)
Procedure
Create dummy lab
In order to create procedures OpenEMR associate them with a dummy lab. So even though these procedures may not ever be sent to an actual lab, we need to create a dummy lab inside OpenEMR. If the interfacing and other requirements are ever set up to send orders to a working clinical lab, these procedures will work with that arrangement.
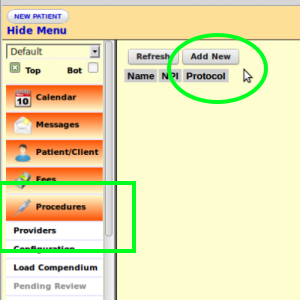
- 1. As Administrator user, from the left nav menu: 'Procedures-> Providers' (green rectangle)
- 2. Click 'Add New' button (green oval)
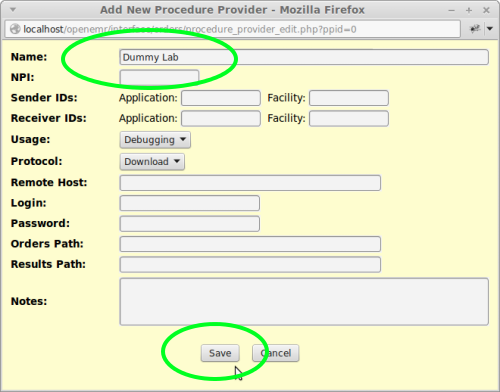
- 3. Click 'Save' button at bottom
Create Three Tier/ Panel Procedure
Plan the Three Tiers
Procedures may be visualized as having up to three “tiers”, the top, middle and bottom. Our first example will consist of the following tiers:
- Tier 1: Top tier, the Procedure order named, "Annual PE Labs"
- Tier 2: Middle tier, the names of the tests themaselves: "CBC" and "Chem Panel".
- Tier 3: Bottom tier, The discrete results of the CBC are WBCs and RBCs.
- Tier 3: Discrete results of the Chem Panel are Na and Glucose
Create top level tier “Annual PE Labs”
In the left nav menu:
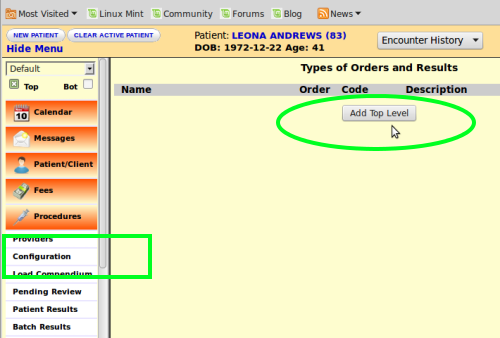
- 1. Procedures-> Configuration. (green rectangle)
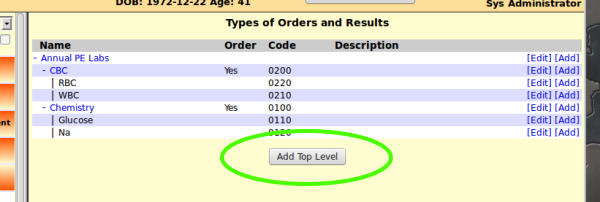
- 2. Click 'Add Top Level' button. (green oval)
- 3. 'Add New Order/ Result Type' popup appears
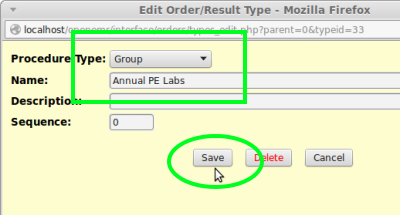
- 4. Select from the dropdown list, 'Group' (green rectangle)
- 5. Enter the items:
- Name: the lab procedure (panel) name, e.g., "Annual PE Labs"
- Name: the lab procedure (panel) name, e.g., "Annual PE Labs"
- Description: Optional additional information about the procedure
- Sequence: disregard for now; See “Info: Sequence Numbers” section below.
- 6. Click 'Save' button at bottom. (green oval)
Add first tier 2 procedure
Now add the the first tier 2 item, the Chem procedure order, to the Annual PE Labs procedure .
- 1. At the right end of the line, “Annual PE Labs”, click the '[Add]' link (green oval)
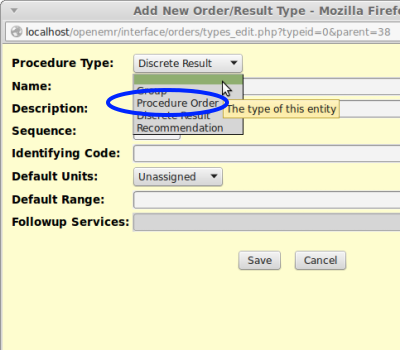
- 2. In the new panel select from the top dropdown list, 'Procedure Order' (blue oval).
The new panel expands adding new fields.
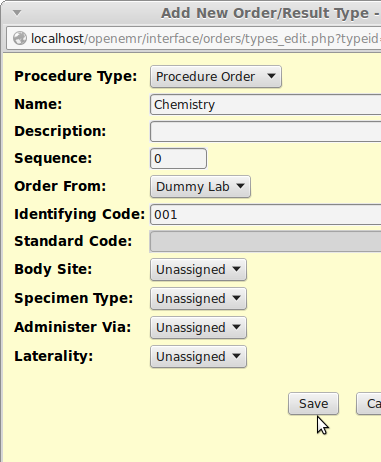
- 3. Enter the required items:
- Name: what the procedure will be called.
This is what the search module looks for when finding procedures.
- Name: what the procedure will be called.
- Description: optional additional information.
- Description: optional additional information.
- Sequence: Leave = "0"; read “Info: Sequence Numbers” section below
- Sequence: Leave = "0"; read “Info: Sequence Numbers” section below
- Identifying code: may be clinical lab's code for the test or internal designator
- Identifying code: may be clinical lab's code for the test or internal designator
- Standard Code: lets you select test's industry standard code if the code sets have been loaded
- 4. Clinically significant but optional for procedure function:
- Body Site: (default: Arm/ Buttock/ Other )
- Specimen Type: (default: Blood/ Saliva/ Urine/ Other )
- Administer Via: (default: Injection/ Oral/ Other )
- Laterality: (default: Left/ Right/ Bilat )
- 5. Click 'Save' button at bottom. (mouse pointer)
Add second tier 2 procedure
For the second tier 2 procedure order in our Annual PE Labs procedure, repeat the previous section from step 1.
Click the '[Add]' link at the right end of 'Annual PE Labs' again, and fill out another panel with the name 'CBC' and Identifying Code, "002"
Create tier 3 “Discrete Results“ items
Next step: create the 3rd tier items, containing the discrete results for each of those procedures. Let's add first Discrete Results tier, to the CBC.
- 1. Click the [Add] link at the right of that line.
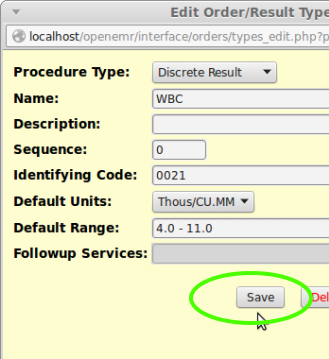
The first Discrete Results: WBCs
- 2. Select from the dropdown list, “Discrete Result” (blue oval below)
- Name: WBC
- Description: optional
- Sequence: see Info: Sequence Numbers section below
- Identifying Code: arbitrarily give it 00210
- Default Units: select from the dropdown list the units for this result.
- Default Range: enter what your clinic considers the normal value.
- Followup Services: reads from your OpenEMR's installed codesets to locate the code for some followup service to the results of this test.
- 3. Click 'Save' button at bottom.
The second Discrete Results: RBCs
- 1. Click the '[Add]' link to the right of 'CBC' to add another tier to CBC.
- 2. Select “Discrete Result” from dropdown list
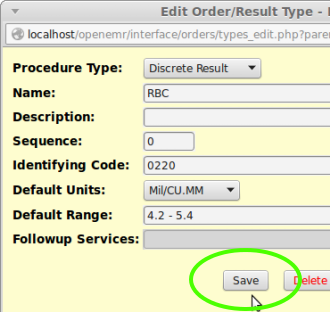
Name: RBC
- Identifying Code: 0220
- Default Units: Mil/CU.MM
- Default Range: 4.2 - 5.4
- Identifying Code: 0220
- 3. Click 'Save' button at the bottom.
The expanded Procedure Order list now looks like this:
Discrete Results tier for the Chemistry procedure order
First Discrete Results, Glucose
- 1. Click the '[Add]' link at the right end of the "Chemistry" line
- 2. On new panel select 'Discrete Result' from dropdown list
- Name: Glucose
- Identifying Code: 0110
- Default Units: Mil/CU.MM
- Default Range: 4.2 - 5.4
- 3. Click 'Save' button
Second Discrete Results, Sodium
- 1. Click the '[Add]' link at the right end of the "Chemistry" line
- 2. On new panel select 'Discrete Result' from dropdown list
- Name: Sodium
- Identifying Code: 0120
- Default Units: HMOL/L
- Default Range: 136 - 144
- 3. Click 'Save' button
That completes the creation of the multiple- test lab procedure.
If any row has a '+' sign in the left column, click on it to expand the row.
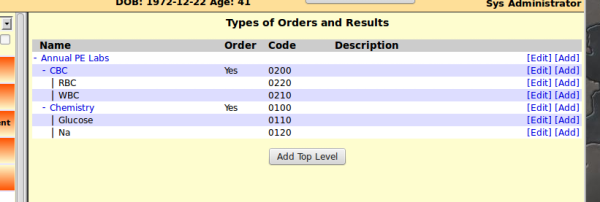
The finished expanded procedure screen should look like this:
Create the Single Test / Two Tier Procedure
Plan the Two Tiers
The Single Test procedure has 2 tiers.
- A top level procedure order tier named “THC Level”
- A discrete results tier named... “THC Level”.
Create top level tier “THC Level”
Let us now add a single test procedure, for a simple THC Level.
In the procedure Configuration page (nav menu: 'Procedures-> Configuration') click 'Add Top Level' button, circled above.
Now the familiar tier 2 process:
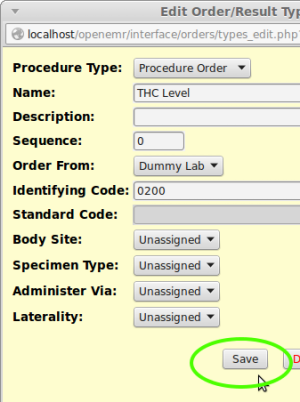
- 1. Select from 'Procedure Type' dropdown list, “Procedure Order ”
- 2. Fill out the relevant entries.
- 3. Click 'Save' button (green oval)
Now add the Discrete Results tier:
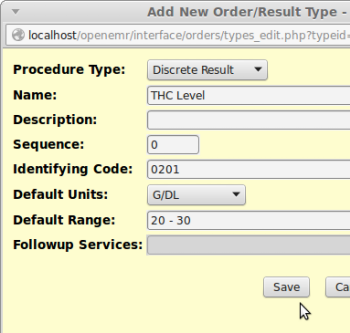
- 1. Click the '[Add]' link at the right of THC Level (green oval)
- 2. Enter the 'Discrete Result' panel data (right)
- 3. Click the 'Save' button.
With all the procedure rows expanded our screen should look like this:
Using the Procedure in an Encounter
Order the Procedure
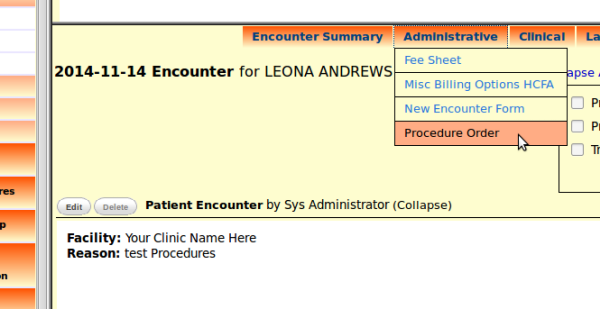
- 1. Click the Administrative menu item at the top of an active encounter.
- 2. Select the Procedure Order menu item (shaded red above).
- 3. Initiate search for the first procedure order by clicking inside 'Procedure 1' text area (green oval below) ...
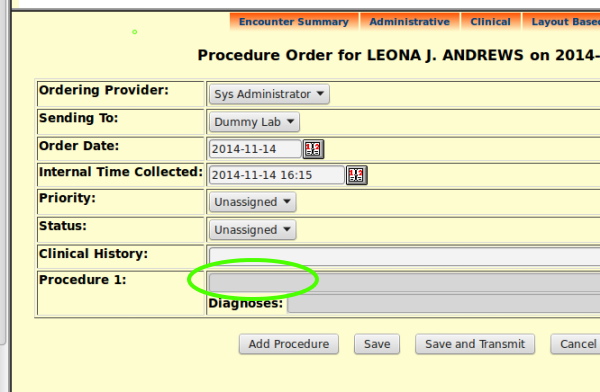
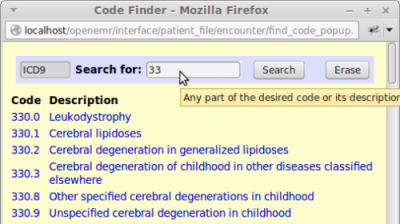
...which displays a 'Procedure Picker' search popup (below).
- 4 Enter "Chem" in the 'Search for:' text area
- 5. Click the 'Search' button (mouse arrow)
- ...and the Chemistry procedure is retrieved as clickable text (green oval above)
- 6. Click it to add the Chemistry procedure to the encounter.
Similarly, to add the justifying diagnosis for the procedure:

- 7. Click in the 'Diagnosis' text area (mouse pointer)
- 9. Click 'Search' Button
- 10. Click on the desired diagnosis in the search results.
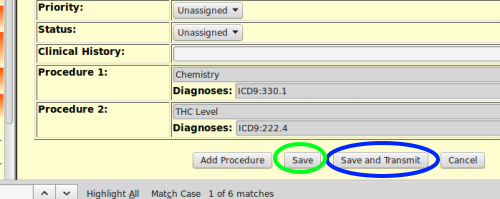
- 11 Click 'Add Procedure' (blue oval above)
In a similar manner, add the 'THC level' procedure order to the encounter:
- 1. Click in 'Procedure 2' text area
- 2. Search for “THC” and select that procedure order
- 3. Click in 'Diagnosis' text area
- 4. Search for and select the justifying diagnosis
When finished adding procedures to the encounter, click the 'Save' button (green oval below)
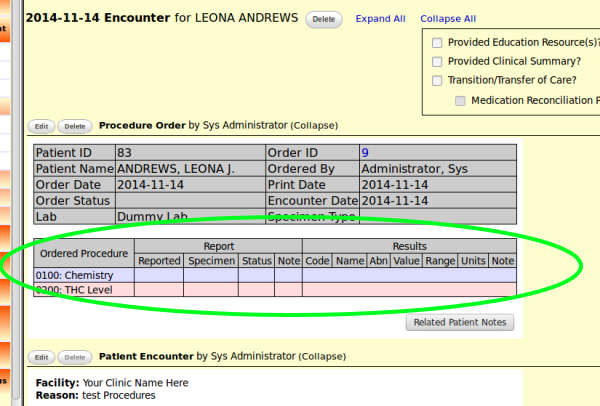
The encounter reappears displaying the orders for these procedures along with the results matrix.
Review Procedure Results
When the results are ready to be reviewed, they are entered and signed off in the same operation. This must be done by a Physician or a user who is privileged to sign off labs.[**see acls for lab acceess wherever]
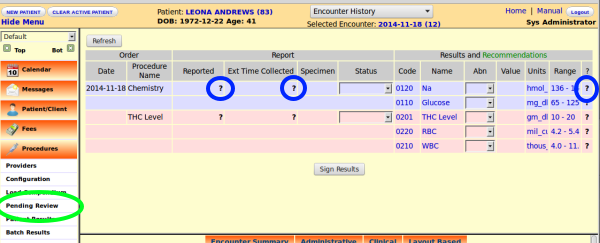
- 1. From the left nav menu: 'Procedures-> Pending Review' (green oval below left)
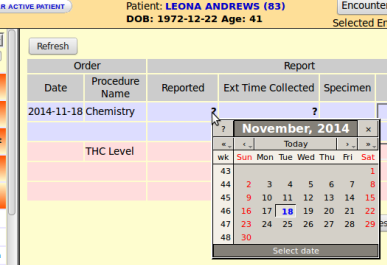
- 3. Click on the '?' in the 'Reported' column and select the date.
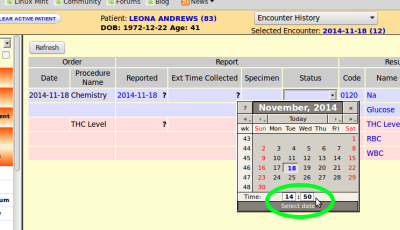
- 4. Click on the '?' in the 'Ext Time Collected' column and enter the time and date
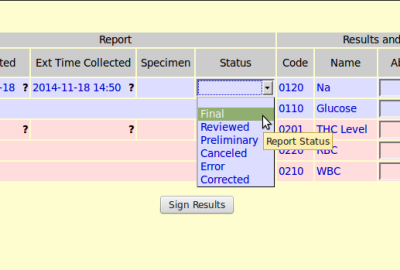
- 5. Click on 'Status' dropdown list and select result status
- 6. Enter the lab's 'Value' in that column.
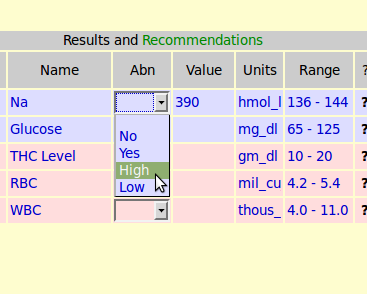
- 7. The 'Abn' dropdown is where the Physician interprets the values as WNL or not.
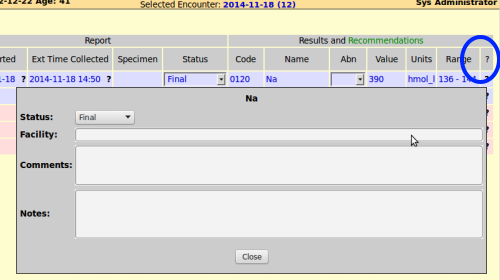
- 8. The final '?' (blue oval far right) opens a panel into which comments and notes may be entered. These entries are displayed in 'Patient Results' screen, from the nav menu; also in 'Patient Notes' on the patient's summary screen. Click 'Close' button when finished.
- 9. Click the 'Sign Results' button at the bottom of the panel (green oval) and the results that have been reviewed leave the list.
- 10. Finally, when all the results of one procedure have been signed, they appear in the encounter screen.
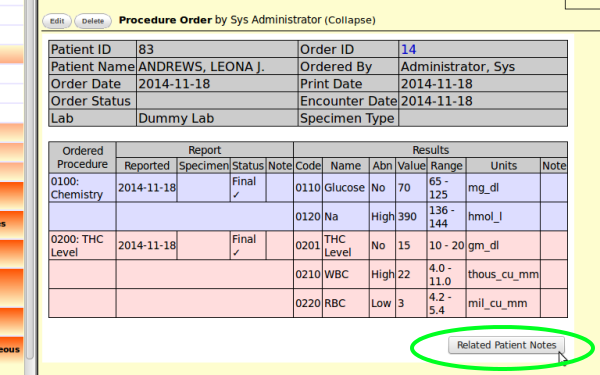
If a Patient Note had been entered in step 8 above, click the button, 'Related Patient Notes' (green oval) to open this patient's 'Patient Notes' widget, found on their summary screen.
Info: Sequence Numbers
A procedure item's 'Sequence' value determines the display order of the items in the same tier.
The rule is:
- if the sequence numbers are the same, the items display alphabetically;
- if the numbers are different, they display in numeric order.
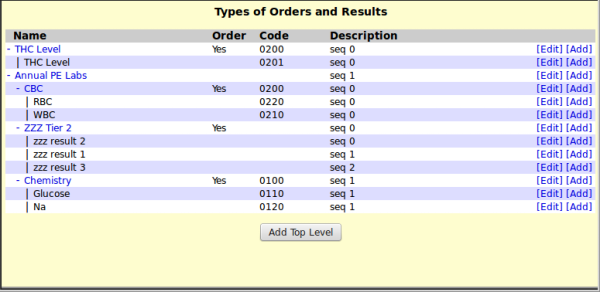
Let's look at this graphic and see how it illustrates the sequence numbers (for brevity let's call them “seqs”).
Incidentally, the seqs are not normally visible like this; they've been entered into the description field so we can see them for this explanation. And I've added an extra Tier 2 procedure 'ZZZ Tier 2' just for demo purposes.
- "THC Level" and "Annual PE" are both in the top tier. Their seqs are different so “THC”s 0 displays before “PE”s 1.
- Inside "Annual PE", the tier 2 items, "CBC" and "ZZZ" both have seqs of 0 so they display alphabetically, 'C' before 'Z'.
The seq of tier 2 “Chemistry” is 1 so it comes after the 0's - Inside "CBC" the seqs are the same so they list alphabetically, RBC before WBC.
- Inside "ZZZ" the seqs set the order 0, 1, 2
- Inside "Chem" the seqs are both 1 so they list alphabetically.
If it doesn't matter that every item in every tier displays alphabetically, just leave all seq's '0'.
