Sample Layout Based Visit Form
About This Document
This document, Sample Layout Based Visit (LBV) Form, is a supplement to the OpenEMR wiki page, LBV Forms.
Screenshots in this document were taken from a stock instance of OpenEMR v-4.1.1 installed on a Lenovo Thinkpad netbook running Linux Mint 13 (64 bit), equivalent to Ubuntu 12.04 Precise Pangolin. The data in the displays comes from random simulated patient data generated by the excellent PrintaPatient package from the Tools page.
"LBV forms" is one of OpenEMR's custom form creation capabilities that has been available since OpenEMR version 3.2. It allows a user to create custom forms that input data and assign them to fields in the OpenEMR databases.
This page steps through the creation of a sample LBV form that documents some elements of an encounter for acute substance abuse withdrawal. The form is intended to demonstrate the use of the LBV interface and just a few representative data collection objects; it is not an exhaustive study of the LBV capabilities and it does not produce a clinically useful form. However, after building this sample a user should have sufficient experience to build their own custom form. Please see LBV Forms for more important information about LBV forms in general and other data types and field options that are available.
Creating an LBV form is done in three parts:
- Add the new LBV form to OpenEMR's list of all LBV forms
- Edit the layout of the new form by adding data collection fields and labels.
- Use the form
Add Your LBV Form To The List Of Existing LBV Forms
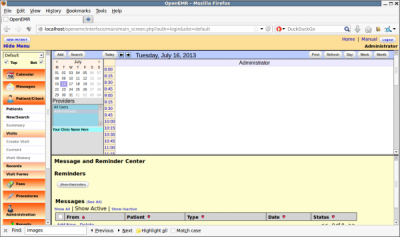
- Starting at the default home page
- 1. Devise a Form ID and descriptive name for the form
- The Form ID is the identifier of the form in OpenEMR's table of LBV forms. "LBF" is prepended to whatever Form ID you use.
- OpenEMR 4.1.1 will convert any spaces, numbers and capitalized words in the Form ID and name into acceptable characters.
- The form name should represent the phenomenon it documents.
- 2. Edit OpenEMR's list of LBV forms:
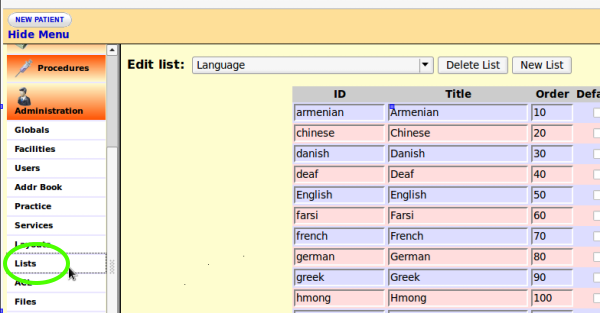
- 3. On Navigation menu select Administration / Lists
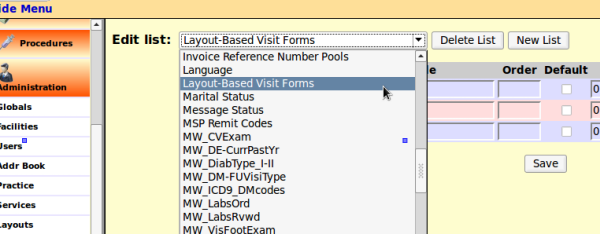
- 4. Select Layout-Based Visit Forms from the Edit List listbox
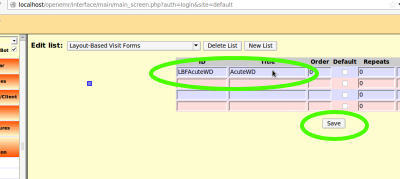
- 5. In the table Enter the form's ID in the left column; for this demo use "AcuteWD"
- 6. Enter the form name in 2nd column; use "AcuteWD"
- 7. Click the Save button
Create The LBV Form
NOTE: When building an LBV form to document an encounter, create fields that record distinct data points of the problem.
- For example, an acute withdrawal encounter should have such fields as: date and time of last use; amount used; description of current symptoms; vital signs.
LBV custom forms may contain multiple "groups" of data fields. The first group might collect data from the initial encounter, then one or more additional groups may be added if more information will be appended to that encounter later.
- For example, the initial group might include documenting the administration of a stabilizing medication. A second group could include assessing the effects of that medication and the administration of a second dose; a third group could record the results of that second dose of medication.
For demonstration purposes this example will consist of one group with 3 fields and a second group with one field.
- 1. Go to Navigation menu / Layouts
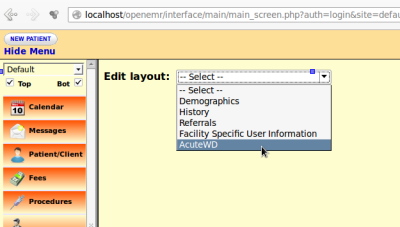
- 2. On Edit Layout in top frame select from the dropdown menu the form that was just named.
- 3. Click 'Add Group' button to add the first group to the form.
- This also creates the labels and text areas for the first field in the first group of this form.
Fill the field options with your choices.
- See 'Field Options' section in LBV Forms for details on these items.
Field 1:
- Group Name - For this example let's use "Initial Assessment"
- Order - the order in which that field is displayed in the group. Start with 1
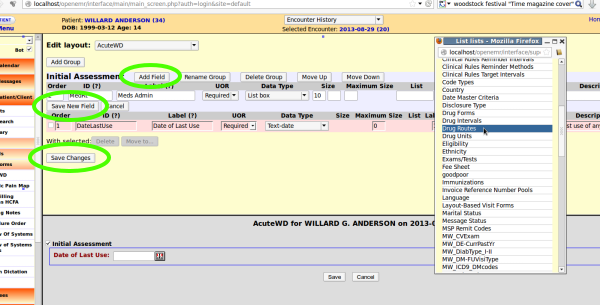
- ID - This is the ID of the first data field of the group. Must be unique to the form; most useful if it is a variant of the label (see next item). For this example use "DateLastUse"
- Label - the text describing the data field. "Date of Last Use"
- UOR - Select 'Required'
- Data Type - Select Text-date
- Size - 10; leave other size values empty
- List - if the data type uses a list, clicking here will offer all lists which have been configured in this OpenEMR installation. Otherwise, selecting a list has no effect. For this datum, leave it blank.
- Label/ Data Columns: label = 1, data = 6
- Options - see Options section of Field Options at [O-link]; none are appropriate for this data type
- Description - this is the tool tip that appears when the mouse hovers on the displayed data field. Use, "Date of last use of any intoxicant"
- Only when creating the first field in a group, there is no "Save New Field" button. Use instead, 'Save New Group'.
NOTE: It is handy to have the form displayed while it's being built, to see the effects of changes.
- Select a patient, start an encounter, select the desired form from Navigation menu, 'Patient/ Client' / Visit Forms.
- Then, after making changes to the form in the 'Edit Layout' frame, click the button 'Save Changes', then click again the link in the Navigation menu to the new LBV form.
Repeat the steps from Field 1 with the following values for the remaining fields:
Field #2
- Click 'Add Field'
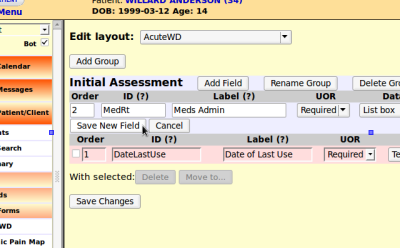
- Order - 2
- ID - "MedRt"
- Label - "Meds Admin"
- UOR - Select 'Required'
- Data Type - 'Listbox'
- Size: 10
- List - click in field, select "Drug Routes" from floating panel; see the evolving encounter form visible in bottom frame. Also, the list panel.
- Label/ Data Columns: label = 1, data = 2
- Options - N/A
- Description - provide suitable tool tip
- Click 'Save New Field'
Field #3
- Click 'Add Field'
- Repeat the steps above with the following values:
- Order - 3
- ID - "Pt_LOC"
- Label - "Present Level Of Consciousness"
- UOR - Select 'Required'
- Data Type - Select 'Radio buttons'
- Size - 10
- List - click and select "goodpoor"
- Label/ Data Columns: label = 1, data = 6
- Options - N/A
- Description - enter a tool tip
- Click 'Save New Field'
The first group is complete. Begin the second:
- Click button, 'Add Group'
- Give suitable name such as, "Followup Assessment"
- Fill in settings for the first field in this group:
Group #2/ Field #1
- Click 'Add Field'
- Repeat the steps above with the following values:
- Order - 1 (first object to display in this group)
- ID - "FU_Descr"
- Label - "F/U Symptom Description"
- UOR - Select 'Required'
- Data Type - Select 'Textarea'
- Size - width = 30; height = 10; maximum = 0 (no limit)
- List - N/A
- Label/ Data Columns: label = 1, data = 0
- Options - "U" (enter uppercase U without the quote marks. This converts all text entered to uppercase.)
- Description - enter a suitable tool tip
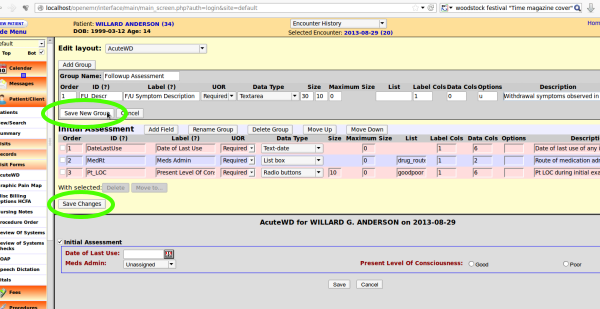
- Click, 'Save New Group'. (Remember: no 'Save New Field' for first field of a group...)
- Click 'Save Changes' at bottom of Edit Layout frame.
- Review the final form by re- selecting it from the Navigation menu.
- Notice the arrangement of data entry fields corresponding to their Label/ Data Cols settings.
Use The Form
- Open OpenEMR
- Select a patient
- Start an encounter
- In Navigation menu: select 'Patient/Client' / Visit Forms / AcuteWD.
- Enter the encounter data into the form and click the 'Save' button when finished.
- The contents of the first group are shown when the form opens.
- Click the checkbox next to the second group's name and enter data into it if desired.
How To Delete An LBV Form
- In Navigation menu select Administration / List
- Edit list: Layout-Based Visit Forms
- Manually delete the ID and Title of the LBV you want to get rid of.
- Click 'Save' button.
WARNING: Do NOT click 'delete list' button, because that will delete all LBV forms
Re: Label/ Data Col values
The LBV form utility makes use of the values in both the field's 'Order' and its 'Label/ Data Col' to determine placement of the label and data fields in the group. These general statements may be made about the Label/ Data col values for placement of data fields:
- if a field's Label Col = 0 the label will immediately follow the previous data field in the Order sequence, on the same line as the Data field
- if a field's Data Col = 0 the data field will immediately follow its label field on the same line
- if a field's Label Col = 1 the label field will go to a new line unless the previous field's total column values (Label + Data) is less than 4
- if Data Col = 2 the next field in order will be positioned in a second column on the same line no matter what the Data Col value is of that next field
- Generally, the first field in a group should be Label Cols = 1 Data Cols = 6.
- Then make subsequent fields in the same row, Label = 0 Data = 0
- If placing the next field on a new line, make the fields Label = 1 Data = 1
- Please see LBV Forms for more on this topic
