HOWTO Setup and Use OpenEMR Groups Module
>> note, this doc is in the process of final editing; it is not in its final form. - HT
Introduction
OpenEMR's Groups module makes it possible to document patients' participation in group sessions.
NOTE: these 'groups' are not related to the user role groups seen in ACL contexts. These groups can be used for any kind of group gathering, for any number of patients. They may have assigned to them any number of 'Main Counselors' and any arbitrary list of 'Guest counselors'.
Individual groups are managed by the EMR in a similar fashion as a patient is, in that when you're working with a particular group, its name and group ID is displayed where a patient's name and PID is in the patient record interface. Like a patient, it has its own dropdown list of past encounters, and a group session appointment is added to the Main Counselors(s) calendar similarly to a patient's appointment. Also group activities are 'contained' in a summary 'group encounter' form for the date the group session occurred, similar to the events are that occur during a patient's appointment.
However, unlike a patient appointment, group encounters are also associated with the records of the multiple patients who participate in that group's sessions so the session encounter is listed in each individual patient's own list of encounters. These group encounter summaries may contain individual free-text notes on that patient's participation in that group.
This document is the result of my reverse engineering the use of the module and no code review was used. If I missed anything please let me know and I'll be happy to update the doc.
- HTuck MI-Squared
Procedure
This document is divided into the following sections:
Setup
- A. Configure EMR/ User
- B. Create group
Use
- C. Schedule group sessions
- D. Add group participants
- E. Document group activity
Setup
A. Configure EMR/ ACLs
As an administrator- privileged user:
1. From Main Menu: 'Administration / Globals, Appearance' (default opening tab) - select: 'Enable Group Therapy', 1/3 down the list.
2. On '/ Globals, Calendar' tab, make sure the item, 'Appointments - Group Summary - Number to Display' - is what you want.
3. Update user group ACL
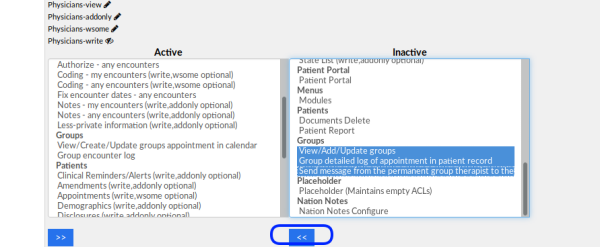
The default active user permissions for Groups are not sufficient to fully use the group module. Move to 'Active' pane all the Groups ACLs for whichever user group will be assigned to work with this module.
Alternately, create a new user group named, perhaps, 'Group Therapist', containing all the 'Groups' ACLs. Then add that group to all users who will be using the module.
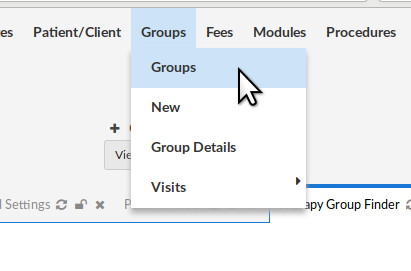
4. Survey of the Groups menu
Main menu: Groups/
'Groups' - shows list of existing groups
- can search for groups if list is longer than display
- can filter closed groups out of display by 'Group type'
'New' - create new group
'Group Details' - edit parameters of groups.
- (Shows same display as if a group is selected from Groups list)
Visits - operations related to visit (encounter) summaries of the currently selected group. Most functions also available from group summary display
- / create visit - create an encounter summary for the current group
- / current - displays the group summary of the currently selected group
- / visit history - displays the selected group's list of visit (encounter) summaries
B. Create A Group
From Main Menu, click 'Groups / New'
1. 'Add group': tab opens (top of pic above)
2. Fill in its name: Vietnam Vets PTSD Group
Date of group creation is 'Starting Date' by default
3. Type of Group: 'Closed' is default-- Be sure to change this!
- If left closed, the group may be created and fully populated but it will be inoperative. You'll need to delete it and start again!
4. Obligatory Participation: set as desired
5. Status: Active, Finished, Canceled. Set as appropriate
6. Main Counselors: Ctrl+left click to select counselors of group
- Main counselors must be EMR users
7. Notes: re: the nature of the group, or its mission, or whatever.
8. Guest Counselors: this is freetext so can be anybody including non- EMR users
9. Click 'Add Group' (oval at lower left in pic above)
- Group panel displays with 'General Data' tab active (above)
Removing a group
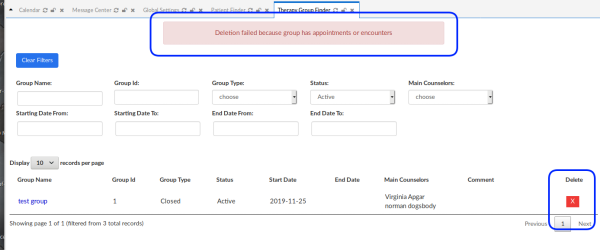
Note that similar to a patient record, a Group cannot be deleted if it has been used at all, because it will contain patient information which is not allowed to be destroyed; per error message at top above (round rectangle below). You may delete a group immediately after it has been created, for e.g., if an error was made in its configuration. Otherwise, its Type may only be set to 'Closed'.
- Closed groups remain on the group list
- Once a group is closed it can not be reopened!
Use
C. Schedule group sessions
At this point you may schedule its sessions.
- Note, this step may be performed from the Calendar display,
- just be sure to select the 'Group' tab
It appears that the group appointment may be added to all of the official counselors' calendars, not only the lead counselor. But each counselor's scheduled appointment must be handled individually, for example if that counselor will be listed in reports that they led a group.
From Main Menu select 'Groups/ Groups/ ' and click on the desired group (not pictured)
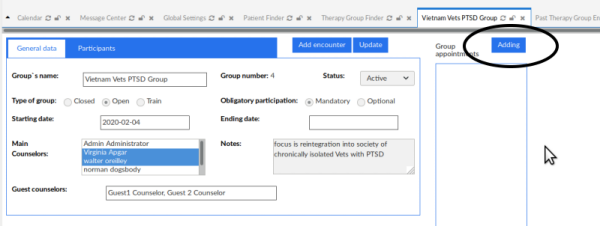
1. Open the Group's General Data tab
2. Click 'Adding' button at top right (oval top right below)
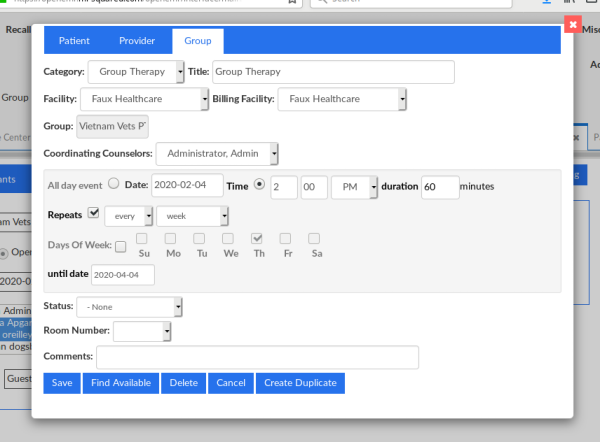
3. Fill out the event dialog in the same manner as scheduling a regular appointment
- See that documentation for instructions
Presumably this will be a repeating appointment, as pictured.
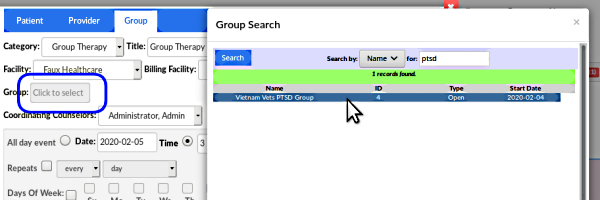
4. Click in the 'Group' text area to activate a search tool to locate the group (round rectangle above)
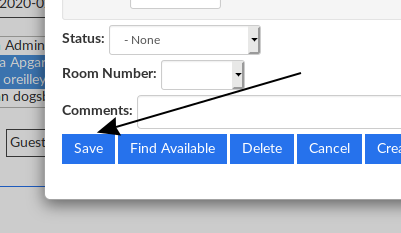
5. Click 'Save' button at lower left of dialog (arrow below)
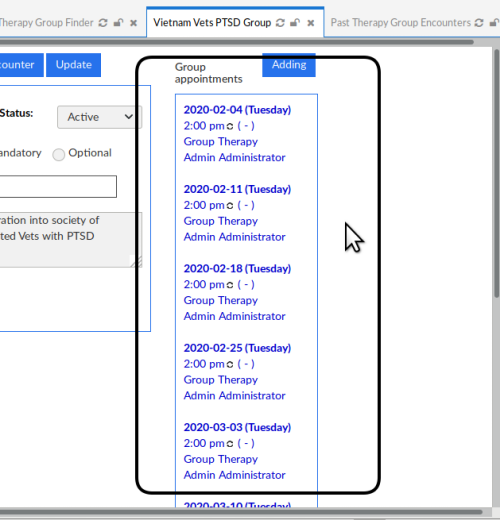
6. The scheduled sessions are displayed in 'Group Appointments' at right of panel.
D. Add participants to group
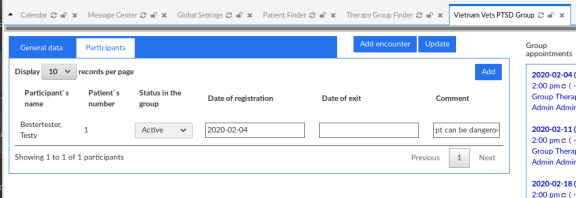
1. In the group details panel click 'Participants' tab (black oval below)
2. Click 'Add' button (cursor arrow at right above)
- Participants panel expands down
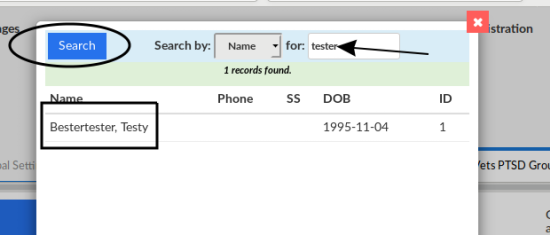
3. Click in 'Participant's Name' text area (arrow above) which opens the name picker.
4. Enter part of name (arrow top right above)
5. Click 'Search' (oval)
6. Select name from list (rectangle)
Now:
- 'Participant's Name' is displayed
- 'Date of Registration' is current date by default; may be changed.
7. Add optional comment about participant in text area below name
8. Click button 'Adding a Participant' (arrow above)
- Participant's name with the comment is added to list
Repeat from step 2 above to add all Participants
E. Document group activity
Indicate Group Status for Reports
Some OpenEMR reports monitor visit and encounter data so you may want to indicate in the calendar's event dialog that the session did occur. This is accomplished in the same basic manner as for a patient encounter.
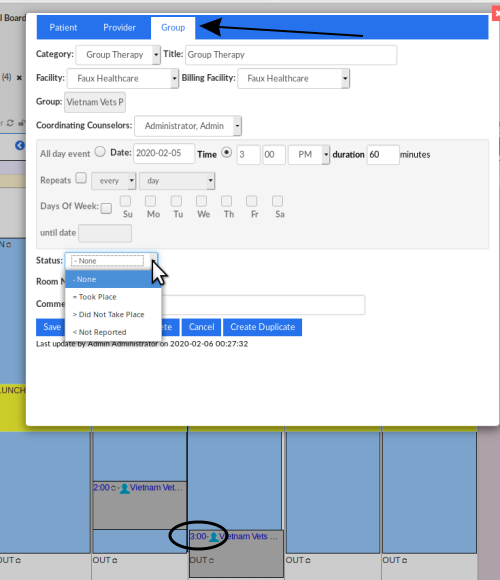
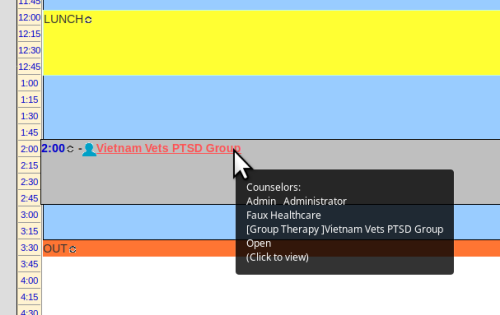
1. On the calendar, click the group session's time (oval at bottom, right)
- visually confirm you're looking at the 'Group' tab (arrow at top)
2. Open the Status dropdown and select 'Took Place'
(cursor arrow at right below)
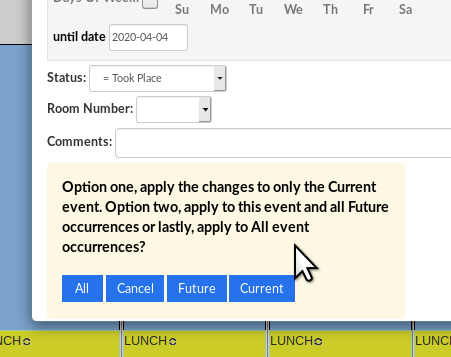
3. Click on 'Current' to indicate that only this day's session took place, not all the rest of the scheduled sessions.
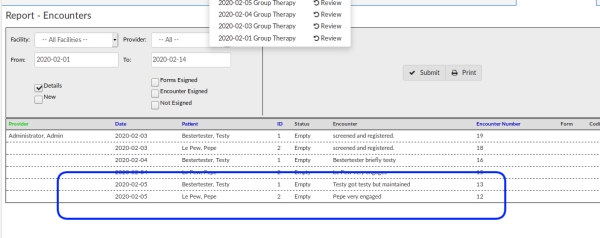
Here's an example of this group session appearing in a report.
This is 'Reports / Visits / Encounters' showing the group sessions that have been marked 'Took Place', and their participants, and any comments.
Create Group Encounter Form
Unlike the option that exists for a regular patient appointment the Groups module will not create a group encounter form when a group session is marked as 'Taken Place'. A suitably privileged staff will need to manually create one for a session for it to appear in reports and in the participants' records.
1. Either on the calendar click the group name...
... or from the main menu select 'Groups / Groups' then select the group name (not pictured)...
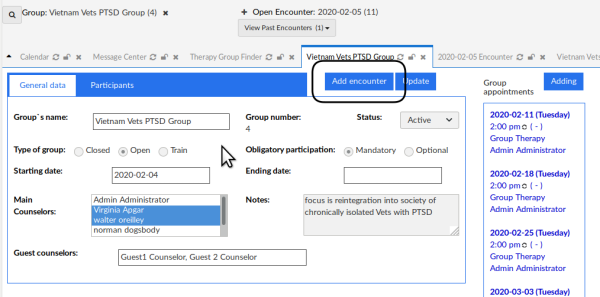
... and arrive at the Group Details screen
2. Click button 'Add Encounter' (round rectangle at top) to show the group encounter form.
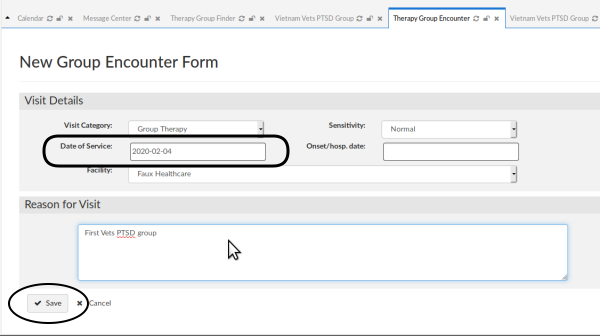
3. Set the date of service (round rectangle above)
- (it will default to the date you are making the encounter form)
4. Enter a comment on the group proceedings if desired (cursor arrow)
5. Click 'Save' (oval lower left)...
... and the encounter summary appears.
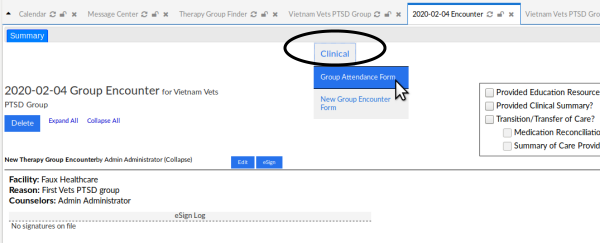
6. Click the 'Clinical' encounter menu item (oval above)
7. Select 'Group Attendance Form' in 'Clinical' menu list (cursor arrow above)
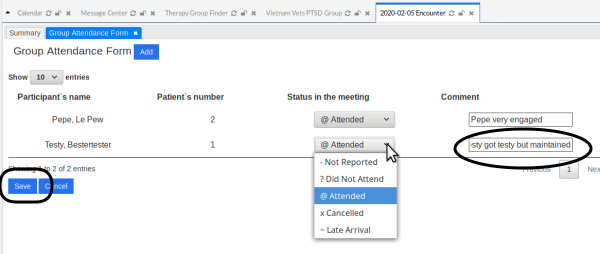
8. Select each participant's 'Status in the meeting' dropdown (cursor arrow below)
9. Add a comment on that patient's participation if desired (oval above)
10. Click 'Save' at lower left (round rectangle)
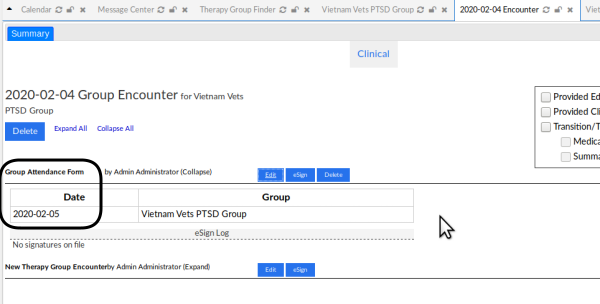
The session summary appears on the group encounter summary. The summary's date reflects when the encounter summary was created, and shows the session date in the 'Group Attendance Form' section (round rectangle below).
Each patient's group sessions appear in their encounter list
and 'Past Encounters and Documents' list (rectangles below).
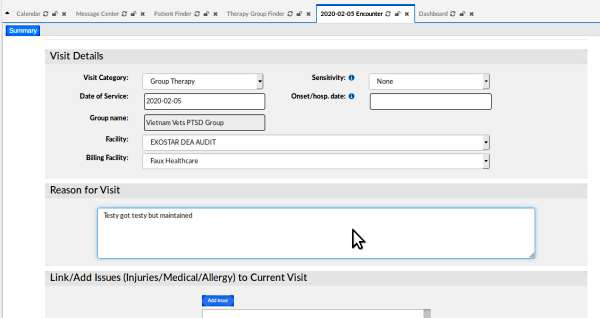
View a patient's participation note
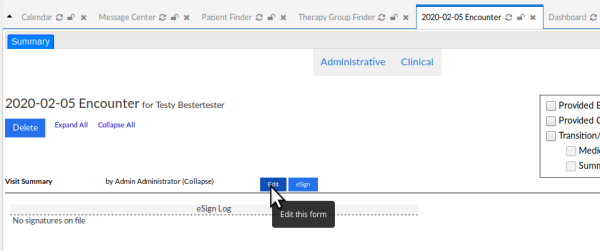
1. Click the session's listing in 'Past Encounters and Documents' (blue rectangle above) to display the patient's encounter summary.
2. Click the 'Edit' button...
- Note that similar to a regular encounter summary, group session encounters may be e-signed, which will register them in the relevant reports.
3. ... and read the participant's group encounter summary for that session (cursor arrow above) in 'Reason for Visit' text area.
Conclusion
The Groups module adds to OpenEMR the capability to log and track patients' participation in any sort of group session. Sessions are documented in a way that includes the data in reports and other EMR functions in the same manner as a regular patient appointment.


