Testing Stuff Out Page
Testing Stuff Out Page
Basic User ACLs in OpenEMR And How To Customize Them
Introduction
An OpenEMR user is able to do what they do in the EMR because the ACL (Access Control List) assigned to their user role gives them permission to do it. And as a bonus, OpenEMR provides a tool to create a custom ACL group containing a specific capability that can be added to any user's standard ACL.
WARNINGS/ Notes
- This is OpenEMR rocket science which if improperly used can be bad for your EMR data. I am simply showing you the tool; it is up to you to use it wisely.
- This tutorial is for those who know generally what ACLs are but not necessarily how OpenEMR uses them.
- One obstacle you will encounter doing this procedure is that the specific ACLs are poorly documented and it can take a lot of trial/ error to determine which ones grant precisely what access-- for example, our sample ACL modification shown below of editing Demographics also affects editing Insurance data. HOWEVER- once you know which ACL you’re working with, this doc will tell you how to use it.
- Custom ACLs can only be created by an OpenEMR Administrator.
- This document was made w/ the OpenEMR v7.0.1 public dev demo but the ACL Admin interface has not changed significantly since... v3?
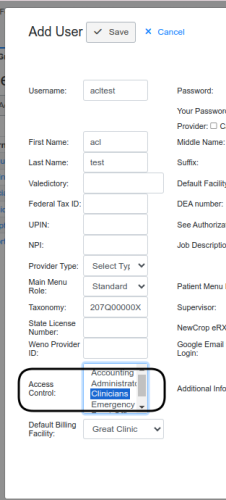
The main menu that a user sees when they log into OpenEMR depends on their ACL group, which is assigned in their User Profile (oval above).
All ACL groups appear in that list and any one or more can be assigned to a user, giving them access to the capabilities of all the selected groups.
Conversely, if a user does not have a particular ACL group assigned they will not see the menu items that it gives access to.
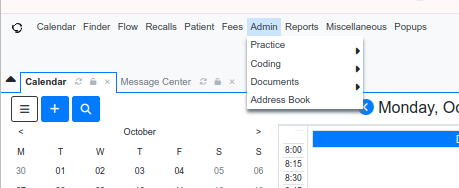
For example, when a user assigned to the ‘Front Office’ ACL group logs in they will have a much shorter 'Admin' main menu item compared to the Administrator's (next img below)
Basic OpenEMR ACLs
First let us look at the basics of OpenEMR ACLs then we'll create and use a custom ACL group.
The ‘Access Control List’
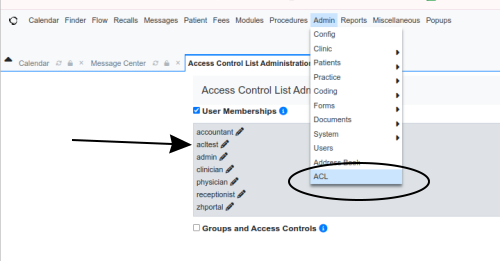
1. Open the 'Access Control List Administration' from the main menu: 'Admin/ ACL' (oval below)
- Initially only the ‘User Memberships’ panel is displayed open.
- ** the images in this doc are from the public demo and the usernames do not resemble real ones. I added user 'acltest' (arrow above) for this documentation **
Let us look at user acltest.
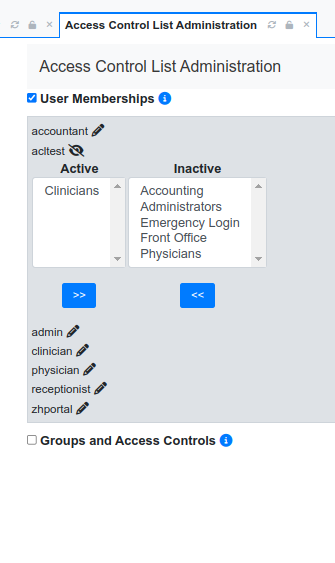
2. Click the pencil next to the user name to open their ACL list.
- The ACL group(s) that a user is assigned to are in their Active list in the left column. The ones that they are not are Inactive on the right.
3. The user’s ACL that was assigned in their profile as shown previously, will appear in the active column in this display.
ACL Groups
Below the ‘User Memberships’ panel:
1. Click in the checkbox next to 'Groups and Access Controls' to open it.
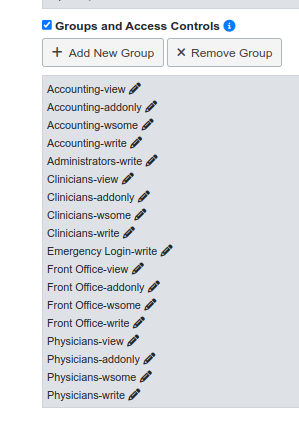
All the default ACL groups are listed here.
Each one has a modifier which determines the extent of the group’s access to the EMR content:
- [group]-view - read only
- [group]-addonly - may only add to but not modify existing content
- [group]-wsome - may modify limited parts of the content; the particular parts are variable depending on the content
- [group]-write - full editing access
2. Click on the pencil of the desired group.
All available ACLs are grouped beneath bold headings of the sort of access they relate to, for example: 'Administration', 'Encounters','Groups'.
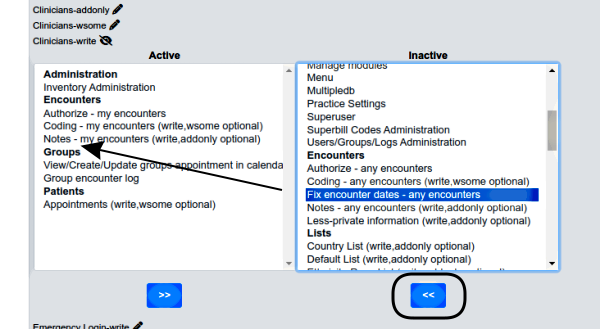
In this image, the Inactive column contains the ones not used by the Clinicians group; the ones they do use are moved over to the Active column.
The specfic ACLs are described to a limited extent in the wiki page: Access_Controls_Listing
Add ACLs to a Group
Looking in the Clinicians’ Active column (above) we see that normally Clinicians do not have the power to fix encounter dates. If you want to allow them that:
1. Click on the inactive ACL to highlight it, then
2. Click on the ‘<<’ button and it moves to the Active window.
- Removing ACLs of course goes the opposite way: highlight the Active item and click ‘>>’
With this procedure you may modify the capabilities of any group.
Create a Hybrid ACL Group
The thing to remember about adding an ACL to a group, as described above, is that everybody in that group will have that new capability.
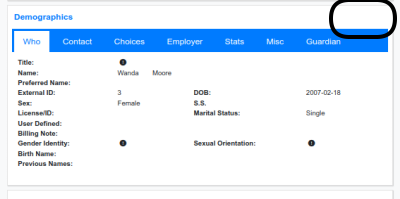
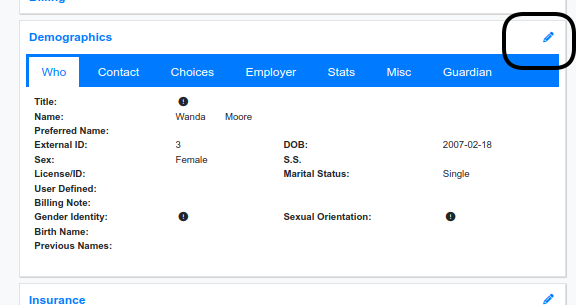
Looking at another example, some ACL groups normally do not have the ability to edit demographics. That is indicated here by no pencil in the demographics widget as viewed by a Clinician user.
If you want only one of your Clinicians, but not the rest of them, to be able to edit demographics you can make what I'm calling a 'hybrid ACL' and assign it to the user you want to be able to do that thing.
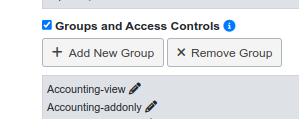
Let us go back to the Groups and Access Controls.
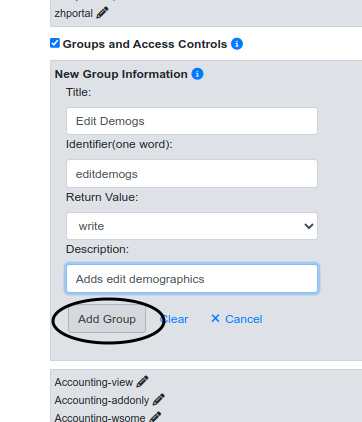
1. Click 'Add New Group' button
- the 'New Group Information' panel appears.
2. Fill in the details:
- Title - the name that appears in the 'Groups and Access Controls' list. May be multi-word but keep it brief
- Identifier - single word name for the new group
- Return Value - just go ahead and make it 'write' unless you know you want it different
- Description - free-text note about the group
3. Click 'Add Group' (oval above)
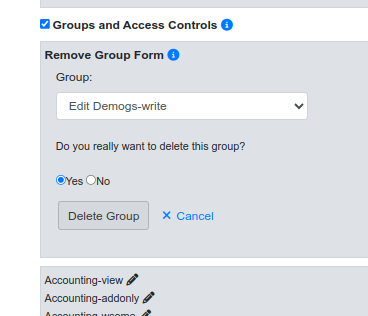
- QUICK NOTE: Once it is created you can't edit a new group's details.
So if you made a mistake just delete it and re-do it right.
- a. Click the 'Remove Group’ (found up by the ‘Add Group’ button)
- b. Select the group in the dropdown
- c. Click 'Delete Group'
Back to what we were doing:
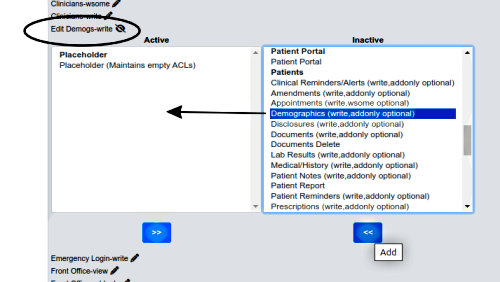
3. Clicking ‘Add Group’ puts the new group in the Groups list.
4. Open the new group (oval below)
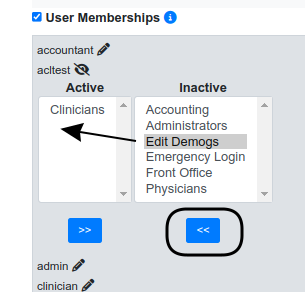
5. Select the inactive ACL you want (highlighted at right)
6. Click '<<' ...
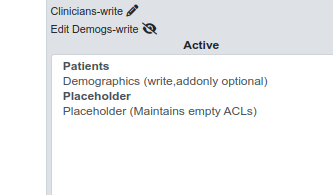
... to add it to the new group as active.
Last step: in the User Memberships panel locate the user you want to be able to do this.
7. Open the user
8. Select the custom group in their inactive window
9. Click '<<' to move it to active
10. Close the ACL tab and you’re finished.
The next time staffperson acltest logs in they should be able to edit demographics:
Conclusion
Be sure to use caution when editing any ACLs, including making these hybrid ACLs. On the whole, they're safe and predictable. However, not every one of the specific accesses they provide have been extensively documented and many of them will afford capabilities that are not obvious from the name.
One good way to gain more understanding of ACLs is to create a test user on your system. Modify their ACLs then log in in as them and see how their capabilities change as a result of different settings. But do it carefully-- be sure to keep notes of the changes you make so you can undo them if needed!
