Difference between revisions of "Backing Up Using the Built In Tools"
| Line 96: | Line 96: | ||
9. Supply the | 9. Supply the MySQL root password. If it has been lost, here is a [http://www.upubuntu.com/2012/02/how-to-change-reset-lost-mysql-root.html reset tutorial]. | ||
[[File:Restore4.png|center]] | [[File:Restore4.png|center]] | ||
Revision as of 12:35, 11 August 2014
Backup your Installation
Via the Web Interface
OpenEMR gives you a way to backup your data through the Web Interface:
- Go to Administration -> Backup
- Click the 'Create Backup' button on this page
- Save the emr_backup.tar file that it creates
I recommend renaming the file to indicate the date you ran the backup (ex., 'emr_backup_2010-02-18.tar' so that you know what date the backup was run. The tarball will contain the gzipped files openemr.sql.gz and openemr.tar.gz.
Note: The .tar file contains all of the data from your database as well as any scanned documents you have uploaded into OpenEMR. It is, therefore, Protected Health Information (aka PHI) and should be protected just like you would protect any PHI for your agency according to HIPAA and any other applicable guidelines.
Via the CLI
This method is designed to give you the same result as the GUI backup method.
For the following commands, you will need to ssh into the server.
- ssh into the server
ssh user@server.com
- You should also run pwd so that you know what the present working directory is (ie, where you are). If you ssh-ed in as root, then you should be in /root, if you ssh-ed as a user, then you should be in /home/yourusername. You need to know this location for future steps.
pwd
Get a backup of the database
The following command will dump the database structure and contents into a gzipped file in the present working directory.
- Run mysqldump and pipe the output to a gzip file
mysqldump --opt --quote-names -u openemr -p openemr | gzip > openemr.sql.gz
- The -p is a short form of --password and indicates that mysqldump should prompt you for the password after executing the command. Enter the password when prompted to do so. It will be the password you used when you installed the MySQL database for OpenEMR.
- The other options for mysqldump inicated above are
- --opt: optimizes the dump
- --quote-names puts backticks around the object names
- -u is a short form of --user and indicates the mysql user account to use when running the commmand (the username follows the option)
- the 'openemr' before the pipe indicates the name of the database to dump
Stay sshed in the server in order to do the next section.
Get a backup of the openemr folder
The following command will archive and compress the contents of /var/www/openemr and store it in the present working directory alongside the MySQL dump. note that this location may be different for different installation methods.
- Use tar to create and compress an archive of the openemr folder and store it in the same place you stored your mysql dump file
tar -C /var/www/openemr/ -zcf openemr.tar.gz ./
- The options on the tar command above are as follows
- -C: Change to the stated directory and run tar from there. It accomplishes the same as using cd to move to the stated location and then using cd to come back to the original directory when done.
- -z: Compress archive using gzip program
- -c: Create archive
- -f: Archive File name (ie, the name of the output tarball)
- -v: Verbose (ie, display progress while creating archive) If you want to see the terminal spit out a list of all the files being archived, you can include this option.
Stay sshed in the server in order to do the next section.
Tar the data and filesystem backups together
- Use tar to take the files created in the above sections and bind them into one file
- You can simply name the tar file 'emr_backup.tar' like the GUI process does and then rename the tar later. But why go through another step if you don't have to? You can name the tar file using the conventions mentioned above (ie, emr_backup_[date].tar) when you're making the tar.
tar -cvf emr_backup.tar openemr.sql.gz openemr.tar.gz
- The options on the tar command above are as follows
- c: Create archive
- v: Verbose (i.e display progress while creating archive) If you don't want to see the terminal spit out a list of all the files being archived, you can leave this option out.
- f: Archive File name
Recovery
General Directions
1. Move the emr_backup.tar to the home directory or where you are currently working.
2. Copy the restore script from /openemr/contrib/util/ to the home directory or current working location.
3. Delete the openemr directory from /var/www/
4. Run the restore script and proceed as prompted.
Using the Terminal
1. Copy emr_backup.tar and restore script to the home directory.
2. Delete the openemr web directory.
3. Open Terminal.
4. Issue this command after the dollar sign: sudo ./restore ($ sudo ./restore), 1 space after $ with no space before restore.
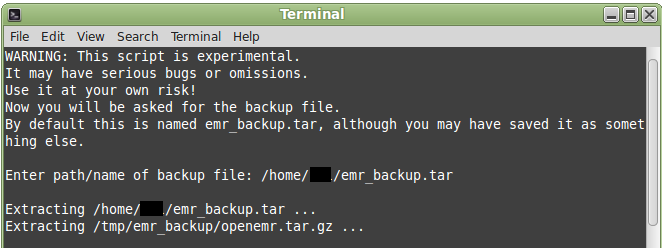
5. Path to the backup file: /home/<your home directory username>/emr_backup.tar
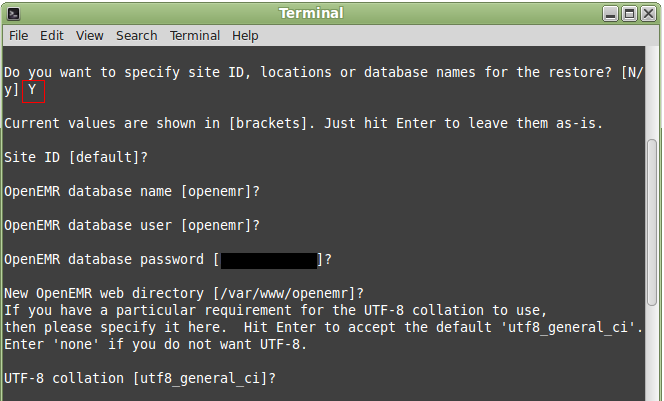
6. Answer Y when asked about supplying the site ID, etc.
7. If the practice has only 1 site, use the default values between the square brackets and hit enter each time.
8. If the practice has multiple sites, supply the relevant data.
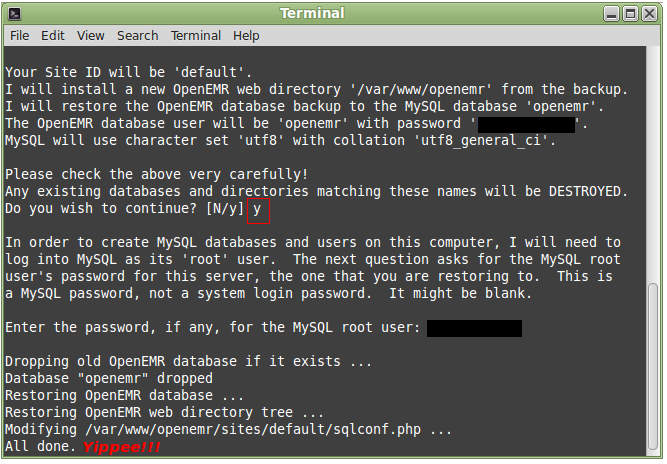
9. Supply the MySQL root password. If it has been lost, here is a reset tutorial.


