Difference between revisions of "Patient Portal Templates"
Harley Tuck (talk | contribs) |
Harley Tuck (talk | contribs) |
||
| Line 370: | Line 370: | ||
== Assigning Groups, Patients Or Profiles == | == Assigning Groups, Patients Or Profiles == | ||
The mechanism to assign is the same ‘drag and drop’ for all assignments.* simply drag left column item to below the desired heading in the right column | The mechanism to assign is the same ‘drag and drop’ for all assignments. | ||
* may un- assign by | * simply drag left column item to below the desired heading in the right column | ||
* may un- assign by dragging back to left column | |||
| Line 439: | Line 440: | ||
[[Image:tpla-04.png|right]] | [[Image:tpla-04.png|right]] | ||
== Edit The Template == | == Edit The Template == | ||
Revision as of 20:30, 13 January 2023
Introduction
OpenEMR’s Templates are a deep and complex topic. They have so much functionality built into them that this doc is only going to be a preliminary guide to their basic functionality; see the Conclusion below for links to the whole story.
Strictly speaking, OpenEMR uses more than one type of dicument template to create documents that are used in multiple areas of the EMR. The templates described here can be used for some of those other purposes but this tutorial only discusses their use in the Patient Portal.
Some aspects of template management in OpenEMR v 6.0 are fairly similar to OpenEMR v5 and that doc may be used for some additional background on the v6+ templates. However, the upgrade from 6.0 to 6.1 saw a significant improvement in the template management tool, so this doc of v6+ will include lots of new information.
For this tutorial I log in as the admin user, to the OpenEMR v6.1 public demo with demo data.
Template Organization
The high- level view of the template functionality:
- Document templates may be added to the list of documents that are available to a patient in their Patient Portal account.
- Templates can be organized by how they will be used or who will use them.
A few template management definitions:
- CATEGORY - a heading in the Documents list displayed in a patient’s Portal account, under which a template will be found. Categories are NOT required; if ommitted (i.e., the default 'General' category left as the only one), all templates will appear in the same list.
- PROFILE - a collection of templates that have a common theme or purpose. A template may be assigned to more than one profile; multiple profiles may be associated with one patient. And a profile may be associated with a Group (see below). For example, all the forms a new patient must fill out could be put in the 'New Patient' profile which is assigned to every new patient. If a specific set of documents are routinely given to all COPD patients, the templates could all be added to a 'COPD' profile.
- GROUP (AKA: 'GROUP BY CATEGORY') - a collection of patients who fit the group criteria. When a template profile is associated to that group, all patients in that group get the templates in that profile. For example, all patients who are being treated for a chronic pain can be assigned to a 'Chronic Pain' group and they will get the templates of any profiles associated with that group. If some of those patients happen to be in another group too, such as, 'School Children', they will get all the templates associated with both Chronic Pain and School Children.
- One can create as many groups as necessary to accommodate all of the practice's patient population.
Template Tasks
Create Custom Categories, Profiles And Groups
It is helpful if your template collections are meaningfully named for your practice’s procedures and workflows. Here's how to edit the existing names or create your own.
Note:
- A few Categories, Profiles and Groups are already named in the list manager by default. However, to demonstrate the steps of creating a new one we will create the 'School Notes' Category. Use these same steps to edit the other default items if desired; just be sure to leave the 'Repository' and 'General' categories alone.
- The list named 'Patient Groupings' (called simply 'Groups' in the template manager) is pre-populated by 'Group I’, ‘Group II’, etc. Those names are not very descriptive; you are certainly free to rename them all to something meaningful to your practice's workflows.
1. From Main menu: Admin/ Forms/ Lists
2. Enter to select the desired list:
- Document Template Categories /or/
- Document Template Profiles /or/
- Patient Groupings
3. Edit the columns as desired but remember:
- ID - must be alphanumeric and unique to the list
- Title - alphanumeric with spaces
- Order - determines the item's display order in the dropdown list. It is prudent to leave values between items (e.g., 10, 20, 30…) for future additions that you want to appear between the existing ones
- Default - leave unselected in these lists
- Active - only active items will appear on the lists; may inactivate to remove from display
- Notes - explanatory comments not visible outside list editor
- Codes - N/A in this application
Initial Assignment of Patients to Groups
When a new patient’s record is created they should be assigned in their Demographics to at least one Group even if it’s ‘Unspecified’
In the patient record dashboard near the bottom of the ‘Choices’ panel (below), the ‘Patient Categories’ list: select the groups they belong to.
- Ctrl+left click to select multiple items
Prepare To Use Templates
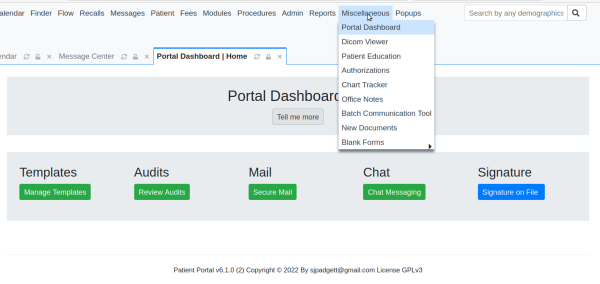
1. Open the Template Manager from the main menu (below):
Miscellaneous/ Portal Dashboard
2. Click the 'Manage Templates' button.
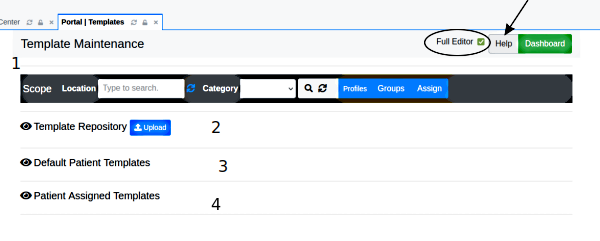
3. … which opens the ‘Template Maintenance’ panel
The elements at top of the panel (numbered items top to bottom)
- 'Full editor' (oval) - keep selected if you might want to use the native template editor
- 'Help' (arrow) - displays the template developer's explanation of the Templates, a good perspective w/ additional info from what is included in this doc.
Note, the ‘Help’ was written before some interface revisions so some terminology is inconsistent
- 'Dashboard' green button takes you back to the dashboard screen
Major sections of the screen:
1. 'Scope' bar - the tool to change templates' locations and assign them to different collections
2. 'Template Repository' - the default location of all templates, from where they can be assigned to different locations
3. 'Default Patient Templates' - the listing of all active templates, which appear in all patients' portal Documents list, with the categories to which they are assigned.
4. 'Patient Assigned Templates' - the collection of templates that are assigned to specific patients. Will be empty in a new OEMR instance
Click on the 'eye-con' (Get it? 'eye icon'?)
to expand that section.
Upload A Template
0. Have the template stored in your local system where it can be accessed by the file upload dialog.
1. Click the blue 'Upload' button in the Template Repository section
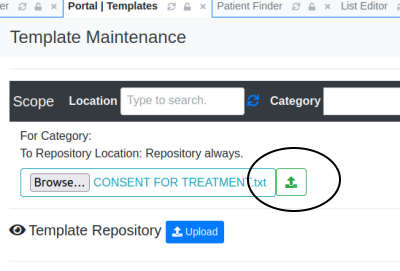
2. Click the revealed 'Browse' button, browse to the locally stored template* upload the file
(not shown- your upload dialog may vary)
3. With the template file name now showing, click the green up arrow button (oval).* The display will return to its original state.
4. Click the 'Template Repository' eye-con (arrow below) to see the new template added to the Repository (oval)
All uploaded templates automatically go to the Template Repository's General list first to be assigned to other locations from there.
Assign A Template's Location
A template's category may be assigned or changed
In the Template Repository:
- 1. Select the 'Send' checkbox for the desired template (oval above)
- 2. Choose its new category in the dropdown (rectangle)
- 3. Check the 'Location' text area in the 'Scope' bar. If anything is there click its red ‘x’ to remove it
- 4. Click the Scope bar’s green 'Send' button (arrow)
Templates may be assigned to multiple different categories; simply repeat the assignment procedure for each different category.
A template may be assigned to a specific patient.
From the Template Repository (picture above)
- 1. Select the template's 'Send' checkbox
- 2. Click 'Location' text area in ‘Scope’ bar and select the patient(s) to assign the template to (may ctrl+click multiple names)
- 3. Click the green 'Send' button
See the template in its new location by clicking the eye-con in 'Patient Assigned Templates' section at the bottom of the 'Template Maintenance' screen (pic below)
Click on the patient name to reveal the list of templates assigned to that patient
As shown in the portal
The pic below shows the changes that have been described above, as they would display in the portal.
1. Document templates have green titles; category names are black.
2. Note the non-default template category, ‘School Notes’.
- Any custom category names will appear indented with the templates that are assigned to them listed underneath.
3. The uploaded custom template, ‘Consent For Treatment’ assigned to category ‘School Notes’* Templates left in the ‘General’ category will simply be listed with the default templates.
Assigning Groups, Patients Or Profiles
The mechanism to assign is the same ‘drag and drop’ for all assignments.
- simply drag left column item to below the desired heading in the right column
- may un- assign by dragging back to left column
Numbered buttons above relate to numbered sections below:
1. Profiles – assign templates to profiles* if a form needs to be re-signed every so often, the time interval to prompt may set in text area at top right
2. Groups – assign patients to groups* Phil’s name has been dragged from the left column to Groups I and III in the right column
- he is now assigned to both Groups
3. Assign – assign groups to the template profiles which their members receive* Patients in Group I get templates for all Registration profile documents
Edit The Template
To edit a template with the native 'pop-up editor', click on the template name’s blue button in the 'Template Actions' column (round rectangle below)
The editor popup window pops up with the file in it
- the text body of the template displays as unformatted text (round rectangle)
- use the standardized editing controls (oval) in the customary fashion to modify the text
- insert data tags by clicking on them in the right ‘Directives’ column (arrow)
- per the module developer the template editor is good for limited edits but lacks capability for full- fledged template composition.
See this page’s ‘Conclusion’ for links to documentation on creating and editing templates.
Conclusion
Multiple document formats may be used as templates, including OpenEMR's native LBFs. Each document format requires different methods to create temolates and because of this complexity, instructions on how to make templates will need to be found elsewhere. The forum has a bazillion posts on templates in the portal, and templates in general. I'll list ones that seem relevant but be ware, they may refer to different emr vers than you have!
Some common aspects of Template management between OpenEMR v5 and OpenEMR v 6+ are fairly similar, as described for v5 in [[Patient_Portal_Document_Templates]]. This reference is for deep background only; plenty of workflow changes have been added.
The most up to date explanation by template dev SJP is here:
https://community.open-emr.org/t/newly-revamped-patient-portal-v6-0-4-and-future-v6-1-0/17776
and it has some useful details slightly outside the scope of this doc, i.e., notes re: iPhone usage.
Important additions and updated notes on template use including: importing existing templates, making assignments, new template directives
https://community.open-emr.org/t/new-portal-patch-v6-0-4-and-v6-1-0/17781
Newest feature as of Nov 2022:
https://www.open-emr.org/lectures/#openemr-form-builder-new-feature-quick-and-easy-form-builder
Portal Dev SJP has made a video walking through the portal.


