Difference between revisions of "CAMOS module"
Bradymiller (talk | contribs) |
Bradymiller (talk | contribs) |
||
| (14 intermediate revisions by 3 users not shown) | |||
| Line 5: | Line 5: | ||
CAMOS (Computer Aided Medical Ordering System) is, on the surface, just a fancy interface for organizing and choosing pieces of text to insert into a patient's chart. It is designed to be intuitive and easy to use. | CAMOS (Computer Aided Medical Ordering System) is, on the surface, just a fancy interface for organizing and choosing pieces of text to insert into a patient's chart. It is designed to be intuitive and easy to use. | ||
Screenshots in this document were taken from a stock instance of OpenEMR v-4.1.1 installed on a Lenovo Thinkpad netbook running Linux Mint 13 (64 bit), equivalent to Ubuntu 12.04 Precise Pangolin. The data in the displays comes from random simulated patient data generated by the excellent [http://open-emr.org/wiki/index.php/OpenEMR_Tools PrintaPatient] package. | |||
==Configuration== | |||
To use this module/form, it needs to be turned on within OpenEMR: | |||
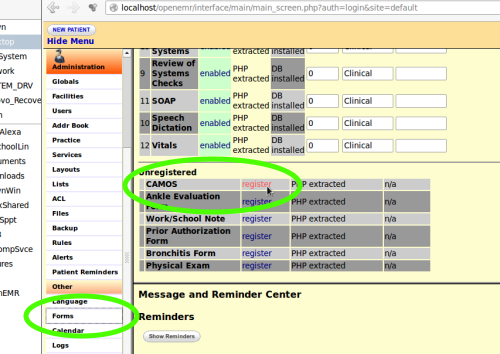
:1. Goto: Administration => Other => Forms | |||
:2. Click 'register' on CAMOS entry (in the Unregistered section) | |||
[[File:Cam-01-RegCam.png|center]] | |||
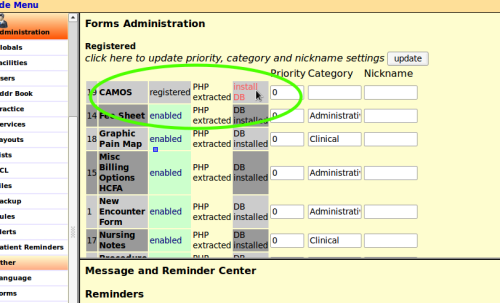
:3. Click 'Install DB' on CAMOS entry (it is now in the Registered section) | |||
[[File:Cam-02-instDb.png|center]] | |||
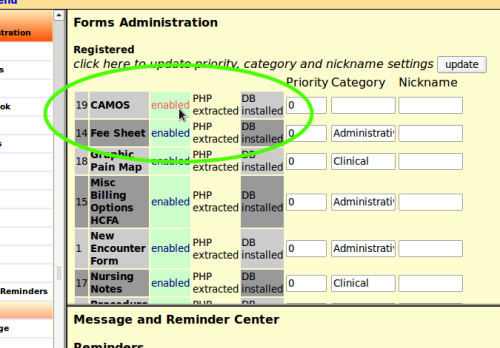
:4. Click 'disabled' on CAMOS entry (note it switches to 'enabled', which mean it is turned on. | |||
[[File:Cam-03-enableCam.png|center]] | |||
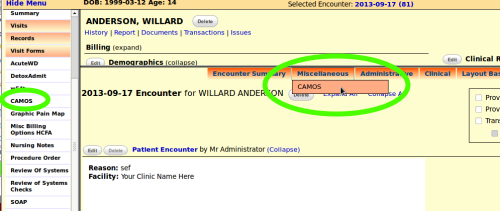
:5. Log out and log back in. CAMOS will now show up as a form. | |||
::*In the Patient/Client->Visit Forms | |||
::*In the Patient/Client->Visits->List (click on an encounter, then it's listed at right with other forms) | |||
[[File:Cam-04-openInEnc.png|center]] | |||
==Basic Use== | ==Basic Use== | ||
===Video Tutorial=== | |||
{{#ev:youtube|ctNfcGdhtTw|300||'''OpenEMR CAMOS Tutorial'''}} | |||
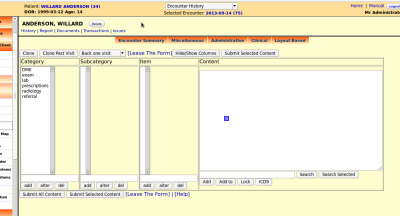
[[File:Cam-05-CAM-opened.png|center]] | |||
===Sample CAMOS Note=== | |||
One may either '''compose a note''' for entry into the patient's encounter form, or '''create new''' CAMOS content. The steps for each process are similar. | |||
:1. | |||
:'''Compose a note:''' | |||
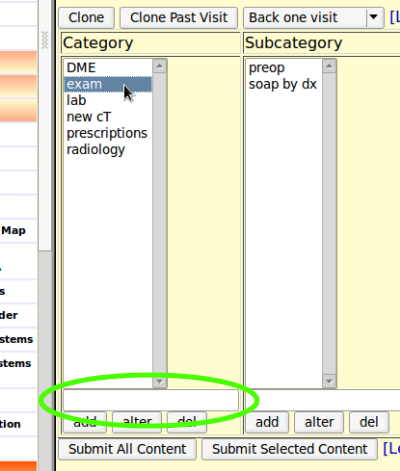
:Select the category of the CAMOS note. | |||
:The CAMOS screen opens with the subcategories displayed, of the selected category. | |||
:'''Create a new Category''' | |||
:Enter its name in the green circled text area above the buttons for the Category column. | |||
[[File:Cam-06-selCat.png|center]] | |||
:2. | |||
:'''Compose a note:''' | |||
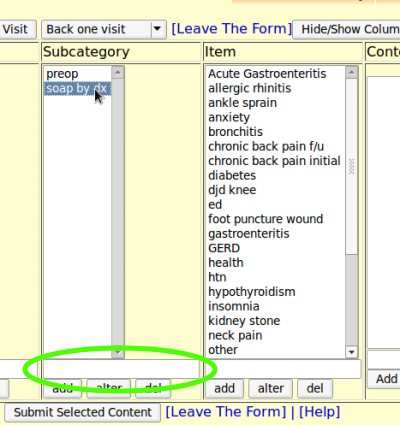
:Select the desired subcategory | |||
[[File:Cam-07-selSubcat.png|center]] | |||
:'''Create a new Subcategory''' of the new category | |||
:Enter its name in the green circled text area above the buttons for the Subcategory column. | |||
:3. | |||
:'''Compose a note:''' | |||
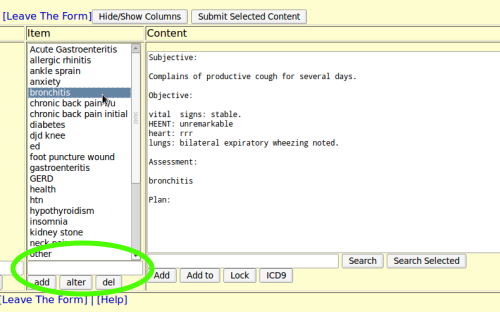
:Select the desired item of the subcategory | |||
[[File:Cam-08-selItem.png|center]] | |||
The note content pertaining to that item is displayed in the Content text area. | |||
enter text in txt area above buttons for this column. | |||
:'''Create a new Item''' of the new Subcategory | |||
:Enter its name in the green circled text area above the buttons for the Item column. | |||
4. | |||
:'''Compose a note:''' | |||
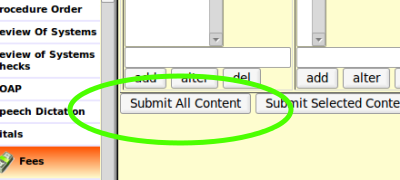
:If the entire SOAP note in the Contents is to be inserted into the current encounter note, click the button, "Submit all content" at lower left of CAMOS module | |||
[[File:Cam-09-SubAll.png|center]] | |||
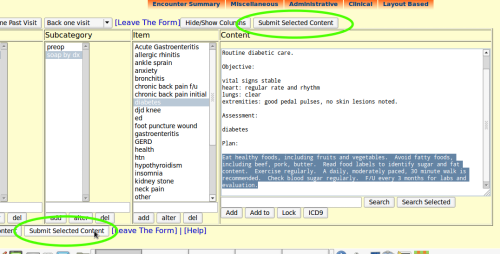
:If only a portion of the Contents is to be inserted into the current encounter note, highlight the desired text and click "Submit Selected Content" above Content area or at lower left of CAMOS module | |||
[[File:Cam-10-subSelContent.png|center]] | |||
:'''Create a new Item''' | |||
:Manually enter the Content to be associated with this new CAMOS item. | |||
::Creating or changing the text of the Contents area is different than editing the Category, Subcategory and Item columns. | |||
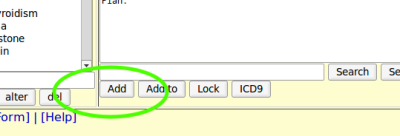
::Directly edit the text then when it is ready to be saved, click the "Add" button | |||
:::'''Be Wary of the 'ADD TO' button, it may not perform as advertized.''' | |||
[[File:Cam-11-AddContent.png|center]] | |||
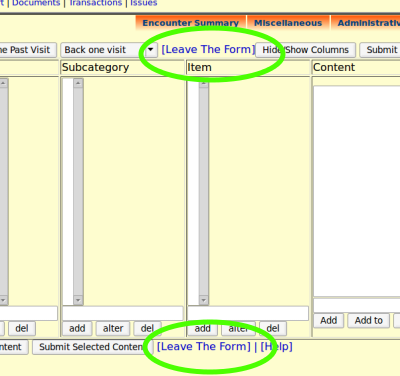
5. Click the link "[Leave The Form"]" to exit the CAMOS module. | |||
[[File:Cam-12-LeaveForm.png|center]] | |||
The Content appears in the current encounter note. | |||
[[File:Cam-11-ContentInEnc.png|center]] | |||
===Bottom row of buttons=== | ===Bottom row of buttons=== | ||
[[File:Cam-05-BottomButtons-L.png|left]] | |||
[[File:Cam-05-BottomButtons-R.png|right]] | |||
'''add''' button - Type something in the text box above the button and it will be added to the column above. | '''add''' button - Type something in the text box above the button and it will be added to the column above. | ||
| Line 30: | Line 144: | ||
'''search selected''' button - Like the search button described above, but searches are limited by what is selected in the columns. | '''search selected''' button - Like the search button described above, but searches are limited by what is selected in the columns. | ||
'''Additional features of search box''' - If you | '''Additional features of search box''' - If you enter a colon (':') in the search box and click the 'Search' button, patient data will be displayed with results. If you enter a double colon ('::'), patient data and phone number data will be displayed with results. If you put a first and/or last name in any order before the colon, results for matching names will be displayed. If you put the word 'this' before the colon, the current selected patient's data will be displayed. Words after the colon will be used as search terms. These features work with the 'search' and 'search selected' buttons. | ||
===Top Row of Buttons=== | ===Top Row of Buttons=== | ||
[[File:Cam-14-TopButtons.png|center]] | |||
'''clone''' button - Searches for list of entries in this patient's history under the selected category and returns the most recent of each. Data is displayed in the content box in camos function format (see advanced section below). | '''clone''' button - Searches for list of entries in this patient's history under the selected category and returns the most recent of each. Data is displayed in the content box in camos function format (see advanced section below). | ||
| Line 43: | Line 158: | ||
==Prescription and Progress note Printing== | ==Prescription and Progress note Printing== | ||
[[File:Cam-13-ClickRx.png|center]] | |||
After leaving the CAMOS form, Your entries will show with a link titled 'rx'. Click on this link, choose which items to print with checkboxes and submit. Make sure to set all margins to zero and print in landscape mode. There are a variety of other links as well. 'sig_rx' generates prescriptions with a signature image. The user must create a signature image and name it sig.jpg in the CAMOS directory for this to work. 'Print This Encounter' and 'Print Any Encounter' allow for printing of progress notes. The vitals table data and CAMOS data are integrated. The format depends on having CAMOS categories 'exam' and 'prescriptions'. For customization, programmers can edit the file notegen.php. Forms other than vitals and CAMOS will not appear in these notes. | After leaving the CAMOS form, Your entries will show with a link titled 'rx'. Click on this link, choose which items to print with checkboxes and submit. Make sure to set all margins to zero and print in landscape mode. There are a variety of other links as well. | ||
[[File:Cam-13-FillRx.png|center]] | |||
'sig_rx' generates prescriptions with a signature image. The user must create a signature image and name it sig.jpg in the CAMOS directory for this to work. 'Print This Encounter' and 'Print Any Encounter' allow for printing of progress notes. The vitals table data and CAMOS data are integrated. The format depends on having CAMOS categories 'exam' and 'prescriptions'. For customization, programmers can edit the file notegen.php. Forms other than vitals and CAMOS will not appear in these notes. | |||
==Advanced Use== | ==Advanced Use== | ||
| Line 161: | Line 281: | ||
==Module Author== | ==Module Author== | ||
Mark Leeds (can contact on the OpenEMR sourceforge development forums) | Mark Leeds (can contact on the OpenEMR sourceforge development forums) | ||
[[Category:User Guide 4.2.0]][[Category:User Guide 4.1.2]][[Category:User Guide 4.1.1]][[Category:User Guide 4.1.0]][[Category:User Guide]][[Category:Video Tutorial]] | |||
Latest revision as of 06:33, 15 March 2015
Introduction
CAMOS (Computer Aided Medical Ordering System) is, on the surface, just a fancy interface for organizing and choosing pieces of text to insert into a patient's chart. It is designed to be intuitive and easy to use.
Screenshots in this document were taken from a stock instance of OpenEMR v-4.1.1 installed on a Lenovo Thinkpad netbook running Linux Mint 13 (64 bit), equivalent to Ubuntu 12.04 Precise Pangolin. The data in the displays comes from random simulated patient data generated by the excellent PrintaPatient package.
Configuration
To use this module/form, it needs to be turned on within OpenEMR:
- 1. Goto: Administration => Other => Forms
- 2. Click 'register' on CAMOS entry (in the Unregistered section)
- 3. Click 'Install DB' on CAMOS entry (it is now in the Registered section)
- 4. Click 'disabled' on CAMOS entry (note it switches to 'enabled', which mean it is turned on.
- 5. Log out and log back in. CAMOS will now show up as a form.
- In the Patient/Client->Visit Forms
- In the Patient/Client->Visits->List (click on an encounter, then it's listed at right with other forms)
Basic Use
Video Tutorial
Sample CAMOS Note
One may either compose a note for entry into the patient's encounter form, or create new CAMOS content. The steps for each process are similar.
- 1.
- Compose a note:
- Select the category of the CAMOS note.
- The CAMOS screen opens with the subcategories displayed, of the selected category.
- Create a new Category
- Enter its name in the green circled text area above the buttons for the Category column.
- 2.
- Compose a note:
- Select the desired subcategory
- Create a new Subcategory of the new category
- Enter its name in the green circled text area above the buttons for the Subcategory column.
- 3.
- Compose a note:
- Select the desired item of the subcategory
The note content pertaining to that item is displayed in the Content text area. enter text in txt area above buttons for this column.
- Create a new Item of the new Subcategory
- Enter its name in the green circled text area above the buttons for the Item column.
4.
- Compose a note:
- If the entire SOAP note in the Contents is to be inserted into the current encounter note, click the button, "Submit all content" at lower left of CAMOS module
- If only a portion of the Contents is to be inserted into the current encounter note, highlight the desired text and click "Submit Selected Content" above Content area or at lower left of CAMOS module
- Create a new Item
- Manually enter the Content to be associated with this new CAMOS item.
- Creating or changing the text of the Contents area is different than editing the Category, Subcategory and Item columns.
- Directly edit the text then when it is ready to be saved, click the "Add" button
- Be Wary of the 'ADD TO' button, it may not perform as advertized.
5. Click the link "[Leave The Form"]" to exit the CAMOS module.
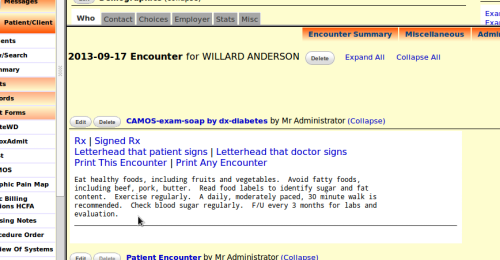
The Content appears in the current encounter note.
Bottom row of buttons
add button - Type something in the text box above the button and it will be added to the column above.
alter button - Select text in the column above and type something in the text box above the button and the column text will be altered.
del button - Select text in the column above and press the button to delete it. In the 'Item' column, you can use your 'Ctrl' key (PC) or Apple key (Mac) and click multiple items for deletion.
submit all content button - Submit text in content box to patient's chart.
submit selected content button - Submit only selected text in content box to patient's chart. This does not work in Internet Explorer.
add to button - Like the add button for content but instead of replacing existing content with new, it appends the new text to the existing content.
lock button - Inserts text: '/*lock::*/' which prevents accidental deletion. Admittedly a dumb way to do it, but maybe helpful.
icd9 button - Inserts icd9 codes from billing table for this encounter. You have to remember to enter them first before viewing this form.
search button - Searches content from form_CAMOS table based on keywords entered in text box to the left of the button. Starting the keywords with the word 'codes' or 'billing' will search the codes or billing table for matching icd9, cpt4 or other codes. Data is displayed in the content box in camos function format (see advanced section below).
search selected button - Like the search button described above, but searches are limited by what is selected in the columns.
Additional features of search box - If you enter a colon (':') in the search box and click the 'Search' button, patient data will be displayed with results. If you enter a double colon ('::'), patient data and phone number data will be displayed with results. If you put a first and/or last name in any order before the colon, results for matching names will be displayed. If you put the word 'this' before the colon, the current selected patient's data will be displayed. Words after the colon will be used as search terms. These features work with the 'search' and 'search selected' buttons.
Top Row of Buttons
clone button - Searches for list of entries in this patient's history under the selected category and returns the most recent of each. Data is displayed in the content box in camos function format (see advanced section below).
clone last visit button - Returns all CAMOS submitted items from last encounter plus billing table data. Data is displayed in the content box in camos function format (see advanced section below). By last encounter, we mean the last encounter which has billing entries associated with it.
Leave The Form link - Leave the CAMOS form without saving data to patient's chart.
help link - Access help page.
Prescription and Progress note Printing
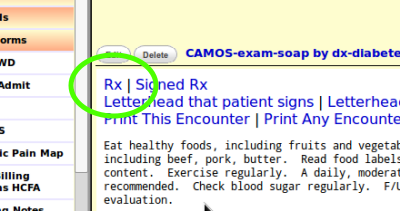
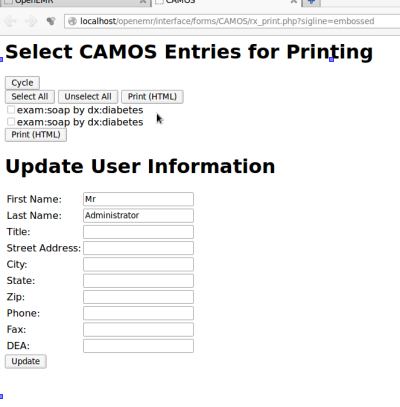
After leaving the CAMOS form, Your entries will show with a link titled 'rx'. Click on this link, choose which items to print with checkboxes and submit. Make sure to set all margins to zero and print in landscape mode. There are a variety of other links as well.
'sig_rx' generates prescriptions with a signature image. The user must create a signature image and name it sig.jpg in the CAMOS directory for this to work. 'Print This Encounter' and 'Print Any Encounter' allow for printing of progress notes. The vitals table data and CAMOS data are integrated. The format depends on having CAMOS categories 'exam' and 'prescriptions'. For customization, programmers can edit the file notegen.php. Forms other than vitals and CAMOS will not appear in these notes.
Advanced Use
For the advanced user
Accessing CAMOS from outside of an encounter.
The CAMOS form has uses that are not related to a patient encounter. For example, you may maintain a list of referral sources to submit in a patient's chart if you wish to refer the patient, but you may want to look at referral data in CAMOS without going into the chart. This would be like CAMOS doubling as a phone book. Another use is to build up content data for future use without having to go into a patient's chart. To access CAMOS externally, setup a bookmark or link with the following url:
http://webroot/interface/forms/CAMOS/new.php?mode=external
This will hide buttons which should not be used if you are not in an encounter.
Comments
CAMOS supports C style comments. Here is how they work. A comment opens with /* and closes with */. You cannot nest comments. You cannot overlap comments. Anything in a comment will be seen within CAMOS in the item window, but it will not show when you enter it into the patient's chart. This is useful for making notes on items that are not appropriate to go in the chart. You may want, for example, to document which insurance a particular facility accepts.
/* Accepts BC/BS */   ok
/* rx list follows */ ok
/* /*     */ */       not right
Special Double Clicking
Double clicking between the comment delimiters /* and */ in the content box will select the delimiters and text between them. Double clicking again, will remove surrounding text other than what was selected (crop to selection). Double clicking a third time will return removed text to the content box. This is useful for managing data formatted as embedded functions as described below and with the submit selected content button.
Embedded functions
Embedded functions are contained within comments. The first word is the function name. A '::' follows, and then a list of function arguments, each seperated by '::'.
The billing function
If you want to enter an entry into the billing table to have, for example, a CPT4 or ICD9 code come up after entering a CAMOS form into a patient's chart, do this:
billing function signature
/*billing::code_type::code::code_text::modifier::units::fee::justify1::justify2*/
Examples
/*billing::CPT4::80054::CMP:: :: ::50.00*/ /*add a cmp for $50*/
/*billing::CPT4::85024::CBC:: :: ::25.00*/ /*add a cbc*/
/*billing::CPT4::80061::Lipid Panel:: :: ::50.00*/
/*billing::ICD9::V70.0::physical:: :: ::0.00*/ /*this is a diagnosis, not a procedure*/
The camos function, CAMOS calling CAMOS:
This function is used by the cloning features. You may take advantage of it yourself. Obvserve how it is used. Keyword is 'camos' and arguments are category, subcatory, item, content.
The replace function. Used as follows:
Atenolol 50mg
/*replace::30 tablets qd*/
In this example, the replace function looks for an 'item' entry called '30 tablets qd' and replaces the function call with the text from the associated content box. This replace function works recursively, meaning that if the text which is used in the replacement contains a call to 'replace' itself, this will be called as well. Other function calls will be executed only after all replace calls are completed.
The vitals function. Used as follows:
/*vitals::wt::ht::bps::bpd::pulse::temp*/
This function submits vital sign data to the vitals table.
The date_add function. Used as follows:
/*date_add::x*/
This function call is replaced by the day of the week and date x days from the encounter date.
The date_sub function. Used as follows:
/*date_sub::x*/
Same as date_add but it subtracts x days from the encounter date.
The appt function. Used as follows:
/*appt::x::time*/
This function submits an appointment to the calendar x days from the current date at time. Note: this needs work. The function may not submit all of the data required for the appointment to actually appear in the regular calendar, so it's probably not too useful to anyone at this point.
patientname, patientage, patientgender, doctorname. Used as follows:
patientname is a patientage year-old patientgender patient of doctorname.
These keywords are substituted with the appropriate information from the patient's demographic data.
Trouble Shooting
Data in the 'category', 'subcategory' and 'item' columns and the 'content' box disappear and the form becomes non-functional (none of the buttons do anything). - This is caused by bugs that corrupt the Javascript code as it is generated by PHP. We hope that these bugs have been eliminated, but there is the possibility of unforseen use that may cause it to happen again. First, exit the form and re-enter it. If everything comes back as normal, remove the most recently entered data into the form. If not, you will have to go into the database to correct the problem. Be careful to back up your data first. If your most recent entry before the problem was to the 'category' column, remove the last entry to the form_CAMOS_category table. If your most recent entry before the problem was to the 'subcategory' column, remove the last entry to the form_CAMOS_subcategory table. If your most recent entry before the problem was to the 'item' column, remove the last entry to the form_CAMOS_item table. If your most recent entry before the problem was to the 'content' box, remove the last entry to the form_CAMOS_item table. Please make a note of the offending data which caused the problem and report it on the developer's forum at http://sourceforge.net/projects/openemr/forums .
Other bugs or unusual behavior - please report to the forum at the above link.
Import/Export
http://webroot/interface/forms/CAMOS/admin.php
NOT FOR PRODUCTION USE YET! Try on test servers only where lost data will not be important.
Module Author
Mark Leeds (can contact on the OpenEMR sourceforge development forums)
