Difference between revisions of "Eye Exam"
Ray Magauran (talk | contribs) |
|||
| (117 intermediate revisions by 2 users not shown) | |||
| Line 1: | Line 1: | ||
[[File:Eye feature.png|right|250px|thumb|'''Eye (Ophthalmology/Optometry) Module''']] | |||
[[File:ONC_Certification_HIT_2015Edition.jpg|250px|right|border|link=]] | |||
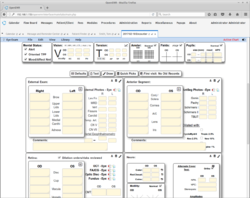
This document provides an in depth look into the usage of the OpenEMR Eye Exam form. | |||
= General overview = | |||
[[File:Eye feature.png|right|250px|thumb|'''Eye (Ophthalmology/Optometry) Module''']] | |||
The Eye Exam is an OpenEMR form for ophthalmology and optometry. It is feature rich, yet remarkably simple to use. It is written to mirror the workflows of the provider. Given that workflows vary from provider to provider, the Eye Exam is adaptive and seeks to learns the preferences of each provider, based on how it is used by a given doctor. It's like it is alive. At least that is how we want it to appear. It is listening to what you do as you do it, and learns. The more you use it, the more it learns. The more it learns, the more feedback it can give you. | |||
The Eye Form is one page. No need to click around looking for data - it is all in front of you. | |||
When a provider documents something, it is stored. Done. No submit button. No clicks. Just move on to the next patient. | |||
And how can a provider document? Text/Shorthand/Draw? Yes, yes and yes. | |||
:* Text input is boring, but the standard in EHRs. Better get a scribe if you want to remain productive and plan to use this technique exclusively. | |||
:* Drawing. Well, the technology is getting better but it is not the best way to complete a whole exam. The Eye Exam has draw sections for each area because, as eye doctors, we like pictures. Use a pen, a mouse or a touch screen. It's all good when it comes to this form. | |||
:* Shorthand. To the non-ophthalmologist/optometrist, this is total Greek. But to eye doctors, this is "totally, outrageously awesome". It turns your chicken-scratch into pure prose at the speed of your brain. | |||
:* Old Records are always available, on the one page still, to compare or pull-forward into the current chart. And you can pull forward one clinical section, or all of it. | |||
What does the form do with your clinical input, beside storing it? Is it really alive? | |||
:* It integrates with the OpenEMR Care data management plans. | |||
:* It recognizes diseases and translates them into diagnostic codes. | |||
:* It builds your Impression Plan. | |||
:* It suggests a billing code for the visit. | |||
:* It builds your routing slip/Fee Sheet. | |||
= Documentation/Display Options = | |||
Different users interact with EMRs in different ways. Sometimes we want to draw a picture, other times we need to write out our findings in detail. With the OpenEMR: Eye Exam, you can use a number of different methods to document your exam. | |||
:* <b>TEXT:</b> fill in anatomic-specific fields with text by typing | |||
:* <b>PULL FORWARD:</b> pull-forward values from an earlier encounter | |||
:* <b>DRAW:</b> draw your findings | |||
:* <b>QUICK PICKS:</b> select from a dynamic list of clinical findings | |||
:* <b>SHORTHAND:</b> a rapid method for entering findings via the keyboard based on traditional shorthand used with paper charts. | |||
:* <b>DICTATION:</b> users facile with the Shorthand module and with dictation software can dictate their notes in shorthand format directly into the Shorthand zone, or directly into the fields with the aid of their mouse to navigate through the EMR. | |||
:* <b>DEFAULTS:</b> populate the form with default values. | |||
NOTE: Active Charting vs. READ-ONLY mode: | |||
: | |||
: | |||
{{#ev:youtube|DkpJKN-dhsk||'''Right Panel'''}} | |||
== Text == | == Text == | ||
Using the tab key or mouse you can select a field and type in your findings. Tab or click to move through the fields. This is the typical way we interact with web based forms, and perhaps the most common reason clinicians fail to move from paper to electronic charts... | |||
== Draw == | == Draw == | ||
Each portion of the form has a Draw Component. Choose the color and size and Draw away. Redo and Clear Functions extend the range of this feature. As the tools for drawing via web-based applications improve, this method of charting, which is essentially the same as using paper, will improve. | |||
== Quick Picks == | == Quick Picks == | ||
Commonly used findings can be clicked on to fill the appropriate field/s on the form. Currently the list of items in the Quick Pick lists is static. Development is underway to build these lists dynamically on a per provider basis, so a provider's frequently used terms will appear over time. | |||
== KeyBoard (Shorthand) == | == KeyBoard (Shorthand) == | ||
| Line 36: | Line 57: | ||
<blockquote> | <blockquote> | ||
<b>What if you could document electronically using your shorthand?</b><br/> | <b>What if you could document electronically using your shorthand?</b><br/> | ||
We converted | We converted a standard ophthalmic record and commonly used shorthand terms into <i>Eye Shorthand, an electronic lingua franca oculī.</i><br /> | ||
Using this shorthand method, all findings are entered in a single text field, | |||
and the EMR fields are automatically filled.<hr /> | |||
Using this shorthand method, all | |||
and | |||
<b>Paper vs. EHR:</b><br /> | <b>Paper vs. EHR:</b><br /> | ||
You know what <b>RUL: 2mm ptosis</b> means. <br /> | You know what <b>RUL: 2mm ptosis</b> means. <br /> | ||
With a typical EHR, you need to find and click on the field for the right upper lid and type in 2mm ptosis. <br /> | With a typical EHR, you need to find and click on the field for the right upper lid and type in 2mm ptosis. <br /> | ||
Then click on the next field, or maybe even tab to it, and type your findings for the next field. And on it goes.<br /><br /> | Then click on the next field, or maybe even tab to it, and type your findings for the next field. And on it goes. If this is your preferred way to document, you can do this <b>TEXT</b> method with this form.<br /><br /> | ||
Consider another example: <b>Right C/D 0.6Vx0.4H with inferior notch | Consider another example: <b>Right C/D 0.6Vx0.4H with inferior notch, left C/D 0.5</b>?<br /> | ||
OK, find the correct | OK, find the correct field (right cup) to click. Enter the appropriate text, 0.6Vx0.4H with inferior notch. Then tab or click to the next field. Type 0.5. <br /> | ||
<br /> | <br /> | ||
How can we speed up this process?<br /><br /> | How can we speed up this process?<br /><br /> | ||
Look at this example in shorthand, based on a simple structure: <b>Field.text;Field.text;Field.text</b><br /> | Look at this example in shorthand, based on a simple structure: <b>Field.text;Field.text;Field.text</b><br /> | ||
<div style="text-align:center;font-weight:600;margin:20;background-color:yellow;padding:30 50;width:95%;border:1pt black solid">rcup | <div style="text-align:center;font-weight:600;margin:20;background-color:yellow;padding:30 50;width:95%;border:1pt black solid">rcup:0.6Vx0.4H w/ inf notch;lcup:0.5</div> | ||
Type this shorthand text into the Keyboard Entry area in the form, and the fields are automatically filled.<br /> | Type this shorthand text into the Keyboard Entry area in the form, and the fields are automatically filled.<br /> | ||
Done. No extra clicks.<br /> | Done. No extra clicks.<br /> | ||
| Line 59: | Line 76: | ||
It is easy to learn.<br /> | It is easy to learn.<br /> | ||
The <b>Fields</b> and <b>text</b> parts look just like our handwritten shorthand!<br /> | The <b>Fields</b> and <b>text</b> parts look just like our handwritten shorthand!<br /> | ||
Type the abbreviation for a clinical field, a | Type the abbreviation for a clinical field, a colon, followed by your finding, in your shorthand.<br /> | ||
You can add your own unique style of shorthand to your local copy of /forms/eye_mag/js/js_my_base.js<br /> | |||
Consider sharing your shorthand back to the community for future users. Chances are you are not the only one who documents that way! | |||
Consider sharing your shorthand back to the community for future users. | |||
The explanation below centers around four lines of typing which document normal findings <b>and more than 40 different clinical issues</b>. | The explanation below centers around four lines of typing which document normal findings <b>and more than 40 different clinical issues</b>. | ||
| Line 74: | Line 90: | ||
<div style="text-align:center;font-weight:600;margin:20;background-color:yellow;padding:30 50;width:95%;border:1pt black solid"> | <div style="text-align:center;font-weight:600;margin:20;background-color:yellow;padding:30 50;width:95%;border:1pt black solid"> | ||
D;bll | D;bll:+2 meibomitis;rll:frank ect, 7x6mm lid margin bcc lat.a;bul:2mm ptosis;rul.+3 dermato.a; | ||
bc | bc:+2 inj;bk:med pter;rk:mod endo gut.a;bac:+1 fc, +1 pig cells; | ||
bd | bd:+2 bowtie pallor;rcup:0.6Vx0.4H w/ inf notch;lcup:0.5;rmac:+2 BDR, +CSME;lmac:flat, tr BDR;v.+PPDR, ++venous beading;rp:ht 1 o,no vh; | ||
scDist;5 | scDist;5:8ix 1rht;4:10ix;6:6ix;2:15xt;8:5ix;ccDist;4:5ix;5:ortho;6:ortho | ||
</div> | </div> | ||
{{#ev:youtube|3eb_X8lIzTE|640||'''Right Panel'''}} | |||
Within openEMR: Eye Exam there are detailed instructions for each section. <br /> | |||
If you are already an eyedoc, | If you are already an eyedoc, try it out on a dummy patient and you'll see how simple, intuitive and fast this shorthand technique is. <br /> | ||
<hr /> | <hr /> | ||
<div style="font-color:red;padding:20px;width:600;text-align: | <div style="font-color:red;padding:20px;width:600;text-align:justify;"><b>Key point:</b> Only use the <b>"D;"</b> once and only <b>at the start</b>. It is very powerful. The <b>D;</b> tells Eye Exam to ERASE EVERY field and replace them with your default values (defined in /eye_mag/js/js_my_base.js). <b>D;</b> will replace everything with its default value.<br /> | ||
Use <b>DEXT;</b> to replace all the External Exam fields with default values.<br /> | |||
Use <b>DAS;</b> to replace all the Anterior Segment fields with default values.<br /> | |||
Use <b>PAS;</b> to replace all the Posterior Segment fields with default values.<br /> | |||
</div> | |||
</blockquote> | </blockquote> | ||
</div> | </div> | ||
<hr /> | |||
===<span style="size:14pt;font-weight:600;">Basic Structure</span>=== | ===<span style="size:14pt;font-weight:600;">Basic Structure</span>=== | ||
<div id="general" style="text-align:left;"> | <div id="general" style="text-align:left;"> | ||
<b>Usage:</b> field | <b>Usage:</b> field:text(.a)(;)<br /> | ||
<blockquote class="style2"><i>where: <br /></i> | <blockquote class="style2"><i>where: <br /></i> | ||
<b>Field</b> is the shorthand term for the clinical field.<br/> | <b>Field</b> is the shorthand term for the clinical field.<br/> | ||
| Line 103: | Line 125: | ||
The semi-colon "<b>;</b>" is used to divide entries, allowing multiple field entries simultaneously. <br /> | The semi-colon "<b>;</b>" is used to divide entries, allowing multiple field entries simultaneously. <br /> | ||
<small><i>The semi-colon separates entries and cannot be used within a text field.</i></small><br /> | <small><i>The semi-colon separates entries and cannot be used within a text field.</i></small><br /> | ||
After pressing <b>Enter/Return</b>, the data is submitted. <br /> | After pressing <b>Enter/Return or TAB</b>, the data is submitted. <br /> | ||
</blockquote> | </blockquote> | ||
</div> | </div> | ||
{{#ev:youtube|xT7iqi6fMUQ|640||'''Right Panel'''}} | |||
<hr /> | |||
===External: Shorthand Walk Through === | ===External: Shorthand Walk Through === | ||
<blockquote class="style2"> | <blockquote class="style2"> | ||
<b>Keyboard Entry</b> | <b>Keyboard Entry</b> | ||
<div style="text-align:center;font-weight:600;margin:20;background-color:yellow;padding:30 50;width:95%;border:1pt black solid"> | <div style="text-align:center;font-weight:600;margin:20;background-color:yellow;padding:30 50;width:95%;border:1pt black solid"> | ||
D;bll | D;bll:+2 meibomitis;rll:frank ect, 7x6mm lid margin bcc lat.a;bul:2mm ptosis;rul:+3 dermato.a | ||
</div> | </div> | ||
[[File:sh_ext.png| | [[File:sh_ext.png|center|640px]]<br /> | ||
</blockquote> | </blockquote> | ||
<br /> | <br /> | ||
<b>This line will be recorded in OpenEMR: Eye Exam as:</b> | <b>This line will be recorded in OpenEMR: Eye Exam as:</b> | ||
| Line 133: | Line 161: | ||
<td>Default values</td><td>D or d</td> | <td>Default values</td><td>D or d</td> | ||
<td><b style="color:red;">d;</b><br /><b style="color:red;">D;</b></td> | <td><b style="color:red;">d;</b><br /><b style="color:red;">D;</b></td> | ||
<td>All fields with defined default values are <b>erased</b> and filled with default values.<br />Fields without defined default values are not affected. </td> | <td>All fields with defined default values are <b>erased</b> and filled with default values.<br />Fields without defined default values are not affected. </td> | ||
</tr> | |||
<tr > | |||
<td>Default External values</td><td>DEXT or dext</td> | |||
<td><b style="color:red;">dext;</b><br /><b style="color:red;">DEXT;</b></td> | |||
<td>All <b>EXTERNAL</b> fields with defined default values are <b>erased</b> and filled with default values.<br />Fields without defined default values are not affected. </td> | |||
</tr> | </tr> | ||
<tr > | <tr > | ||
<td>Right Brow</td><td>rb or RB</td> | <td>Right Brow</td><td>rb or RB</td> | ||
<td><b style="color:red;">rb</b> | <td><b style="color:red;">rb</b>:1cm lat ptosis<br /><b style="color:red;">rb</b>:med 2cm SCC</td> | ||
<td>1cm lateral ptosis<br />medial 2cm SCC</td> | <td>1cm lateral ptosis<br />medial 2cm SCC</td> | ||
</tr> | </tr> | ||
<tr> | <tr> | ||
<td>Left Brow</td><td>rb or RB</td> | <td>Left Brow</td><td>rb or RB</td> | ||
<td><b style="color:red;">rb</b> | <td><b style="color:red;">rb</b>:loss of lat brow follicles<br /><b style="color:red;">lb</b>:no rhytids from VIIth nerve palsy</td> | ||
<td>loss of lateral brow follicles<br />no rhytids from VIIth nerve palsy</td> | <td>loss of lateral brow follicles<br />no rhytids from VIIth nerve palsy</td> | ||
</tr> | </tr> | ||
<tr> | <tr> | ||
<td>Both Brows/Forehead</td><td>fh or FH<br />bb or BB</td> | <td>Both Brows/Forehead</td><td>fh or FH<br />bb or BB</td> | ||
<td><b style="color:red;">fh</b> | <td><b style="color:red;">fh</b>:+3 fh rhytids<br><b style="color:red;">BB</b>:+3 glab rhytids</td> | ||
<td>+3 forehead rhytids<br />+3 glabellar rhytids</td> | <td>+3 forehead rhytids<br />+3 glabellar rhytids</td> | ||
</tr> | </tr> | ||
<tr> | <tr> | ||
<td>Right Upper Lid</td><td>rul or RUL</td> | <td>Right Upper Lid</td><td>rul or RUL</td> | ||
<td><b style="color:red;">RUL</b> | <td><b style="color:red;">RUL</b>:1cm lat ptosis<br /><b style="color:red;">rul</b>:med 2cm SCC</td> | ||
<td>1cm lateral ptosis<br />medial 2cm SCC</td> | <td>1cm lateral ptosis<br />medial 2cm SCC</td> | ||
</tr> | </tr> | ||
<tr> | <tr> | ||
<td>Left Upper Lid</td><td>lul or LUL</td> | <td>Left Upper Lid</td><td>lul or LUL</td> | ||
<td><b style="color:red;">LUL</b> | <td><b style="color:red;">LUL</b>:1cm lat ptosis<br /><b style="color:red;">lul</b>:med 2cm SCC</td> | ||
<td>1cm lateral ptosis<br />medial 2cm SCC</td> | <td>1cm lateral ptosis<br />medial 2cm SCC</td> | ||
</tr> | |||
<tr> | |||
<td>Both Upper Lids</td><td>bul or BUL</td> | |||
<td><b style="color:red;">BUL</b>:+2 dermato<br /></td> | |||
<td>+2 dermatochalasis (to Both Right and Left Upper Lid fields)</td> | |||
</tr> | </tr> | ||
<tr> | <tr> | ||
<td>Right Lower Lid</td><td>rll or RLL</td> | <td>Right Lower Lid</td><td>rll or RLL</td> | ||
<td><b style="color:red;">rll</b> | <td><b style="color:red;">rll</b>:1cm lat ptosis<br /><b style="color:red;">rll</b>:med 2cm SCC</td> | ||
<td>1cm lateral ptosis<br />medial 2cm SCC</td> | <td>1cm lateral ptosis<br />medial 2cm SCC</td> | ||
</tr> | </tr> | ||
<tr> | <tr> | ||
<td>Left Lower Lid</td><td>lll or LLL</td> | <td>Left Lower Lid</td><td>lll or LLL</td> | ||
<td><b style="color:red;">lll</b> | <td><b style="color:red;">lll</b>:0.5cm lat ptosis<br /><b style="color:red;">LLL</b>:med 2cm SCC</td> | ||
<td>1cm lateral ptosis<br />medial 2cm SCC</td> | <td>1cm lateral ptosis<br />medial 2cm SCC</td> | ||
</tr> | |||
<tr> | |||
<td>Both Lower Lids</td><td>bll or BLL</td> | |||
<td><b style="color:red;">BLL</b>:med ect<br /></td> | |||
<td>medial ectropion (to Both Right and Left Lower Lid fields)</td> | |||
</tr> | </tr> | ||
<tr> | <tr> | ||
<td>Right Medial Canthus</td><td>rmc or RMC</td> | <td>Right Medial Canthus</td><td>rmc or RMC</td> | ||
<td><b style="color:red;">rmc</b> | <td><b style="color:red;">rmc</b>:1cm bcc<br /><b style="color:red;">RMC</b>:healed dcr scar</td> | ||
<td>1cm BCC<br />healed DCR scar</td> | <td>1cm BCC<br />healed DCR scar</td> | ||
</tr> | </tr> | ||
<tr> | <tr> | ||
<td>Left Medial Canthus</td><td>lmc or LMC</td> | <td>Left Medial Canthus</td><td>lmc or LMC</td> | ||
<td><b style="color:red;">lmc</b> | <td><b style="color:red;">lmc</b>:acute dacryo, tender w/ purulent drainage<br /><b style="color:red;">lmc</b>:1.2cm x 8mm mass</td> | ||
<td>acute dacryo, tender with purulent drainage<br />1.2cm x 8mm mass</td> | <td>acute dacryo, tender with purulent drainage<br />1.2cm x 8mm mass</td> | ||
</tr> | </tr> | ||
<tr> | <tr> | ||
<td>Right Adnexa</td><td>rad or RAD</td> | <td>Right Adnexa</td><td>rad or RAD</td> | ||
<td><b style="color:red;">rad</b> | <td><b style="color:red;">rad</b>:1.8x2.0cm bcc lat<br /><b style="color:red;">RAD</b>:healed DCR scar</td> | ||
<td>1cm BCC<br />healed DCR scar</td> | <td>1cm BCC<br />healed DCR scar</td> | ||
</tr> | </tr> | ||
<tr> | <tr> | ||
<td>Left Adnexa</td><td>lad or LAD</td> | <td>Left Adnexa</td><td>lad or LAD</td> | ||
<td><b style="color:red;">lad</b> | <td><b style="color:red;">lad</b>:1cm lacr cyst protruding under lid<br /><b style="color:red;">LAD</b>:1.2cm x 8mm mass</td> | ||
<td>1cm lacrimal cyst protruding under lid<br />1.2cm x 8mm mass</td> | <td>1cm lacrimal cyst protruding under lid<br />1.2cm x 8mm mass</td> | ||
</tr> | </tr> | ||
| Line 205: | Line 248: | ||
<b>Keyboard Entry</b> | <b>Keyboard Entry</b> | ||
<div style="text-align:center;font-weight:600;margin:20;background-color:yellow;padding:30 50;width:95%;border:1pt black solid"> | <div style="text-align:center;font-weight:600;margin:20;background-color:yellow;padding:30 50;width:95%;border:1pt black solid"> | ||
D;bc | D;bc:+2 inj;bk:med pter;rk:moderate endo gut:a;bac:+1 fc, +1 pig cells | ||
</div> | </div> | ||
[[File:sh_antseg.png| | [[File:sh_antseg.png|center|800px]]<br /> | ||
</blockquote> | </blockquote> | ||
</div> | </div> | ||
<b>This line will be recorded in OpenEMR: Eye Exam as:</b> | <b>This line will be recorded in OpenEMR: Eye Exam as:</b> | ||
<br />[[File:sh_antseg_EMR.png|center]] | <br />[[File:sh_antseg_EMR.png|center]] | ||
| Line 223: | Line 268: | ||
<tr > | <tr > | ||
<td>Default values</td><td>D or d</td> | <td>Default values</td><td>D or d</td> | ||
<td>< | <td> | ||
<b style="color:red">d</b>;<br /> | |||
<b style="color:red">D</b>;</td> | |||
<td>All fields with defined default values are <b>erased</b> and filled with default values.<br />Fields without defined default values are not affected. </td> | <td>All fields with defined default values are <b>erased</b> and filled with default values.<br />Fields without defined default values are not affected. </td> | ||
</tr> | |||
<tr > | |||
<td>Default Ant Seg values</td><td>DAS or das</td> | |||
<td> | |||
<b style="color:red">das</b>;<br /> | |||
<b style="color:red">DAS</b>;</td> | |||
<td>All Anterior Segment fields with defined default values are <b>erased</b> and filled with default values.<br />Anterior Segment fields without defined default values are not affected. </td> | |||
</tr> | </tr> | ||
<tr > | <tr > | ||
<td>Conjunctiva</td><td>Right = rc<br />Left = lc<br />Both = bc or c</td> | <td>Conjunctiva</td><td>Right = rc<br />Left = lc<br />Both = bc or c</td> | ||
<td>< | <td> | ||
<b style="color:red">rc:</b>+1 inj<br /> | |||
<b style="color:red">c:</b>med pter</td> | |||
<td>"+1 injection" (right conj only)<br />"medial pterygium" (both right and left fields are filled)</td> | <td>"+1 injection" (right conj only)<br />"medial pterygium" (both right and left fields are filled)</td> | ||
</tr> | </tr> | ||
<tr> | <tr> | ||
<td>Cornea</td><td>Right = rc<br />Left = lc<br />Both = bk or k</td> | <td>Cornea</td><td>Right = rc<br />Left = lc<br />Both = bk or k</td> | ||
<td>< | <td> | ||
<b style="color:red">rk:</b>+3 spk<br /> | |||
<b style="color:red">k:</b>+2 end gut<b style="color:green">;</b> | |||
<b style="color:red">rk:</b>+1 str edema<b style="color:green">.a</b></td> | |||
<td>"+3 SPK" (right cornea only)<br />"+2 endothelial guttatae" (both cornea fields) AND "+1 stromal edema" (appended to Right cornea field)</td> | <td>"+3 SPK" (right cornea only)<br />"+2 endothelial guttatae" (both cornea fields) AND "+1 stromal edema" (appended to Right cornea field)</td> | ||
</tr> | </tr> | ||
<tr> | <tr> | ||
<td>Anterior Chamber</td><td>Right = rac<br />Left = lac<br />Both = bac or ac</td> | <td>Anterior Chamber</td><td>Right = rac<br />Left = lac<br />Both = bac or ac</td> | ||
<td>< | <td> | ||
<b style="color:red">rac:</b>+1 fc<br> | |||
<b style="color:red">ac:</b>+2 flare</td> | |||
<td>"+1 flare/cell" (right A/C field only)<br />"+2 flare" (both A/C fields)</td> | <td>"+1 flare/cell" (right A/C field only)<br />"+2 flare" (both A/C fields)</td> | ||
</tr> | </tr> | ||
<tr> | <tr> | ||
<td>Lens</td><td>Right = rl<br />Left = ll<br />Both = bl or l</td> | <td>Lens</td><td>Right = rl<br />Left = ll<br />Both = bl or l</td> | ||
<td>< | <td> | ||
<b style="color:red">RL:</b>+2 NS<br /> | |||
<b style="color:red">ll:</b>+2 NS<b style="color:green">;</b> | |||
<b style="color:red">l:</b>+3 ant cort spokes.a</td> | |||
<td>"+2 NS" (right lens only)<br />"+2 NS" (both lens fields) AND "+3 anterior cortical spokes" (appended to both lenses)</td> | <td>"+2 NS" (right lens only)<br />"+2 NS" (both lens fields) AND "+3 anterior cortical spokes" (appended to both lenses)</td> | ||
</tr> | </tr> | ||
<tr> | <tr> | ||
<td>Iris</td><td>Right = ri<br />Left = li<br />Both = bi or i</td> | <td>Iris</td><td>Right = ri<br />Left = li<br />Both = bi or i</td> | ||
<td><b style="color:red">bi | <td> | ||
<b style="color:red">bi:</b>12 0 iridotomy<br /> | |||
<b style="color:red">ri:</b>+2 TI defects<b style="color:green">.a</b><b style="color:navy">;</b> | |||
<b style="color:red">li</b>:round</td> | |||
<td>"12 o'clock iriditomy" (both iris fields)<br />", +2 TI defects" (right iris field AND "round" (left iris field only)</td> | <td>"12 o'clock iriditomy" (both iris fields)<br />", +2 TI defects" (right iris field AND "round" (left iris field only)</td> | ||
</tr> | </tr> | ||
<tr> | <tr> | ||
<td>Gonio</td><td>Right = rg<br />Left = lg<br />Both = bg or g</td> | <td>Gonio</td><td>Right = rg<br />Left = lg<br />Both = bg or g</td> | ||
<td>< | <td> | ||
<b style="color:red">rg:</b>ss 360<br /> | |||
<b style="color:red">lg:</b>3-5 o angle rec</td> | |||
<td>SS 360<br />3-5 o'clock angle recession</td> | <td>SS 360<br />3-5 o'clock angle recession</td> | ||
</tr> | </tr> | ||
<tr> | <tr> | ||
<td>Schirmer I</td><td>Right = rsch1<br />Left = lsch1<br />Both = bsch1 or sch1</td> | <td>Schirmer I</td><td>Right = rsch1<br />Left = lsch1<br />Both = bsch1 or sch1</td> | ||
<td>< | <td> | ||
<b style="color:red">rsch1:</b>5mm<br /> | |||
<b style="color:red">sch1:</b>> 10mm/5 minutes</td> | |||
<td>"5mm" (right field only)<br />> 10mm/5 minutes" (both fields)</td> | <td>"5mm" (right field only)<br />> 10mm/5 minutes" (both fields)</td> | ||
</tr> | </tr> | ||
<tr> | <tr> | ||
<td>Schirmer II</td><td>Right = rsch2<br />Left = lsch2<br />Both = bsch2 or sch2</td> | <td>Schirmer II</td><td>Right = rsch2<br />Left = lsch2<br />Both = bsch2 or sch2</td> | ||
<td>< | <td> | ||
<td>"9 mm" (right field only)<br /> | <b style="color:red">rsch2:</b>9 mm<br /> | ||
<b style="color:red">sch2:</b>> 10mm/5 minutes</td> | |||
<td>"9 mm" (right field only)<br />> 10mm/5 minutes" (both fields)</td> | |||
</tr> | </tr> | ||
<tr> | <tr> | ||
<td>Tear Break-up Time</td><td>Right = RTBUT<br />Left = LTBUT<br />Both = BTBUT or tbut</td> | <td>Tear Break-up Time</td><td>Right = RTBUT<br />Left = LTBUT<br />Both = BTBUT or tbut</td> | ||
<td><b style="color:red">tbut | <td><b style="color:red">tbut:</b>> 10 seconds<br /><b style="color:red">Rtbut:</b>5 secs<b style="color:green">;</b><b style="color:red">ltbut:</b>9 seconds<b style="color:green">;</b></td> | ||
<td>"10 seconds" (both fields)<br />"5 seconds" (right) AND "9 seconds" (left)</td> | <td>"10 seconds" (both fields)<br />"5 seconds" (right) AND "9 seconds" (left)</td> | ||
</tr> | </tr> | ||
| Line 281: | Line 349: | ||
<br /> | <br /> | ||
Adding <b>".a"</b> at the end of a <b>text</b> section will append the current text instead of replacing it. | Adding <b>".a"</b> at the end of a <b>text</b> section will append the current text instead of replacing it. | ||
<br >For example, entering <b>"bk | <br >For example, entering <b>"bk:+2 str scarring.a"</b> will <class="underline bold">append</class> "+2 stromal scarring"</b> | ||
to both the right (rc) and left cornea fields (lc).</i | to both the right (rc) and left cornea fields (lc).</i> | ||
<br> | <br> | ||
<br /> | <br /> | ||
< | <b>External Shorthand Abbreviations:</b> | ||
The following terms will be expanded from their shorthand to full expression in the EMR fields: | The following terms will be expanded from their shorthand to full expression in the EMR fields: | ||
| Line 309: | Line 377: | ||
</table> | </table> | ||
</div> | </div> | ||
<br /><br /> | |||
<hr /> | <hr /> | ||
| Line 317: | Line 385: | ||
<b>Keyboard Entry</b> | <b>Keyboard Entry</b> | ||
<div style="text-align:center;font-weight:600;margin:20;background-color:yellow;padding:30 50;width:95%;border:1pt black solid"> | <div style="text-align:center;font-weight:600;margin:20;background-color:yellow;padding:30 50;width:95%;border:1pt black solid"> | ||
D;bd | D;bd:+2 bowtie pallor;rcup:0.6Vx0.4H w/ inf notch;lcup:0.5;rmac.+2 BDR, +CSME;lmac:flat, tr BDR;v:+PPDR, ++venous beading;rp:ht 1 o,no vh; </div> | ||
[[File:sh_retina.png|center|800px]]<br /> | [[File:sh_retina.png|center|800px]]<br /> | ||
</blockquote> | </blockquote> | ||
| Line 330: | Line 398: | ||
<table border=1 style="border:1pt solid black;margin:10;"> | <table border=1 style="border:1pt solid black;margin:10;"> | ||
<tr style="background-color:#C0C0C0;text-align:center;text-weight:600;"><td>Clinical Field</td><td>Shorthand* Field</td><td>Example Keyboard Entry**</td><td>EMR: Field text</td></tr> | <tr style="background-color:#C0C0C0;text-align:center;text-weight:600;"><td>Clinical Field</td><td>Shorthand* Field</td><td>Example Keyboard Entry**</td><td>EMR: Field text</td></tr> | ||
<tr > | <tr> | ||
<td>Default values</td><td>D or d</td> | <td>Default values</td><td>D or d</td> | ||
<td>< | <td><b style="color:red">d</b>;<br /><b style="color:red">D</b>;</td> | ||
<td>All fields with defined default values are <b>erased</b> and filled with default values.<br />Fields without defined default values are not affected. </td> | <td>All fields with defined default values are <b>erased</b> and filled with default values.<br />Fields without defined default values are not affected. </td> | ||
</tr> | |||
<tr> | |||
<td>Default RETINA values</td><td>DRET or dret</td> | |||
<td><b style="color:red">dret</b>;<br /><b style="color:red">DRET</b>;</td> | |||
<td>All RETINA fields with defined default values are <b>erased</b> and filled with default values.<br />Fields without defined default values are not affected. </td> | |||
</tr> | </tr> | ||
<tr > | <tr > | ||
<td>Disc</td> | <td>Disc</td> | ||
<td>Right = rd<br />Left = ld<br />Both = bd or d</td> | <td>Right = rd<br />Left = ld<br />Both = bd or d</td> | ||
<td>< | <td><b style="color:red">rd:</b>temp pallor, PPA<br /><b style="color:red">bd:</b>NVD at 5 o</td> | ||
<td>"temporal pallor, PPA" (right disc only)<br />"NVD at 5 o'clock" (both right and left disc fields)</td> | <td>"temporal pallor, PPA" (right disc only)<br />"NVD at 5 o'clock" (both right and left disc fields)</td> | ||
</tr> | </tr> | ||
<tr> | <tr> | ||
<td>Cup</td><td>Right = | <td>Cup</td><td>Right = rcup<br />Left = lcup<br />Both = bcup or cup</td> | ||
<td>< | <td><b style="color:red">rcup</b>:0.5 w/ inf notch<br /><b style="color:red">cup</b>:temp scalloping, 0.5<b style="color:green">.a</b><b style="color:green">;</b></td> | ||
<td>" | <td>"0.5 with inferior notch" (right cup only)<br />"temporal scalloping, 0.5" (appended to both cup fields)</td> | ||
</tr> | </tr> | ||
<tr> | <tr> | ||
<td>Macula</td><td>Right = rmac<br />Left = lmac<br />Both = bmac or mac</td> | <td>Macula</td><td>Right = rmac<br />Left = lmac<br />Both = bmac or mac</td> | ||
<td>< | <td><b style="color:red">rmac:</b>central scar 500um<br><b style="color:red">mac:</b>soft drusen, - heme.a</td> | ||
<td>"central scar 500um" (right macular field only)<br />"soft drusen, - heme" (appended to both macular fields)</td> | <td>"central scar 500um" (right macular field only)<br />"soft drusen, - heme" (appended to both macular fields)</td> | ||
</tr> | </tr> | ||
<tr> | <tr> | ||
<td>Vessels</td><td>Right = rv<br />Left = lv<br />Both = bv or v</td> | <td>Vessels</td><td>Right = rv<br />Left = lv<br />Both = bv or v</td> | ||
<td>< | <td><b style="color:red">RV:</b>1:2, +2 BDR<br /><b style="color:red">lv.</b>+CSME w/ hard exudate sup to fov (300um)<b style="color:green">;</b><br /><b style="color:red">v:</b>narrow arterioles, 1:2<b style="color:green">.a;</b></td> | ||
<td>"1:2, +2 BDR" (right vessels only)<br />"+CSME with hard exudate superior to fovea (300um)" (left vessel field only) | <td>"1:2, +2 BDR" (right vessels only)<br />"+CSME with hard exudate superior to fovea (300um)" (left vessel field only) | ||
<br /> "narrow arterioles, 1:2" (appended to both vessel fields)</td> | |||
</tr> | </tr> | ||
<tr> | <tr> | ||
<td>Periphery</td><td>Right = rp<br />Left = lp<br />Both = bp or p</td> | <td>Periphery</td><td>Right = rp<br />Left = lp<br />Both = bp or p</td> | ||
<td>< | <td><b style="color:red">rp:</b>12 0 ht, no heme, amenable to bubble<b style="color:green">;</b><br /><b style="color:red">bp:</b>1 clock hour of lattice 2 o<b style="color:green">.a</b><b style="color:navy">;</b></td> | ||
<td>"12 o'clock horseshoe tear, no heme, amenable to bubble" (right periphery field)<br />"1 clock hour of lattice 2 o'clock" (appended to both periphery fields)</td> | <td>"12 o'clock horseshoe tear, no heme, amenable to bubble" (right periphery field)<br />"1 clock hour of lattice 2 o'clock" (appended to both periphery fields)</td> | ||
</tr> | </tr> | ||
<tr> | <tr> | ||
<td>Central Macular Thickness</td><td>Right = rcmt<br />Left = lcmt<br />Both = bcmt or cmt</td> | <td>Central Macular Thickness</td><td>Right = rcmt<br />Left = lcmt<br />Both = bcmt or cmt</td> | ||
<td>< | <td><b style="color:red">rcmt:</b>254<br /><b style="color:red">cmt:</b>flat</td> | ||
<td>254 (right CMT only)<br />flat (both CMT fields)</td> | <td>254 (right CMT only)<br />flat (both CMT fields)</td> | ||
</tr> | </tr> | ||
| Line 376: | Line 450: | ||
<br /> | <br /> | ||
==== Retina Shorthand Abbreviations: ==== | |||
The following terms will be expanded from their shorthand to full expression in the EMR fields: | The following terms will be expanded from their shorthand to full expression in the EMR fields: | ||
| Line 417: | Line 491: | ||
</table> | </table> | ||
</div> | </div> | ||
<br /><br /> | |||
<hr /> | <hr /> | ||
| Line 436: | Line 511: | ||
<br /> | <br /> | ||
<b>This is how this shorthand will appear in a Printable Report:</b><br /> | <b>This is how this shorthand will appear in a Printable Report:</b><br /> | ||
[[File: | [[File:sh_neuro_report.png|center]] | ||
<br /> | <br /> | ||
| Line 502: | Line 577: | ||
<hr /> | <hr /> | ||
== Side Panel == | |||
This form has a built-in panel to display PMSFH and ROS data. | |||
[[File:top_half.png|600px|center]] | |||
{{#ev:youtube|DkpJKN-dhsk|640|center|'''Right Panel'''}} | |||
The Panel slides in and out from the right margin either via the menu (VIEW->PMSFH Panel) | |||
[[File:PMSFH_Menu.png||center]] | |||
or by clicking on the Panel icon [[File:Panel.png]], | |||
located in the top-right corner of the PMSFH section: | |||
[[File:PMSFH.png||center]] | |||
Clicking either the Panel Icon a second time, the '''"X"''' at the top of the Right Panel itself or by selecting the VIEW-> Right Panel on the menu, and the panel will slide to the right and disappear. | |||
== Full Screen Mode == | == Full Screen Mode == | ||
If you are working in the framed mode of openEMR, you can break out into fullscreen mode by clicking on the "plus" icon at the top right corner of the page. The Eye Exam in the bottom frame will close and the billing module will replace it. A new window will open with the Eye Exam form. Pop-up blockers must be disabled for this feature to work reliably. You must authorize this new window to WRITE data to the database, otherwise it will open in READ-ONLY mode. | |||
=== Application-style Menu Bar === | === Application-style Menu Bar === | ||
= Chief Complaint and History of Present Illness = | = Chief Complaint and History of Present Illness = | ||
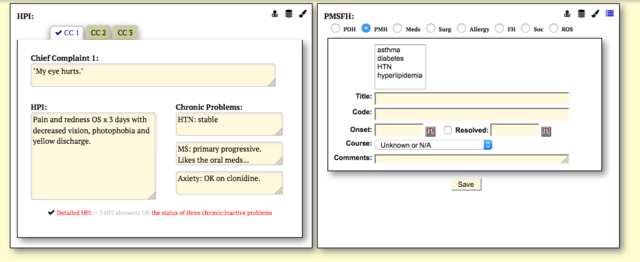
The CC (Chief Complaint) and HPI (History of Present Illness) are standard fields present in any medical document. This form allows the user to document up to three separate complaints, CC1, CC2, CC3, with corresponding HPIs. | |||
[[File:HPI_PMSFH.png|640px|center]] | |||
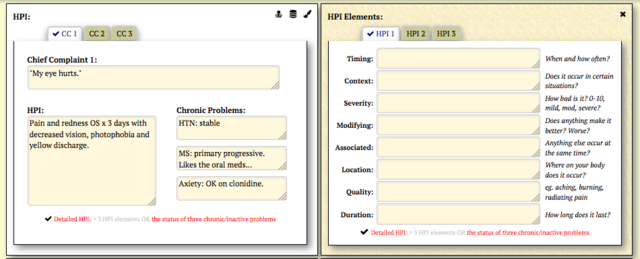
In the US, to reach a higher coding level, you must document a '''detailed HPI'''. This requires documenting and commenting on the status of '''3 chronic or inactive problems''' or document '''4 or more elements''' which comprise the current HPI. Either complete the three Chronic fields, or include the four HPI elements in your narrative, or tap the database icon to display helper fields: | |||
[[File:HPI_detailed.png|640px|center]] | |||
= PMSFH/ROS = | = PMSFH/ROS = | ||
{{#ev:youtube|3PeBYdc-ZMU}} | |||
= Visions/Refraction Panels = | = Visions/Refraction Panels = | ||
The Eye Form displays the most common visual acuities in the Vitals section. | |||
[[File:Vitals_panel.png|720px|center]] | |||
[[File:Vision.png|320px|left]] | |||
<blockquote> | |||
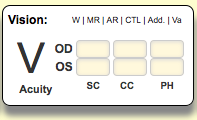
Clicking on the top row will open a refraction pane:<br /> | |||
W = wearing refractions. You can document up to four pairs of glasses. One of our most enjoyable things to do...<br /> | |||
MR = manifest refraction and cycloplegic refractions (wet and dry are in one panel). <br /> | |||
AR = autorefraction.<br /> | |||
CTL = contact lens measurements.<br /> | |||
Add. = Additional measurements => keratometry, biometry, white-2-white, IOL measurements, PAM, LI and more.<br /> | |||
Va = summary panel with all visual acuities in one place.<br /> | |||
</blockquote> | |||
Clicking on one of these sections not only opens the panel, but the "letters" you click are highlighted and the form (it is starting to actually seem to be alive) remembers this as a preference. If you always enter Contact Lens info, this panel will always open for you on subsequent patients. And if you never use a panel, it won't auto-open for you.<br /> | |||
<br /> | |||
As you are working through the visit, when the refraction data is present but not clinically relevant, you can click on "Vision", and all the refraction panels are hidden. This leaves the form uncluttered and let's you concentrate on the portions of the exam that are important at that moment.<br /><br /> | |||
Not to be left out, clicking on Acuity will cycle the display from SC/CC/PH to AR/MR/CR. Go ahead, give it a try on your own version. Simple. Perhaps useful. Easy to ignore if not important. | |||
<b>Current Rxs</b> | |||
<br /> | |||
[[File:Current_Rxs.png|720px|center]] | |||
This image displays two of the four Current RXs panel. They are all similar and numbered. Use the comments to help delineate which pair is for what purpose or a description if need. In the first, the Additional RX tab will open the third and, if needed, fourth "Current Rx" panels. If you need to enter a fifth pair, my thoughts are with you. Perhaps using a soap note might help? <br /> | |||
<br /> | |||
In the top right corner, the three icons perform the following tasks:<br /> | |||
<ol><li> List previous eyeglass/contact lens prescriptions given to this patient</li> | |||
<li> Print/dispense the current refraction as a new prescription</li> | |||
<li> Close the panel.</li> | |||
</ol> | |||
= IOP/Amsler/CVF/Pupils = | = IOP/Amsler/CVF/Pupils = | ||
The IOP panel is basic: 3 IOP measurement types, Applanation, Tonopen and finger tension. If you need to alter this to use Schiotz, pneumotonometry, or some new way to document IOP, this can be performed by editing the file view.php. <br /> | |||
<br /> | |||
The time is updated to when you open the form and can be directly edited to reflect the actual time if documentation and the examination are not concurrent.<br /><br /> | |||
The icon on the top right will lead to a graph of IOP measurements over time, in time...<br /><br /> | |||
<b>Amsler</b><br /> | |||
Click or tap on the amsler image to cycle through six images to represent increasingly severe forms of central scotomas, numbered 0-5. Again, we are a visually leaning specialty and this is a method to visually represent the complaint. It is not an image of a patient-drawn Amsler.<br /><br /> | |||
<b>Visual Fields</b><br /> | |||
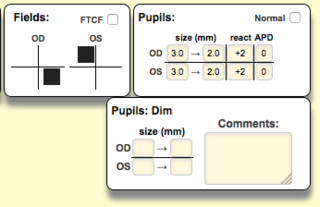
Clicking or tapping in a quadrant will "blacken" that quadrant. Do this as need be for each of the four quadrants per eye. Tap again to clear the field, or click the "FTCF" full-to-count-fingers box to clear them all.<br /><br /> | |||
[[File:Dim_Pupil.png|320px|center]] | |||
<b>Pupils</b><br /> | |||
A good pupils exam is important when there is a pupil abnormality. When there isn't, a check of "normal" fills the field with defaults. If there is a dim light pupil finding, clicking on the text "Pupils" in this panel and the Dim Pupil panel will open. Nice for Adie's, Horner's etc. Click it again to close the panel. The changes are still part of the record and will be included in the final report; they are just hidden from view to keep the interface less cluttered when you move to a new section of the exam. If you return to this chart later, and a Dim Pupil finding was identified/documented, this Dim Pupil Panel will be auto-opened for you. Use the comments box for notes or other findings such as hippus, synechiae, neutral density filters or whatever your routine calls for. Just remember it is an official medical record and although you can hide the panel it is never really lost...<br /> | |||
<br /> | |||
= External = | = External = | ||
= Anterior Segment = | = Anterior Segment = | ||
| Line 517: | Line 672: | ||
= Neuro-Physiology = | = Neuro-Physiology = | ||
= Images and OpenEMR = | = Images and OpenEMR = | ||
Images can be uploaded into openEMR directly via the documents interface (Patients/Client->Summary and click the Documents link) or via the Fax/Scan interface (Administration->Fax/Scan) if you have configured it. Additionally, within each section of the clinical portion of the Eye Form, there are links to upload new images or view the current images. <br /> | |||
[[File:Retina_panel.png|320px|center]] | |||
<br /> | |||
When the Eye Form is first used, you will notice that multiple Imaging categories are automatically created, such as visual fields, OCT, etc. You can edit these names or add new categories using the Administration->Practice Documents link. The example shown above has an OCT image attached to this patient's file. The first icon links to the Documents upload form, the second will lead to a report generator and the final icon is only present when a document of this type is actually present. Clicking this icon will open the image viewer, to the OCT documents section. Using the image viewer you can navigate through all the images on file for this patient.<br /><br /> | |||
There is a file size limit that each server can handle, set during the installation process. There is no limitation on the type of files that you can store: images, movies, audio files, PDFs, etc. | |||
= Impression/Plan = | = Impression/Plan = | ||
The Impression Plan can be entered manually or by using the Impression/Plan Builder. | |||
The Builder extracts potential diagnoses to include in your Impression/Plan from the Past Ocular History, the Past Medical History and the physical exam findings. If your openEMR setup includes codes such as ICD-10 and CPT codes, the Impression/Plan Builder will utilize these. If you plan to use openEMR Ophthalmology to perform your clinic's billing functions, it is advisable to choose the correct codes when a POH or PMH item is added initially. Not only will the Impression Plan Builder make full use of these codes but the Coding Engine will submit these codes to the Fee Sheet for billing. | |||
For returning patients, the prior Impression Plan can be carried forward into the current visit where it can be directly updated with your new findings. | |||
= Printable Report = | = Printable Report = | ||
Using the Eye Form Menu, when you have completed your documentation, you can store or print a PDF copy of the encounter. File->Print/Store PDF.<br /> | |||
[[File:Menu_PDF.png|800px|center]] | |||
<br /> | |||
The PDF version is formatted to include any drawings which you may have made, and any clinical findings you documented. It includes your practice logo, if present on the server and an electronic signature of the provider if present on the server. | |||
<br /><br /> | |||
Logo = $OE_SITE_DIR/images/practice_logo.gif<br /> | |||
Signature = $GLOBALS['webserver_root'] ."/interface/forms/eye_mag/images/sign_".$providerID.".jpg<br /> | |||
<br /> | |||
It is recommended that you include these files when setting up your server to develop your brand look as these two files are also used when printing Refraction prescriptions as well. | |||
<p> | |||
= Conclusions == | = Conclusions == | ||
Latest revision as of 14:08, 1 July 2023

This document provides an in depth look into the usage of the OpenEMR Eye Exam form.
General overview
The Eye Exam is an OpenEMR form for ophthalmology and optometry. It is feature rich, yet remarkably simple to use. It is written to mirror the workflows of the provider. Given that workflows vary from provider to provider, the Eye Exam is adaptive and seeks to learns the preferences of each provider, based on how it is used by a given doctor. It's like it is alive. At least that is how we want it to appear. It is listening to what you do as you do it, and learns. The more you use it, the more it learns. The more it learns, the more feedback it can give you.
The Eye Form is one page. No need to click around looking for data - it is all in front of you.
When a provider documents something, it is stored. Done. No submit button. No clicks. Just move on to the next patient.
And how can a provider document? Text/Shorthand/Draw? Yes, yes and yes.
- Text input is boring, but the standard in EHRs. Better get a scribe if you want to remain productive and plan to use this technique exclusively.
- Drawing. Well, the technology is getting better but it is not the best way to complete a whole exam. The Eye Exam has draw sections for each area because, as eye doctors, we like pictures. Use a pen, a mouse or a touch screen. It's all good when it comes to this form.
- Shorthand. To the non-ophthalmologist/optometrist, this is total Greek. But to eye doctors, this is "totally, outrageously awesome". It turns your chicken-scratch into pure prose at the speed of your brain.
- Old Records are always available, on the one page still, to compare or pull-forward into the current chart. And you can pull forward one clinical section, or all of it.
What does the form do with your clinical input, beside storing it? Is it really alive?
- It integrates with the OpenEMR Care data management plans.
- It recognizes diseases and translates them into diagnostic codes.
- It builds your Impression Plan.
- It suggests a billing code for the visit.
- It builds your routing slip/Fee Sheet.
Documentation/Display Options
Different users interact with EMRs in different ways. Sometimes we want to draw a picture, other times we need to write out our findings in detail. With the OpenEMR: Eye Exam, you can use a number of different methods to document your exam.
- TEXT: fill in anatomic-specific fields with text by typing
- PULL FORWARD: pull-forward values from an earlier encounter
- DRAW: draw your findings
- QUICK PICKS: select from a dynamic list of clinical findings
- SHORTHAND: a rapid method for entering findings via the keyboard based on traditional shorthand used with paper charts.
- DICTATION: users facile with the Shorthand module and with dictation software can dictate their notes in shorthand format directly into the Shorthand zone, or directly into the fields with the aid of their mouse to navigate through the EMR.
- DEFAULTS: populate the form with default values.
NOTE: Active Charting vs. READ-ONLY mode:
Text
Using the tab key or mouse you can select a field and type in your findings. Tab or click to move through the fields. This is the typical way we interact with web based forms, and perhaps the most common reason clinicians fail to move from paper to electronic charts...
Draw
Each portion of the form has a Draw Component. Choose the color and size and Draw away. Redo and Clear Functions extend the range of this feature. As the tools for drawing via web-based applications improve, this method of charting, which is essentially the same as using paper, will improve.
Quick Picks
Commonly used findings can be clicked on to fill the appropriate field/s on the form. Currently the list of items in the Quick Pick lists is static. Development is underway to build these lists dynamically on a per provider basis, so a provider's frequently used terms will appear over time.
KeyBoard (Shorthand)
Introduction
What if you could document electronically using your shorthand?
We converted a standard ophthalmic record and commonly used shorthand terms into Eye Shorthand, an electronic lingua franca oculī.
Using this shorthand method, all findings are entered in a single text field,and the EMR fields are automatically filled.
Paper vs. EHR:
You know what RUL: 2mm ptosis means.
With a typical EHR, you need to find and click on the field for the right upper lid and type in 2mm ptosis.
Then click on the next field, or maybe even tab to it, and type your findings for the next field. And on it goes. If this is your preferred way to document, you can do this TEXT method with this form.
Consider another example: Right C/D 0.6Vx0.4H with inferior notch, left C/D 0.5?
OK, find the correct field (right cup) to click. Enter the appropriate text, 0.6Vx0.4H with inferior notch. Then tab or click to the next field. Type 0.5.
How can we speed up this process?
Look at this example in shorthand, based on a simple structure: Field.text;Field.text;Field.text
rcup:0.6Vx0.4H w/ inf notch;lcup:0.5Type this shorthand text into the Keyboard Entry area in the form, and the fields are automatically filled.
Done. No extra clicks.
Even a slow typist will find the Eye Exam Shorthand can speed up EHR documentation time.
It is easy to learn.
The Fields and text parts look just like our handwritten shorthand!
Type the abbreviation for a clinical field, a colon, followed by your finding, in your shorthand.
You can add your own unique style of shorthand to your local copy of /forms/eye_mag/js/js_my_base.js
Consider sharing your shorthand back to the community for future users. Chances are you are not the only one who documents that way!The explanation below centers around four lines of typing which document normal findings and more than 40 different clinical issues.
That's a lot to document and one mighty complicated patient!
Many more issues than we would see on a routine day with routine patients, but it could happen...
Documenting this many findings would take a little bit of time on paper, and a lifetime in an EHR.
With the openEMR Shorthand, the average typist can do it in less than a minute.
Go ahead and paste the lines below into a test patient's chart. Fiddle with them.
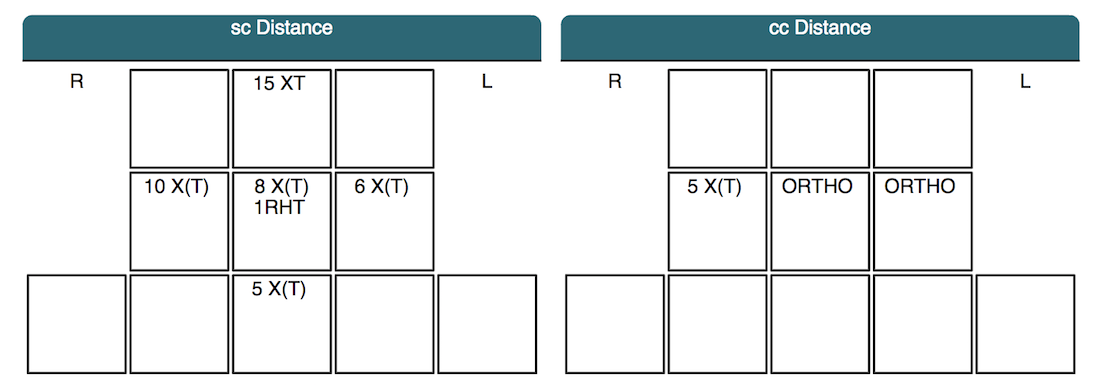
D;bll:+2 meibomitis;rll:frank ect, 7x6mm lid margin bcc lat.a;bul:2mm ptosis;rul.+3 dermato.a; bc:+2 inj;bk:med pter;rk:mod endo gut.a;bac:+1 fc, +1 pig cells; bd:+2 bowtie pallor;rcup:0.6Vx0.4H w/ inf notch;lcup:0.5;rmac:+2 BDR, +CSME;lmac:flat, tr BDR;v.+PPDR, ++venous beading;rp:ht 1 o,no vh; scDist;5:8ix 1rht;4:10ix;6:6ix;2:15xt;8:5ix;ccDist;4:5ix;5:ortho;6:ortho
Within openEMR: Eye Exam there are detailed instructions for each section.
If you are already an eyedoc, try it out on a dummy patient and you'll see how simple, intuitive and fast this shorthand technique is.
Key point: Only use the "D;" once and only at the start. It is very powerful. The D; tells Eye Exam to ERASE EVERY field and replace them with your default values (defined in /eye_mag/js/js_my_base.js). D; will replace everything with its default value.
Use DEXT; to replace all the External Exam fields with default values.
Use DAS; to replace all the Anterior Segment fields with default values.
Use PAS; to replace all the Posterior Segment fields with default values.
Basic Structure
Usage: field:text(.a)(;)
where:
Field is the shorthand term for the clinical field.
text is the complete or shorthand data to enter into this field.
field and text are separated by a "." period/fullstop.
The trailing ".a" is optional and will append the text to the data already in the field, instead of replacing it.
The semi-colon ";" is used to divide entries, allowing multiple field entries simultaneously.
The semi-colon separates entries and cannot be used within a text field.
After pressing Enter/Return or TAB, the data is submitted.
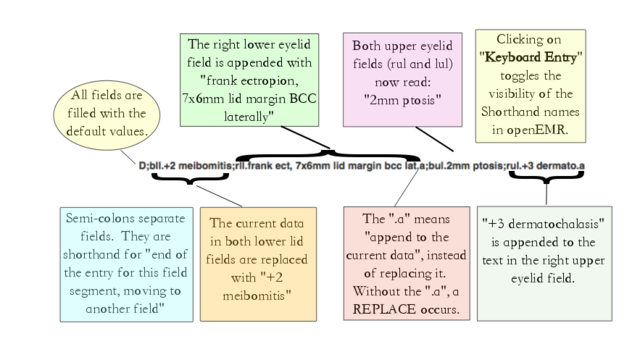
External: Shorthand Walk Through
Keyboard Entry
D;bll:+2 meibomitis;rll:frank ect, 7x6mm lid margin bcc lat.a;bul:2mm ptosis;rul:+3 dermato.a
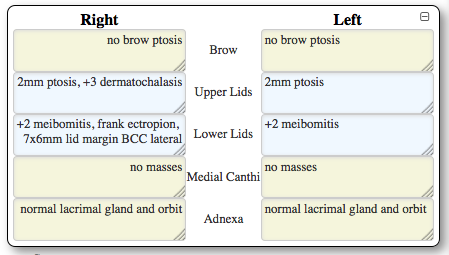
This line will be recorded in OpenEMR: Eye Exam as:
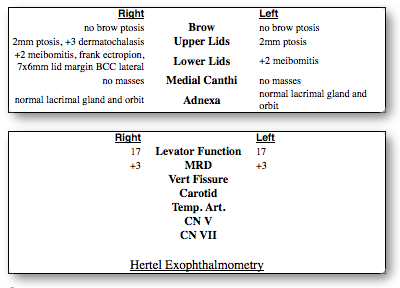
This is how this shorthand will appear in a Printable Report:
External: Field Codes and Shorthand/Abbreviations
| Clinical Field | Shorthand* Field | Example Keyboard Entry** | EMR: Field text |
| Default values | D or d | d; D; |
All fields with defined default values are erased and filled with default values. Fields without defined default values are not affected. |
| Default External values | DEXT or dext | dext; DEXT; |
All EXTERNAL fields with defined default values are erased and filled with default values. Fields without defined default values are not affected. |
| Right Brow | rb or RB | rb:1cm lat ptosis rb:med 2cm SCC |
1cm lateral ptosis medial 2cm SCC |
| Left Brow | rb or RB | rb:loss of lat brow follicles lb:no rhytids from VIIth nerve palsy |
loss of lateral brow follicles no rhytids from VIIth nerve palsy |
| Both Brows/Forehead | fh or FH bb or BB |
fh:+3 fh rhytids BB:+3 glab rhytids |
+3 forehead rhytids +3 glabellar rhytids |
| Right Upper Lid | rul or RUL | RUL:1cm lat ptosis rul:med 2cm SCC |
1cm lateral ptosis medial 2cm SCC |
| Left Upper Lid | lul or LUL | LUL:1cm lat ptosis lul:med 2cm SCC |
1cm lateral ptosis medial 2cm SCC |
| Both Upper Lids | bul or BUL | BUL:+2 dermato |
+2 dermatochalasis (to Both Right and Left Upper Lid fields) |
| Right Lower Lid | rll or RLL | rll:1cm lat ptosis rll:med 2cm SCC |
1cm lateral ptosis medial 2cm SCC |
| Left Lower Lid | lll or LLL | lll:0.5cm lat ptosis LLL:med 2cm SCC |
1cm lateral ptosis medial 2cm SCC |
| Both Lower Lids | bll or BLL | BLL:med ect |
medial ectropion (to Both Right and Left Lower Lid fields) |
| Right Medial Canthus | rmc or RMC | rmc:1cm bcc RMC:healed dcr scar |
1cm BCC healed DCR scar |
| Left Medial Canthus | lmc or LMC | lmc:acute dacryo, tender w/ purulent drainage lmc:1.2cm x 8mm mass |
acute dacryo, tender with purulent drainage 1.2cm x 8mm mass |
| Right Adnexa | rad or RAD | rad:1.8x2.0cm bcc lat RAD:healed DCR scar |
1cm BCC healed DCR scar |
| Left Adnexa | lad or LAD | lad:1cm lacr cyst protruding under lid LAD:1.2cm x 8mm mass |
1cm lacrimal cyst protruding under lid 1.2cm x 8mm mass |
*case insensitive
**The default action is to replace the field with the new text.
Adding ".a" at the end of a text section will append the current text instead of replacing it.
For example, entering "4xL.+2 meibomitis.a" will append "+2 meibomitis"
to each of the eyelid fields, RUL/RLL/LUL/LLL.
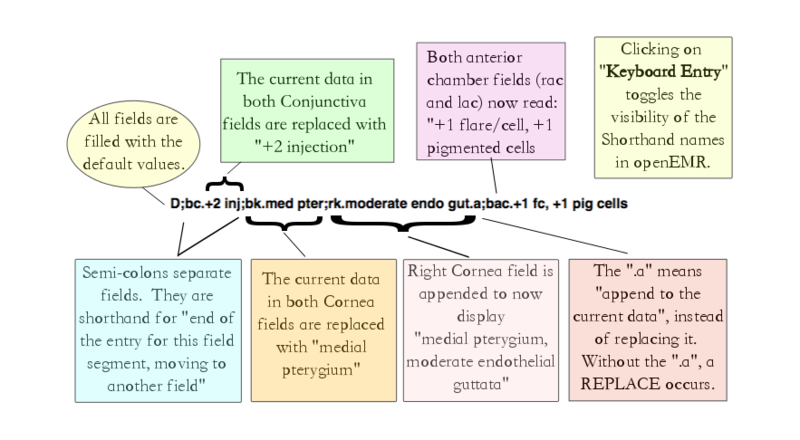
Anterior Segment: Shorthand Walk Through
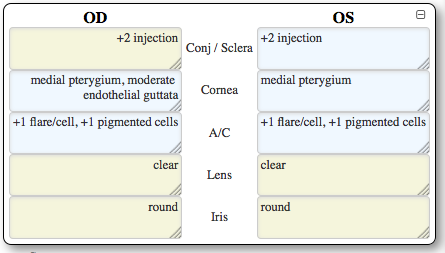
This line will be recorded in OpenEMR: Eye Exam as:
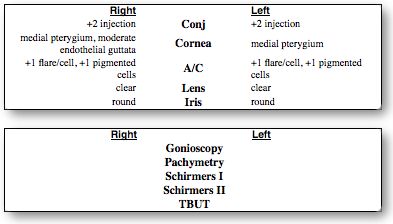
This is how this shorthand will appear in a Printable Report:
Anterior Segment: Field Codes and Shorthand/Abbreviations
| Clinical Field | Shorthand* Field | Example Keyboard Entry** | EMR: Field text |
| Default values | D or d |
d; |
All fields with defined default values are erased and filled with default values. Fields without defined default values are not affected. |
| Default Ant Seg values | DAS or das |
das; |
All Anterior Segment fields with defined default values are erased and filled with default values. Anterior Segment fields without defined default values are not affected. |
| Conjunctiva | Right = rc Left = lc Both = bc or c |
rc:+1 inj |
"+1 injection" (right conj only) "medial pterygium" (both right and left fields are filled) |
| Cornea | Right = rc Left = lc Both = bk or k |
rk:+3 spk |
"+3 SPK" (right cornea only) "+2 endothelial guttatae" (both cornea fields) AND "+1 stromal edema" (appended to Right cornea field) |
| Anterior Chamber | Right = rac Left = lac Both = bac or ac |
rac:+1 fc |
"+1 flare/cell" (right A/C field only) "+2 flare" (both A/C fields) |
| Lens | Right = rl Left = ll Both = bl or l |
RL:+2 NS |
"+2 NS" (right lens only) "+2 NS" (both lens fields) AND "+3 anterior cortical spokes" (appended to both lenses) |
| Iris | Right = ri Left = li Both = bi or i |
bi:12 0 iridotomy |
"12 o'clock iriditomy" (both iris fields) ", +2 TI defects" (right iris field AND "round" (left iris field only) |
| Gonio | Right = rg Left = lg Both = bg or g |
rg:ss 360 |
SS 360 3-5 o'clock angle recession |
| Schirmer I | Right = rsch1 Left = lsch1 Both = bsch1 or sch1 |
rsch1:5mm |
"5mm" (right field only) > 10mm/5 minutes" (both fields) |
| Schirmer II | Right = rsch2 Left = lsch2 Both = bsch2 or sch2 |
rsch2:9 mm |
"9 mm" (right field only) > 10mm/5 minutes" (both fields) |
| Tear Break-up Time | Right = RTBUT Left = LTBUT Both = BTBUT or tbut |
tbut:> 10 seconds Rtbut:5 secs;ltbut:9 seconds; |
"10 seconds" (both fields) "5 seconds" (right) AND "9 seconds" (left) |
*case insensitive
**The default action is to replace the field with the new text.
Adding ".a" at the end of a text section will append the current text instead of replacing it.
For example, entering "bk:+2 str scarring.a" will <class="underline bold">append</class> "+2 stromal scarring"
to both the right (rc) and left cornea fields (lc).
External Shorthand Abbreviations:
The following terms will be expanded from their shorthand to full expression in the EMR fields:
| Enter this: | Get this: |
|---|---|
| inf | inferior |
| sup | superior |
| nas | nasal |
| temp | temporal |
| med | medial |
| lat | lateral |
| dermato | dematochalasis |
| w/ | with |
| lac | laceration |
| lacr | lacrimal |
| dcr | DCR |
| bcc | BCC |
| scc | SCC |
| sebca | sebaceous cell |
| tr | trace |
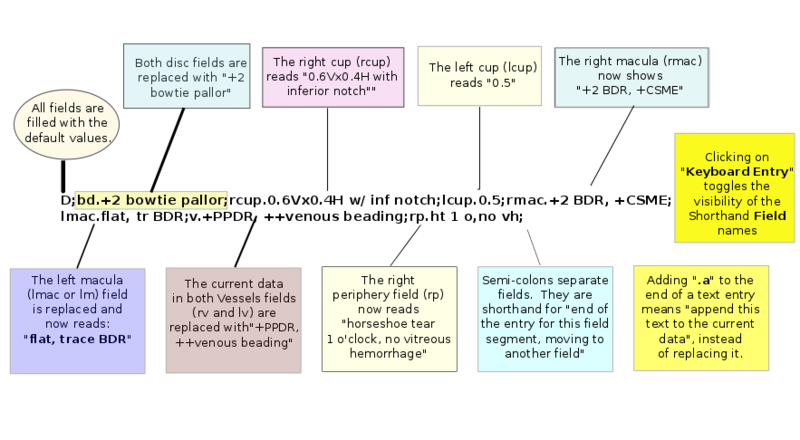
Retina: Shorthand Walk Through
Keyboard Entry
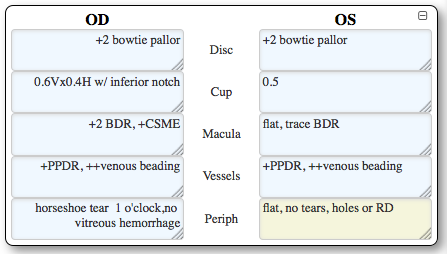
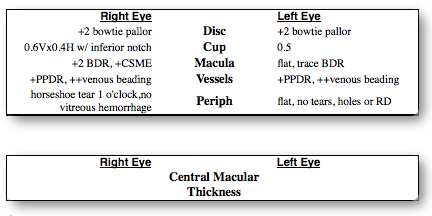
D;bd:+2 bowtie pallor;rcup:0.6Vx0.4H w/ inf notch;lcup:0.5;rmac.+2 BDR, +CSME;lmac:flat, tr BDR;v:+PPDR, ++venous beading;rp:ht 1 o,no vh;
This line will be recorded in OpenEMR: Eye Exam as:
This is how this shorthand will appear in a Printable Report:
Retina: Field Codes and Shorthand/Abbreviations
| Clinical Field | Shorthand* Field | Example Keyboard Entry** | EMR: Field text |
| Default values | D or d | d; D; |
All fields with defined default values are erased and filled with default values. Fields without defined default values are not affected. |
| Default RETINA values | DRET or dret | dret; DRET; |
All RETINA fields with defined default values are erased and filled with default values. Fields without defined default values are not affected. |
| Disc | Right = rd Left = ld Both = bd or d |
rd:temp pallor, PPA bd:NVD at 5 o |
"temporal pallor, PPA" (right disc only) "NVD at 5 o'clock" (both right and left disc fields) |
| Cup | Right = rcup Left = lcup Both = bcup or cup |
rcup:0.5 w/ inf notch cup:temp scalloping, 0.5.a; |
"0.5 with inferior notch" (right cup only) "temporal scalloping, 0.5" (appended to both cup fields) |
| Macula | Right = rmac Left = lmac Both = bmac or mac |
rmac:central scar 500um mac:soft drusen, - heme.a |
"central scar 500um" (right macular field only) "soft drusen, - heme" (appended to both macular fields) |
| Vessels | Right = rv Left = lv Both = bv or v |
RV:1:2, +2 BDR lv.+CSME w/ hard exudate sup to fov (300um); v:narrow arterioles, 1:2.a; |
"1:2, +2 BDR" (right vessels only) "+CSME with hard exudate superior to fovea (300um)" (left vessel field only) "narrow arterioles, 1:2" (appended to both vessel fields) |
| Periphery | Right = rp Left = lp Both = bp or p |
rp:12 0 ht, no heme, amenable to bubble; bp:1 clock hour of lattice 2 o.a; |
"12 o'clock horseshoe tear, no heme, amenable to bubble" (right periphery field) "1 clock hour of lattice 2 o'clock" (appended to both periphery fields) |
| Central Macular Thickness | Right = rcmt Left = lcmt Both = bcmt or cmt |
rcmt:254 cmt:flat |
254 (right CMT only) flat (both CMT fields) |
*case insensitive
**The default action is to replace the field with the new text.
Adding ".a" at the end of a text section will append the current text instead of replacing it.
For example, entering "bk.+2 str scarring.a" will <class="underline bold">append</class> "+2 stromal scarring"
to both the right (rc) and left cornea fields (lc).
Retina Shorthand Abbreviations:
The following terms will be expanded from their shorthand to full expression in the EMR fields:
| Enter this: | Get this: |
|---|---|
| inf | inferior |
| sup | superior |
| nas | nasal |
| temp | temporal |
| med | medial |
| lat | lateral |
| csme | CSME |
| w/ | with |
| bdr | BDR |
| ppdr | PPDR |
| ht | horsheshoe tear |
| ab | air bubble |
| c3f8 | C3F8 |
| ma | macroaneurysm |
| tr | trace |
| mias | microaneurysm |
| ped | PED |
| 1 o | 1 o'clock |
| 2 o | 2 o'clock |
| 3 o | 3 o'clock |
| 4 o | 4 o'clock |
| 5 o | 5 o'clock |
| 6 o | 6 o'clock |
| 7 o | 7 o'clock |
| 8 o | 8 o'clock |
| 9 o | 9 o'clock |
| 10 o | 10 o'clock |
| 11 o | 11 o'clock |
| 12 o | 12 o'clock |
| mac | macula |
| fov | fovea |
| vh | vitreous hemorrhage |
Neuro-Physiology: Shorthand Walk Through
Keyboard Entry
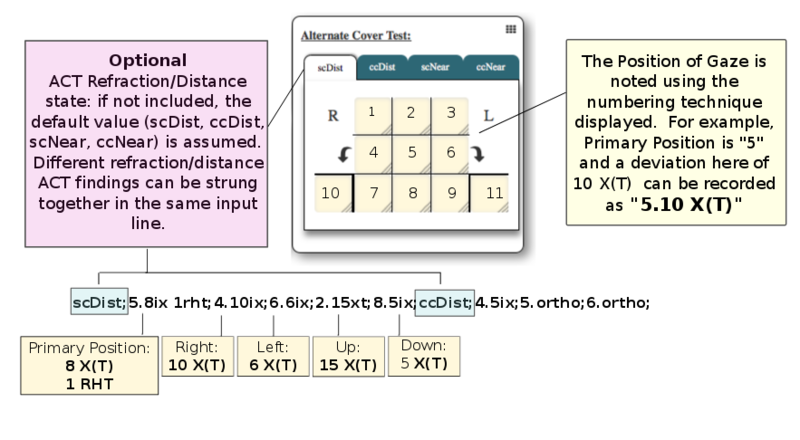
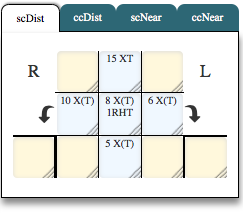
scDist;5.8ix 1rht;4.10ix;6.6ix;2.15xt;8.5ix;ccDist;4.5ix;5.ortho;6.ortho
This line will be recorded in OpenEMR: Eye Exam as:
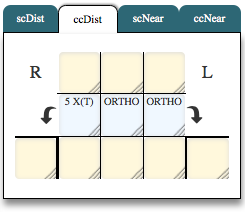
This is how this shorthand will appear in a Printable Report:
Neuro-Physiology: Field Codes and Shorthand/Abbreviations
| Clinical Field | Shorthand* Field | Example Keyboard Entry** | EMR: Field text |
| Default values | D or d |
d; |
All fields with defined default values are erased and filled with default values. Fields without defined default values are not affected. |
| Without correction at Distance | scDist | scdist; | scDIST is selected for ensuing values. |
| With correction at Distance | scDist | ccdist; | ccDIST is selected for ensuing values. |
| Without correction at Near | scNear | scdist; | scDIST is selected for ensuing values. |
| With correction at Near | scNear | scdist; | scDIST is selected for ensuing values. |
*case insensitive
**The default action is to replace the field with the new text.
Adding ".a" at the end of a text section will append the current text instead of replacing it.
For example, entering "bk.+2 str scarring.a" will <class="underline bold">append</class> "+2 stromal scarring"
to both the right (rc) and left cornea fields (lc).
Neuro Shorthand Abbreviations:
The following terms will be expanded from their shorthand to full expression in the EMR fields:
| Strabismus | Enter this: | Get this: |
|---|---|---|
| Exophoria | x | X |
| Intermittent Esotropia | ie or e(t) | E(T) |
| Esoptropia | et | ET |
| Esophoria | e | E |
| Intermittent Exotropia | ix or x(t) | X(T) |
| Exoptropia | xt | XT |
| Hyperphoria | h | H |
| Intermittent Hypertropia | H(T) | H(T) |
| Hypertropia | rht lht | RHT LHT |
| Hypotropia | hyt | HyT |
Side Panel
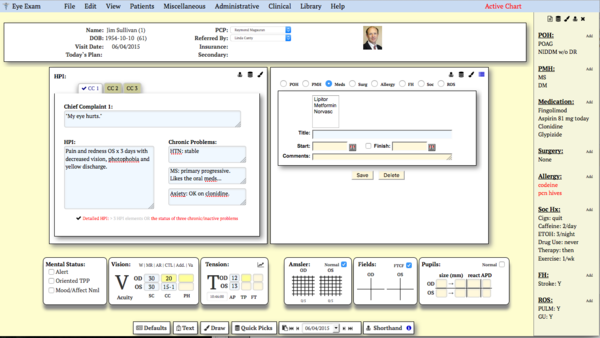
This form has a built-in panel to display PMSFH and ROS data.
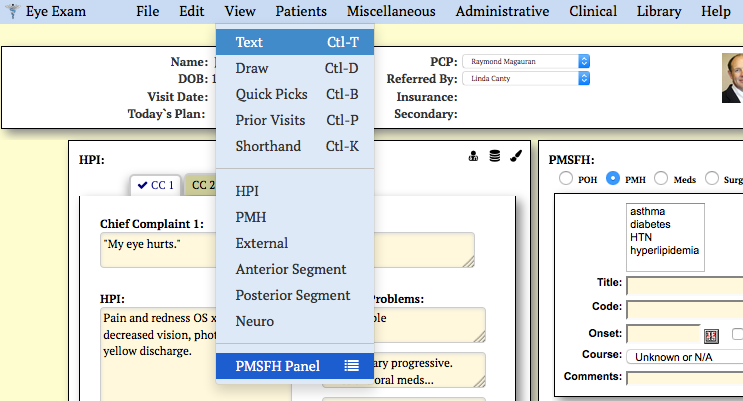
The Panel slides in and out from the right margin either via the menu (VIEW->PMSFH Panel)
or by clicking on the Panel icon ![]() ,
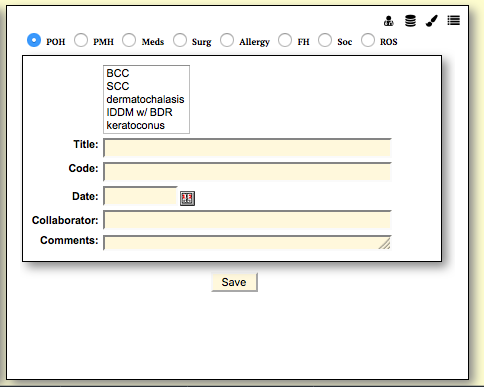
located in the top-right corner of the PMSFH section:
,
located in the top-right corner of the PMSFH section:
Clicking either the Panel Icon a second time, the "X" at the top of the Right Panel itself or by selecting the VIEW-> Right Panel on the menu, and the panel will slide to the right and disappear.
Full Screen Mode
If you are working in the framed mode of openEMR, you can break out into fullscreen mode by clicking on the "plus" icon at the top right corner of the page. The Eye Exam in the bottom frame will close and the billing module will replace it. A new window will open with the Eye Exam form. Pop-up blockers must be disabled for this feature to work reliably. You must authorize this new window to WRITE data to the database, otherwise it will open in READ-ONLY mode.
Application-style Menu Bar
Chief Complaint and History of Present Illness
The CC (Chief Complaint) and HPI (History of Present Illness) are standard fields present in any medical document. This form allows the user to document up to three separate complaints, CC1, CC2, CC3, with corresponding HPIs.
In the US, to reach a higher coding level, you must document a detailed HPI. This requires documenting and commenting on the status of 3 chronic or inactive problems or document 4 or more elements which comprise the current HPI. Either complete the three Chronic fields, or include the four HPI elements in your narrative, or tap the database icon to display helper fields:
PMSFH/ROS
Visions/Refraction Panels
The Eye Form displays the most common visual acuities in the Vitals section.
Clicking on the top row will open a refraction pane:
W = wearing refractions. You can document up to four pairs of glasses. One of our most enjoyable things to do...
MR = manifest refraction and cycloplegic refractions (wet and dry are in one panel).
AR = autorefraction.
CTL = contact lens measurements.
Add. = Additional measurements => keratometry, biometry, white-2-white, IOL measurements, PAM, LI and more.
Va = summary panel with all visual acuities in one place.
Clicking on one of these sections not only opens the panel, but the "letters" you click are highlighted and the form (it is starting to actually seem to be alive) remembers this as a preference. If you always enter Contact Lens info, this panel will always open for you on subsequent patients. And if you never use a panel, it won't auto-open for you.
As you are working through the visit, when the refraction data is present but not clinically relevant, you can click on "Vision", and all the refraction panels are hidden. This leaves the form uncluttered and let's you concentrate on the portions of the exam that are important at that moment.
Not to be left out, clicking on Acuity will cycle the display from SC/CC/PH to AR/MR/CR. Go ahead, give it a try on your own version. Simple. Perhaps useful. Easy to ignore if not important.
Current Rxs
This image displays two of the four Current RXs panel. They are all similar and numbered. Use the comments to help delineate which pair is for what purpose or a description if need. In the first, the Additional RX tab will open the third and, if needed, fourth "Current Rx" panels. If you need to enter a fifth pair, my thoughts are with you. Perhaps using a soap note might help?
In the top right corner, the three icons perform the following tasks:
- List previous eyeglass/contact lens prescriptions given to this patient
- Print/dispense the current refraction as a new prescription
- Close the panel.
IOP/Amsler/CVF/Pupils
The IOP panel is basic: 3 IOP measurement types, Applanation, Tonopen and finger tension. If you need to alter this to use Schiotz, pneumotonometry, or some new way to document IOP, this can be performed by editing the file view.php.
The time is updated to when you open the form and can be directly edited to reflect the actual time if documentation and the examination are not concurrent.
The icon on the top right will lead to a graph of IOP measurements over time, in time...
Amsler
Click or tap on the amsler image to cycle through six images to represent increasingly severe forms of central scotomas, numbered 0-5. Again, we are a visually leaning specialty and this is a method to visually represent the complaint. It is not an image of a patient-drawn Amsler.
Visual Fields
Clicking or tapping in a quadrant will "blacken" that quadrant. Do this as need be for each of the four quadrants per eye. Tap again to clear the field, or click the "FTCF" full-to-count-fingers box to clear them all.
Pupils
A good pupils exam is important when there is a pupil abnormality. When there isn't, a check of "normal" fills the field with defaults. If there is a dim light pupil finding, clicking on the text "Pupils" in this panel and the Dim Pupil panel will open. Nice for Adie's, Horner's etc. Click it again to close the panel. The changes are still part of the record and will be included in the final report; they are just hidden from view to keep the interface less cluttered when you move to a new section of the exam. If you return to this chart later, and a Dim Pupil finding was identified/documented, this Dim Pupil Panel will be auto-opened for you. Use the comments box for notes or other findings such as hippus, synechiae, neutral density filters or whatever your routine calls for. Just remember it is an official medical record and although you can hide the panel it is never really lost...
External
Anterior Segment
Retina
Neuro-Physiology
Images and OpenEMR
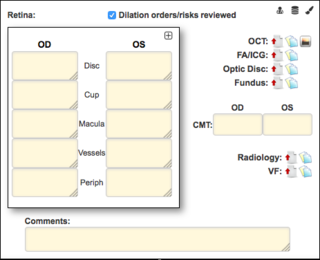
Images can be uploaded into openEMR directly via the documents interface (Patients/Client->Summary and click the Documents link) or via the Fax/Scan interface (Administration->Fax/Scan) if you have configured it. Additionally, within each section of the clinical portion of the Eye Form, there are links to upload new images or view the current images.
When the Eye Form is first used, you will notice that multiple Imaging categories are automatically created, such as visual fields, OCT, etc. You can edit these names or add new categories using the Administration->Practice Documents link. The example shown above has an OCT image attached to this patient's file. The first icon links to the Documents upload form, the second will lead to a report generator and the final icon is only present when a document of this type is actually present. Clicking this icon will open the image viewer, to the OCT documents section. Using the image viewer you can navigate through all the images on file for this patient.
There is a file size limit that each server can handle, set during the installation process. There is no limitation on the type of files that you can store: images, movies, audio files, PDFs, etc.
Impression/Plan
The Impression Plan can be entered manually or by using the Impression/Plan Builder.
The Builder extracts potential diagnoses to include in your Impression/Plan from the Past Ocular History, the Past Medical History and the physical exam findings. If your openEMR setup includes codes such as ICD-10 and CPT codes, the Impression/Plan Builder will utilize these. If you plan to use openEMR Ophthalmology to perform your clinic's billing functions, it is advisable to choose the correct codes when a POH or PMH item is added initially. Not only will the Impression Plan Builder make full use of these codes but the Coding Engine will submit these codes to the Fee Sheet for billing.
For returning patients, the prior Impression Plan can be carried forward into the current visit where it can be directly updated with your new findings.
Printable Report
Using the Eye Form Menu, when you have completed your documentation, you can store or print a PDF copy of the encounter. File->Print/Store PDF.
The PDF version is formatted to include any drawings which you may have made, and any clinical findings you documented. It includes your practice logo, if present on the server and an electronic signature of the provider if present on the server.
Logo = $OE_SITE_DIR/images/practice_logo.gif
Signature = $GLOBALS['webserver_root'] ."/interface/forms/eye_mag/images/sign_".$providerID.".jpg
It is recommended that you include these files when setting up your server to develop your brand look as these two files are also used when printing Refraction prescriptions as well.
