Difference between revisions of "Templates for Patient Documents"
Harley Tuck (talk | contribs) m (→Forum Discussion: updating) |
|||
| (60 intermediate revisions by 5 users not shown) | |||
| Line 2: | Line 2: | ||
==Overview== | ==Overview== | ||
This feature | This feature was added to version 4.2.0. It provides the ability to upload Templates in an Open Document format (OpenOffice or LibreOffice) or as plain text. Use them as boilerplates for creating documents that can then be uploaded to the the Patient Summary, Documents tab in the usual way or downloaded to localhost. | ||
==Keywords== | |||
The .php file has been configured with the following list. | |||
:* {PatientName} | :* {PatientName} (FirstName Middle Lastname) | ||
:* {PatientID} | :* {PatientID} (External ID) | ||
:* {PatientDOB} | :* {PatientDOB} (yyy-mm-dd) | ||
:* {DOS} | :* {DOS} (Date of service in the format of yyyy-mm-dd) | ||
:* {ReferringDOC} | :* {ReferringDOC} (Name of Referring Provider) | ||
:* {ChiefComplaint} | :* {ChiefComplaint} | ||
:* {Allergies} | :* {Allergies} | ||
:* {Medications} | |||
:* {ProblemList} | :* {ProblemList} | ||
:* {PatientSex} | :* {PatientSex} | ||
:* {Address} | :* {Address} (street address only, e.g., 1224 Oakdale Rd.) | ||
:* {City} | :* {City} | ||
:* {State} | :* {State} | ||
:* {Zip} | :* {Zip} | ||
:* {PatientPhone} | :* {PatientPhone} (output in this form: (000)000-0000) | ||
:* {LBFxxx:fieldid} (data from the specified field of a LBF instance) | |||
:* {DEM:fieldid} (data from the specified field of patient demographics) | |||
:* {HIS:fieldid} (data from the specified field of patient history) | |||
If the user wishes to '''expand''' this list of keywords, he must '''change''' the [https://github.com/openemr/openemr/blob/master/interface/patient_file/download_template.php codes]. | |||
==Installing a Template== | |||
The first step is to create a Template on your local computer with one of the mentioned word processors. | |||
A sample file, [http://www.open-emr.org/wiki/index.php/File:Woc.zip woc.zip], is available as a download. It must be extracted before it can be deployed. | |||
The Template may contain any of these keywords (the fields within {...}, pertaining to information entered in the Patient Summary or from the encounter). | |||
Next step is to name the Template with something memorable. | |||
Remember to give the file the '''same extension''' as the word processor. (For OpenOffice/LibreOffice, it should be "file.odt"). This helps to avoid errors when opening the file for editing before printing. | |||
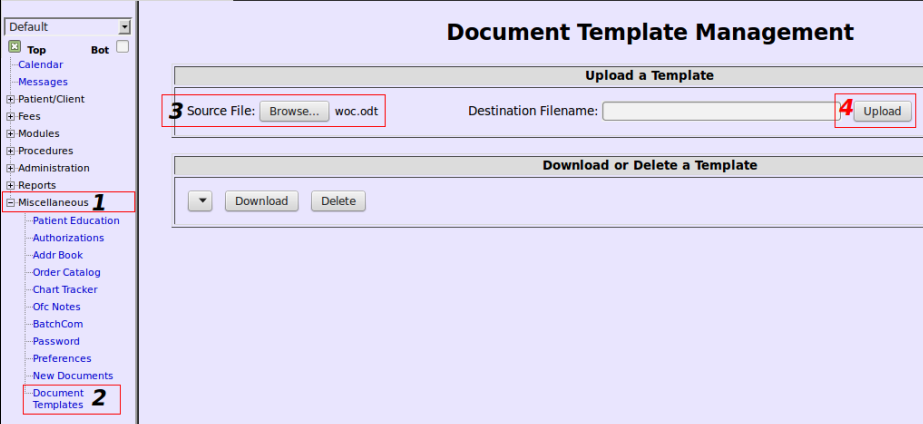
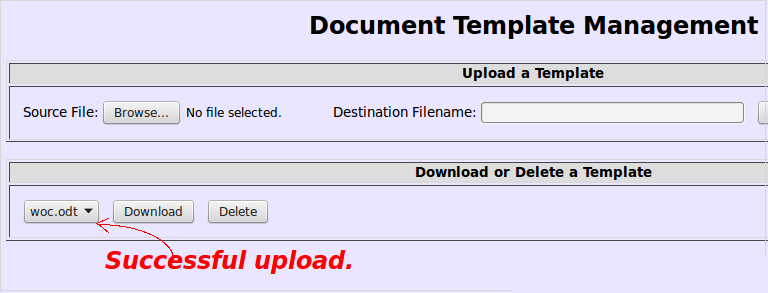
Navigate from the Left Navigation side bar to Miscellaneous, Document Templates, browse for the file and click Upload. | |||
[[File:4dtem.png|center]] | |||
[[File:6dtem.png|center]] | |||
==Using a Template== | ==Using a Template== | ||
In | In Documents, a drop-down list has been added where you may select and download an .odt file. | ||
The Template always has to be connected to a specific patient. | |||
Be certain to have data in the active encounter; if related keywords, such as {DOS}, have been included in the Template. | |||
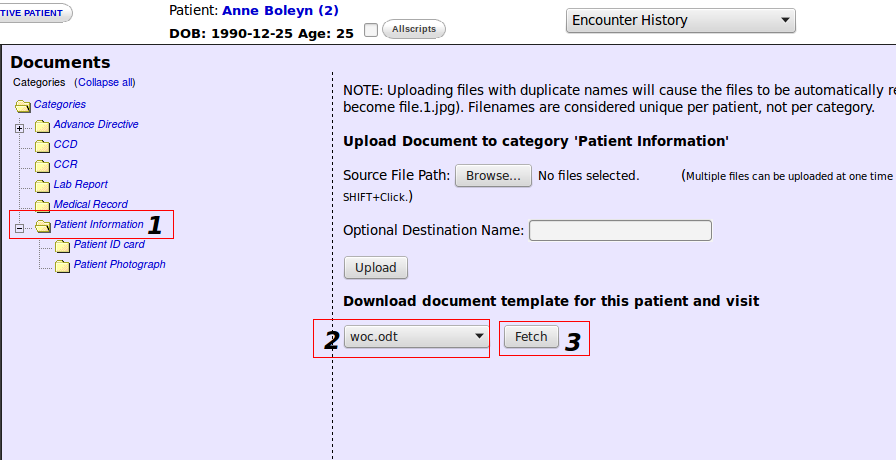
Go to the Patient Summary, Documents tab, click Patient Information, select the Template from the drop-down and click Fetch. | |||
[[File:3dtem.png|center]] | |||
The downloaded document will have its keywords replaced with actual data from the currently selected patient, referring provider, encounter, etc. This is an [[Media:Woc_Boleyn.pdf|illustration]]. | |||
The file will be opened in the word processor and is ready for additional corrections, formatting and final editing. | |||
The .odt file can be converted to a .pdf file by clicking the File tab and choosing Export as PDF. | |||
The file also can be sent as an email attachment, printed, saved, or uploaded to the Documents tab. | |||
==Problems== | ==Problems== | ||
One | One pitfall is that the word processing application might insert XML tags randomly into the middle of keywords as you type them, (this happens when using a non-plain text word processor). It keeps the parser fields from being recognized as keywords during download. | ||
Solution: Keep a list of the parser fields as plain text in another file. Copy/paste to insert them into the document. | |||
= Conclusion = | |||
This page discusses the original document template feature which still has some relevant information, for example the tags and basic construction techniques. Over the years templates have evolved quite a lot; this page | |||
[[Patient_Portal_Document_Templates]] | |||
has more up- to- date feature information and links to further developments. | |||
For the original forum discussion this might be of interest but that forum is closed so can't be posted to: | |||
[http://sourceforge.net/p/openemr/discussion/202506/thread/89134be4/?limit=25#e21d here]. | |||
[[Category:User Guide 4. | [[Category:User Guide 4.2.0]][[Category:User Guide]] | ||
Latest revision as of 18:57, 7 November 2024
Overview
This feature was added to version 4.2.0. It provides the ability to upload Templates in an Open Document format (OpenOffice or LibreOffice) or as plain text. Use them as boilerplates for creating documents that can then be uploaded to the the Patient Summary, Documents tab in the usual way or downloaded to localhost.
Keywords
The .php file has been configured with the following list.
- {PatientName} (FirstName Middle Lastname)
- {PatientID} (External ID)
- {PatientDOB} (yyy-mm-dd)
- {DOS} (Date of service in the format of yyyy-mm-dd)
- {ReferringDOC} (Name of Referring Provider)
- {ChiefComplaint}
- {Allergies}
- {Medications}
- {ProblemList}
- {PatientSex}
- {Address} (street address only, e.g., 1224 Oakdale Rd.)
- {City}
- {State}
- {Zip}
- {PatientPhone} (output in this form: (000)000-0000)
- {LBFxxx:fieldid} (data from the specified field of a LBF instance)
- {DEM:fieldid} (data from the specified field of patient demographics)
- {HIS:fieldid} (data from the specified field of patient history)
If the user wishes to expand this list of keywords, he must change the codes.
Installing a Template
The first step is to create a Template on your local computer with one of the mentioned word processors.
A sample file, woc.zip, is available as a download. It must be extracted before it can be deployed.
The Template may contain any of these keywords (the fields within {...}, pertaining to information entered in the Patient Summary or from the encounter).
Next step is to name the Template with something memorable.
Remember to give the file the same extension as the word processor. (For OpenOffice/LibreOffice, it should be "file.odt"). This helps to avoid errors when opening the file for editing before printing.
Navigate from the Left Navigation side bar to Miscellaneous, Document Templates, browse for the file and click Upload.
Using a Template
In Documents, a drop-down list has been added where you may select and download an .odt file.
The Template always has to be connected to a specific patient.
Be certain to have data in the active encounter; if related keywords, such as {DOS}, have been included in the Template.
Go to the Patient Summary, Documents tab, click Patient Information, select the Template from the drop-down and click Fetch.
The downloaded document will have its keywords replaced with actual data from the currently selected patient, referring provider, encounter, etc. This is an illustration.
The file will be opened in the word processor and is ready for additional corrections, formatting and final editing.
The .odt file can be converted to a .pdf file by clicking the File tab and choosing Export as PDF.
The file also can be sent as an email attachment, printed, saved, or uploaded to the Documents tab.
Problems
One pitfall is that the word processing application might insert XML tags randomly into the middle of keywords as you type them, (this happens when using a non-plain text word processor). It keeps the parser fields from being recognized as keywords during download.
Solution: Keep a list of the parser fields as plain text in another file. Copy/paste to insert them into the document.
Conclusion
This page discusses the original document template feature which still has some relevant information, for example the tags and basic construction techniques. Over the years templates have evolved quite a lot; this page Patient_Portal_Document_Templates
has more up- to- date feature information and links to further developments.
For the original forum discussion this might be of interest but that forum is closed so can't be posted to: here.


