Difference between revisions of "Comlink Telehealth Module Providers Instructions"
Harley Tuck (talk | contribs) m |
Harley Tuck (talk | contribs) m (→Create telehealth appointment: formatting tweaks) |
||
| (3 intermediate revisions by the same user not shown) | |||
| Line 32: | Line 32: | ||
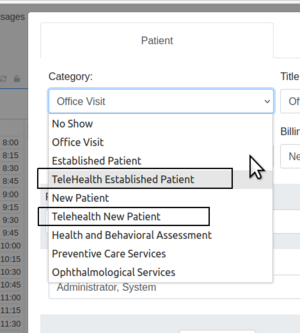
1. When making the appointment use either of the two telehealth appointment categories: | 1. When making the appointment use either of the two telehealth appointment categories: | ||
[[Image:SessionCatDDL.png|300px|center]] | |||
| Line 41: | Line 41: | ||
2. Fill out the appointment details as usual (not pictured) | |||
2. Fill out the appointment details as usual | |||
* Telehealth sessions may be launched within 2 hours before or after their scheduled appointment time | * Telehealth sessions may be launched within 2 hours before or after their scheduled appointment time | ||
| Line 82: | Line 65: | ||
* Blue for sessions that may be launched | * Blue for sessions that may be launched | ||
[[Image:IconBlue.png]] | [[Image:IconBlue.png|center]] | ||
* Black for sessions that have passed the two hour | * Black for sessions that have passed the two hour | ||
[[Image:iconBlack.png]] | [[Image:iconBlack.png|center]] | ||
* Green for completed sessions that can no longer be launched. | * Green for completed sessions that can no longer be launched. | ||
[[Image:iconGreen.png]] | [[Image:iconGreen.png|center]] | ||
== Launch the telehealth appointment == | == Launch the telehealth appointment == | ||
| Line 100: | Line 83: | ||
3. Press OK to confirm that you wish to launch an appointment. | 3. Press OK to confirm that you wish to launch an appointment. | ||
[[Image:launchTHlthApppt.png]] | [[Image:launchTHlthApppt.png|center]] | ||
| Line 119: | Line 102: | ||
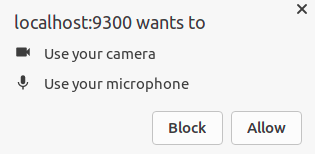
4. Grant Access to your local microphone and camera. | 4. Grant Access to your local microphone and camera. | ||
[[Image:GrantDevAccess.png]] | [[Image:GrantDevAccess.png|center]] | ||
* You will be unable to join the session until you have granted access to at least one of these devices | * You will be unable to join the session until you have granted access to at least one of these devices | ||
| Line 136: | Line 119: | ||
* Your patient will be unable to join until you press the ‘Join Now’ button. | * Your patient will be unable to join until you press the ‘Join Now’ button. | ||
[[Image:thlthsessionJoined.png]] | [[Image:thlthsessionJoined.png|center]] | ||
| Line 160: | Line 143: | ||
[[Image:sessopmIconableVid.png]] | [[Image:sessopmIconableVid.png]] | ||
* Click the video camera icon to toggle your camera off or on. | * Click the video camera icon to toggle your camera off or on. | ||
| Line 174: | Line 153: | ||
[[Image:sessionIconEDMic.png]] | [[Image:sessionIconEDMic.png]] | ||
* Click the microphone icon to toggle your microphine off or on. | * Click the microphone icon to toggle your microphine off or on. | ||
| Line 192: | Line 167: | ||
* Click the notes clipboard icon to minimize the video window and view the encounter form. | * Click the notes clipboard icon to minimize the video window and view the encounter form. | ||
[[Image:thlth-minEditEnc.png]] | [[Image:thlth-minEditEnc.png|center]] | ||
| Line 225: | Line 200: | ||
Click the ‘Iinvite Participant’ icon to launch the Invite Third Party Participant dialog. | Click the ‘Iinvite Participant’ icon to launch the Invite Third Party Participant dialog. | ||
[[Image:sessionIcomInv3dPty.png]] | [[Image:sessionIcomInv3dPty.png|center]] | ||
| Line 263: | Line 238: | ||
1. On the Third Party Participant Dialog screen (picture above) click the Existing Patient button. | 1. On the Third Party Participant Dialog screen (picture above) click the Existing Patient button. | ||
[[Image:Invite3dPtyExistg.png]] | [[Image:Invite3dPtyExistg.png|center]] | ||
| Line 280: | Line 255: | ||
4. Select the Invite Patient button to invite that patient (arrow below) | 4. Select the Invite Patient button to invite that patient (arrow below) | ||
[[Image:invite3dpt.png]] | [[Image:invite3dpt.png|center]] | ||
* The patient will receive an email for them to join the session. | * The patient will receive an email for them to join the session. | ||
| Line 306: | Line 281: | ||
* This icon only appears if there are other participants in the session. | * This icon only appears if there are other participants in the session. | ||
2. Click on the the screen you wish to share | |||
[[Image:ShareImg.png|center]] | |||
2. Click on the the screen you wish to share | |||
| Line 324: | Line 297: | ||
4. Click the blue ‘Stop Sharing’ button (above) when you are finished sharing your screen. | 4. Click the blue ‘Stop Sharing’ button (above) when you are finished sharing your screen. | ||
* Sharing not available on tablets. | * Sharing not available on tablets. | ||
| Line 345: | Line 319: | ||
1. Click the hangup button: | 1. Click the hangup button: | ||
[[Image:sessopmIconHangUp.png]] | [[Image:sessopmIconHangUp.png]] | ||
* You will be asked to confirm that you wish to close the session (not pictured) | * You will be asked to confirm that you wish to close the session (not pictured) | ||
| Line 368: | Line 339: | ||
The dialog will close immediately. | The dialog will close immediately. | ||
Or if another status fits, | Or if another status fits, click the '-None' drodown list and select it. | ||
Click ‘Set Status’ (blue button at right) to close the dialog. | Click ‘Set Status’ (blue button at right) to close the dialog. | ||
| Line 480: | Line 451: | ||
Click the ‘Iinvite Participant’ icon :[[Image:sessionIcomInv3dPty.png| | Click the ‘Iinvite Participant’ icon : | ||
[[Image:sessionIcomInv3dPty.png|center]] | |||
| Line 516: | Line 488: | ||
[[Image:sessionIconShareScn.png]] | [[Image:sessionIconShareScn.png]] | ||
* This icon only appears if other participants are in the session. | * This icon only appears if other participants are in the session. | ||
Latest revision as of 16:00, 27 April 2023
A downloadable version of this document can be found here: ComlinkTelehealthProviderInstructions.pdf
A downloadable Quick Reference Guide for the provider be found here: ComlinkTelehealthProviderInstructionsQuickReferenceGuide.pdf
Provider Instructions
Introduction
The Comlink Telehealth module has three distinct workflows, one for each type of user that interacts with it. # Administrator setup
- Provider’s Session Instructions
- Patient’s Session Instructions
The Comlink Telehealth module is written for desktop computers but is also compatible with tablet devices. Both Providers and Patients may use a tablet, for either conducting or participating in the telehealth session.
This tutorial presents a large amount of detailed information. In order to make the workflows easier to use, an abbreviated Quick Reference Guide is included at the end.
A comprehensive online writup of the Comlink Telehealth module can be found in the OpenEMR wiki page: https://www.open-emr.org/wiki/index.php/Comlink_Telehealth
Provider’s Session Instructions
A telehealth session must be associated with a patient’s appointment. One benefit of this requirement is that the encounter form for that session is available for editing during the telehealth session. This will be shown later in these docs.
Create telehealth appointment
A telehealth appointment is made in the same manner as any other appointment. Specifically, how to make an the appointment is described in the Comlink page linked above, in the section, ‘Schedule a new Telehealth appointment’
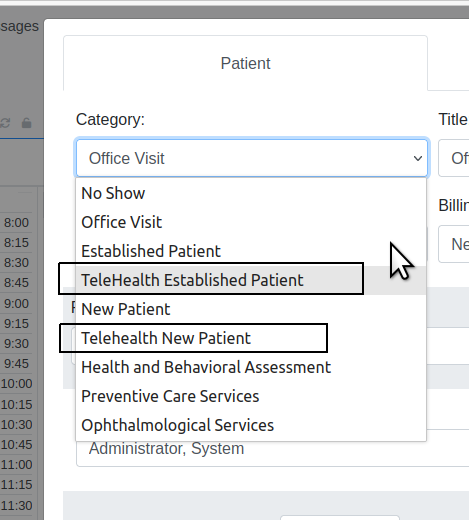
1. When making the appointment use either of the two telehealth appointment categories:
2. Fill out the appointment details as usual (not pictured)
- Telehealth sessions may be launched within 2 hours before or after their scheduled appointment time
3. Click ‘Save’ at the bottom of the event dialog to create the appointment (not shown)
- The camera launch icon in the calendar‘s appointment listing designates a telehealth session:
The launch icons show the status of the session.
- These colors can be different with different OpenEMR themes.
- Blue for sessions that may be launched
- Black for sessions that have passed the two hour
- Green for completed sessions that can no longer be launched.
Launch the telehealth appointment
1. Open the calendar screen
2. Click the video launch icon next to the patient’s name (pictured in step 3 above)
3. Press OK to confirm that you wish to launch an appointment.
Note:
- If this is the client’s first encounter of the day it will create a new encounter.
- If the appointment belongs to a different clinician than the one who opened it, the appointment will be copied into the opening user’s calendar and marked in the original owner’s calendar as having been transferred to you.
- If this is a pending appointment scheduled by a staff member or a patient, the appointment will have its pending status removed.
- If the patient is not currently selected for this appointment, OpenEMR will load with the current patient and the encounter for this appointment.
- If you have configured the patient portal and Notifications section, the system will send an email to the patient with a link to join the session.
4. Grant Access to your local microphone and camera.
- You will be unable to join the session until you have granted access to at least one of these devices
- The permission request may look different on depending your browser
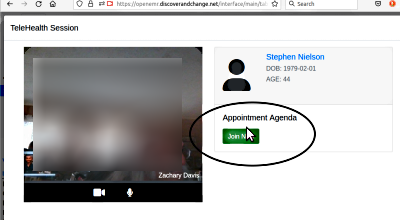
5. Press the ‘Join Now’ button to start the Telehealth session (oval below)
- Your patient will be unable to join until you press the ‘Join Now’ button.
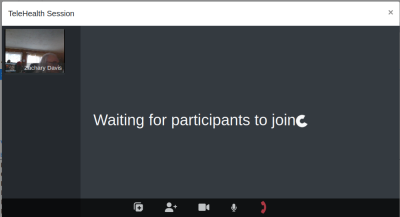
- You are now in the Telehealth Appointment waiting room where you can wait for the patient to join the call.
Telehealth Session Conference Room Controls
Show / Hide Room Controls
- Once the patient joins the session the room controls appear along the bottom edge of the session panel; see in picture above
- They disappear after five seconds of inactivity. Move the mouse (or tap the screen on a touch screen device) to display the controls again.
Enable / Disable Video
- Click the video camera icon to toggle your camera off or on.
Enable / Disable Microphone
- Click the microphone icon to toggle your microphine off or on.
Minimize / Maximize Session For Note Taking
During your telehealth session you may add notes or other information to the encounter form while you are working.
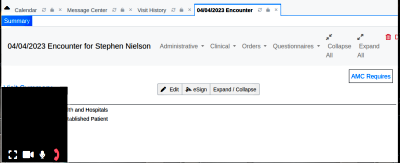
- Click the notes clipboard icon to minimize the video window and view the encounter form.
- Click the expansion icon to restore the video window.
- You can drag the minimized window to a new location for the session and it will remember your settings during the current video session.
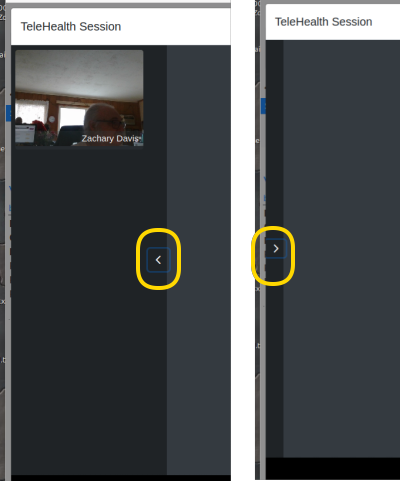
Collapse participants / expand participants
On large screen display devices the participant list is automatically displayed in a sidebar
- Click the expand or collapse icons ( ‘<’ or ‘>’ ) hide or show the sidebar
Invite Third Party Participant
Once the session has begun one additional participant may be invited to join the session.* It can be a current patient of the practice, or you may add a new patient to the practice’s patient roster.
Click the ‘Iinvite Participant’ icon to launch the Invite Third Party Participant dialog.
- Attempting to invite a second participant will replace the currently invited third party patient.
Third Party Invitation – New Patient
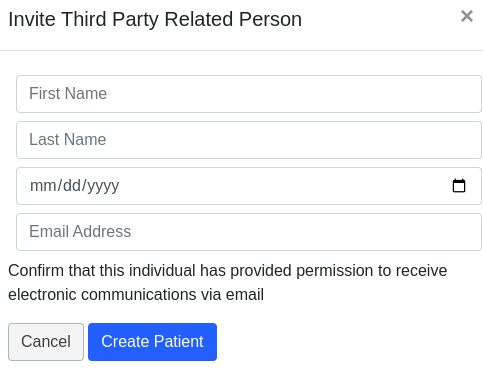
1. Choose the ‘Invite New Patient’ button to launch the New Patient Creation Screen
2. Enter the following required data
- First Name
- Last Name
- Date of Birth
- Email – the email address that the patient will use to login to the session and receive the email invitation to join the Telehealth session.
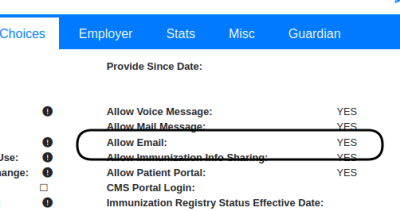
- Check patient’s ‘Demographics / Choices’ selections and verify the participant has given permission to receive HIPAA communications via email
- Click ‘Create Patient’ button
3. The system will:* create a new patient record for the participant in the EMR
- create their patient portal credentials
- send the participant an email with their portal credentials and a link to join the Telehealth session.
Third Party Invitation – Existing Patient
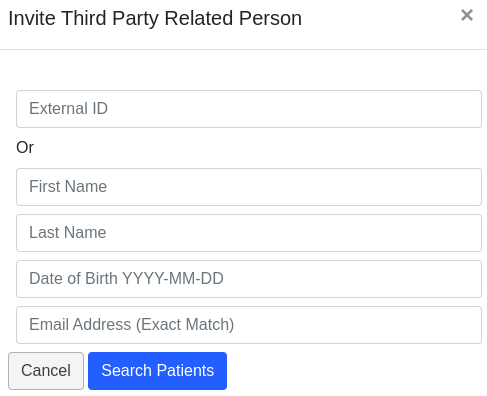
1. On the Third Party Participant Dialog screen (picture above) click the Existing Patient button.
2. Search for an existing patient by:
- PID – if known; it is different from an ‘external ID’ which may be issued by the practice. Exact matches only.
- First or last name – search text found anywhere in the name
- date of birth – search by different formats:
- year (YYYY)
- year and month (YYYY-MM)
- complete DOB (YYYY-MM-DD)
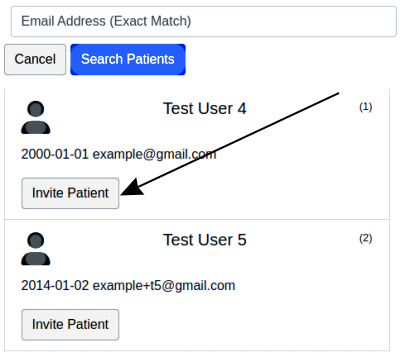
3. Click ‘Search’ button to display a list of the matching patients
4. Select the Invite Patient button to invite that patient (arrow below)
- The patient will receive an email for them to join the session.
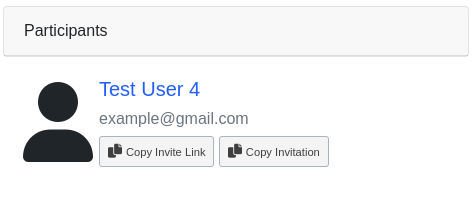
Copy Participant Invitation Link
If you wish to use your own email service to send the invitation to a patient:
- click the ‘Copy Invite Link’ button or ‘Copy Invitation’ button
- paste the contents into your email
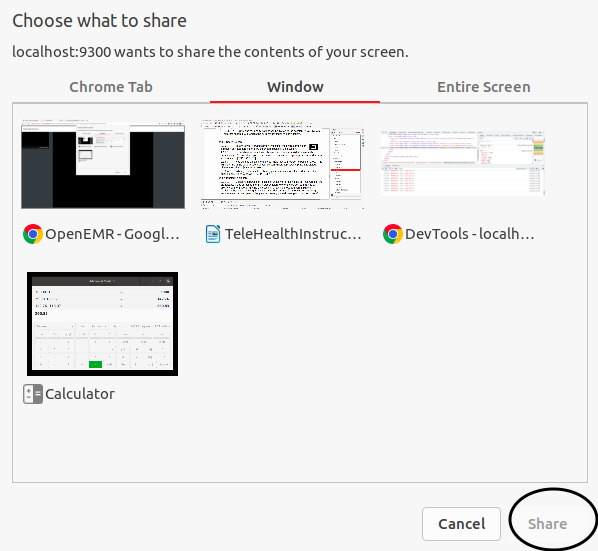
1. To share your viewing screen click the ‘Share Screen’ icon.
- This icon only appears if there are other participants in the session.
2. Click on the the screen you wish to share
3. Click ‘Share.’ (oval)
- A dialog will appear to state that your screen is being shared.
- Its position and wording will depend on your browser.
4. Click the blue ‘Stop Sharing’ button (above) when you are finished sharing your screen.
- Sharing not available on tablets.
Pin a Participant
Click a participant’s session window or click the pin icon
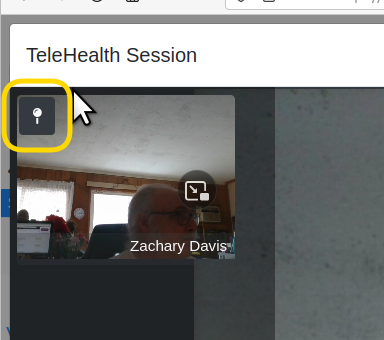
(yellow round rectangle)
This locks the participant’s video window to the main presentation view so they remain visible as long as they are pinned
Click it again to un-pin.
End Telehealth Session
- You will be asked to confirm that you wish to close the session (not pictured)
2. Press the ‘Confirm’ button in the dialog
Update the Appointment Status.
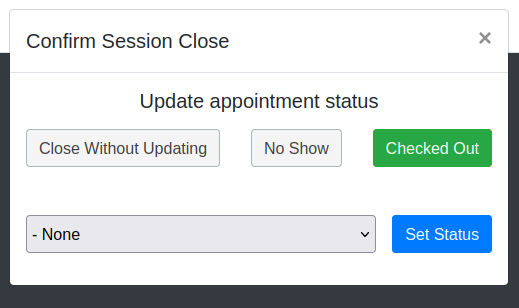
When you close the session a ‘Confirm Session Close’ dialog will display in which you may update the appointment status.
- Close without updating
- No Show
- Checked Out
The dialog will close immediately.
Or if another status fits, click the '-None' drodown list and select it.
Click ‘Set Status’ (blue button at right) to close the dialog.
Conclusion
This module is undergoing improvements so this documentation will be updated periodically. Feel free to email if you find discrepancies between the application and the docs!
Quick Reference Guide to the Comlink Telehealth Module
Create telehealth appointment
A telehealth appointment is made in the same manner as any other appointment.
- use either of the two telehealth appointment categories:
- Telehealth sessions may be launched within 2 hours before or after their scheduled appointment time
The launch icons show the status of the session. IconBlue, iconBlack, iconGreen
- Blue for sessions that may be launched
- Black for sessions that have passed the two hour window
- Green for completed sessions that can no longer be launched.
Launch the telehealth appointment
1. Open the EMR’s calendar screen
2. Click the video launch icon
3. Grant Access to your local microphone and camera.
4. Click ‘Join Now’ button to start the Telehealth session
- You are now in the Telehealth Appointment waiting room where you can wait for the patient to join the call.
Telehealth Session Conference Room Controls
Show / Hide Room Controls
- Controls disappear after five seconds of inactivity. Move the cursor to display the controls again.
Enable / Disable Video
- Click the video camera icon to toggle your camera off or on.
Enable / Disable Microphone
- Click the microphone icon to toggle your microphine off or on.
Minimize / Maximize Session For Note Taking
- Click the notes clipboard icon to minimize the video window and view the encounter form.
- Click the expansion icon to restore the video window.
- You can drag the minimized window to a new location and it will remember its place during the current video session.
Invite Third Party Participant
- Once the session has begun one (and only one) additional participant may be invited to join the session.
- This can be an existing patient or a new patient whose record will be created in the EMR
Click the ‘Iinvite Participant’ icon :
Third Party Invitation – New Patient
1. Click the ‘Invite New Patient’ button
2. All information is required to create the new patient record
Third Party Invitation – Existing Patient
1. Click the ‘Existing Patient’ button.
2. Search for an existing patient by:
- PID – if known; exact matches only.
- First or last name – matches text appearing anywhere in the name
- date of birth – search by different formats:
- year (YYYY)
- year and month (YYYY-MM)
- complete DOB (YYYY-MM-DD)
3. Click ‘Search’
4. Select the ‘Invite Patient’ button to invite that patient
- The patient will receive an email with an invite to join the session.
1. Click the share screen icon
- This icon only appears if other participants are in the session.
2. Click on the the screen you wish to share
3. Click ‘Share.’
- A dialog will appear to state that your screen is being shared.
4. To stop sharing click the blue ‘Stop Sharing’ button
End Telehealth Session
2. Click ‘Confirm’
Update the appointment status.
Optional but recommended
On closing the session a panel will appear offering status update.
Choose the appropriate status
