New Clinic OpenEMR Setup 4.2.0
From OpenEMR Project Wiki
Revision as of 12:00, 29 March 2022 by Stephen Nielson (talk | contribs) (→4. Enter contact information)
Other languages — Help us translating this wiki
• Afrikaans • አማርኛ • العربية • অসমীয়া • asturianu • azərbaycanca • български • বাংলা • brezhoneg • bosanski • català • corsu • čeština • dansk • Deutsch • ދިވެހިބަސް • Ελληνικά • Esperanto • español • eesti • euskara • فارسی • suomi • français • Frysk • Gaeilge • Kréyòl gwadloupéyen • Gàidhlig • galego • Alemannisch • ગુજરાતી • Hausa • עברית • हिन्दी • hrvatski • Kreyòl ayisyen • magyar • հայերեն • interlingua • Bahasa Indonesia • Igbo • íslenska • italiano • 日本語 • Jawa • ქართული • қазақша • ភាសាខ្មែរ • ಕನ್ನಡ • 한국어 • kurdî • Lëtzebuergesch • ລາວ • lietuvių • latviešu • Malagasy • македонски • മലയാളം • मराठी • Bahasa Melayu • Malti • မြန်မာဘာသာ • नेपाली • Nederlands • norsk nynorsk • norsk • occitan • Oromoo • ଓଡ଼ିଆ • ਪੰਜਾਬੀ • polski • پښتو • português • português do Brasil • română • română (Moldova) • русский • سنڌي • සිංහල • slovenčina • slovenščina • Soomaaliga • shqip • српски / srpski • svenska • தமிழ் • తెలుగు • тоҷикӣ • ไทย • Türkçe • українська • اردو • oʻzbekcha/ўзбекча • Tiếng Việt • Wolof • isiXhosa • Yorùbá • 中文(简体) • 中文(繁體) • isiZulu
New Clinic OpenEMR Setup
- (Note the default lower pane containing the 'Message/ Reminders' module will be hidden to make the pictures in this tutorial easier to see)
- The initial setup of OpenEMR consists of 5 steps:
- 1. Enter OpenEMR's application ("global") settings
- 2. Enter facility- specific settings
- 3. Create user accounts for the people who will use OpenEMR
- 4. Enter contact information for the users and for the business accounts the clinic will interact with
- 5. Practice Settings: pharmacy and insurance company information; document formats that can be accepted
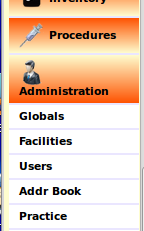
- First- time setup tasks are found in the Administration Menu item
1. Enter OpenEMR global settings
- Configure the settings that you want to apply to the entire OpenEMR application
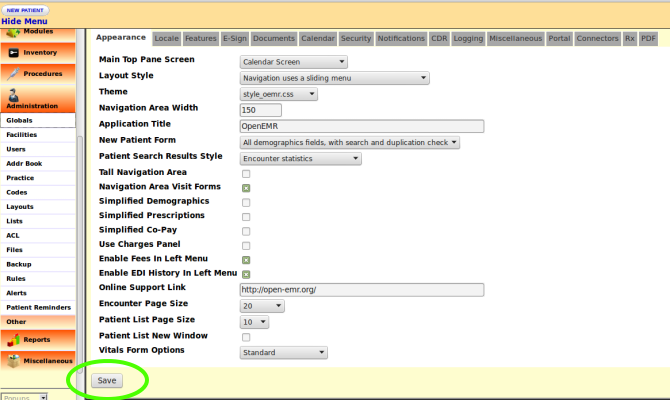
- Open the nav menu item Administration-> Globals (Circled)
- Preset defaults are suitable in most cases to get started but some specific settings will need to be changed to suit your clinic's operations.
- Only a few of the Global settings need to be set at the very beginning; most of them will be set up when different modules are activated. For example, several global settings will be set when configuring Clinical Decision Rules.
- For details of all the global settings, see the Supplemental Topic item, Admin Globals Summary.
- A few items that you should check are:
- Locale/ language: if not using American English
- Features/ Drugs and Products: if you're going to maintain an inventory
- E-sign: if you will be using that functionality
- Calendar: if schedule calendar will use other than office hours of 8a - 5p, in 15 minute increments
2. Enter Facility Settings
- Settings used in the facility's practice management
- Open the nav menu item Administration-> Facilities (circled)
- Initially the panel will have no facilities listed.
- Click Add button (circled) to enter your facility's information
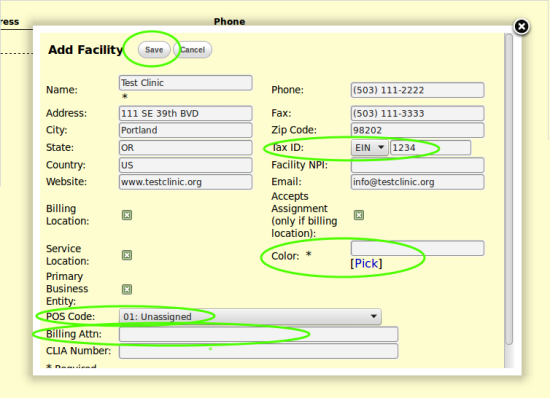
- Enter the requested information in each area in the panel. Only two fields are strictly required: Name (of the facility) and facility Color.
- Some of the less self- evident items:
- Website: the clinic's public website
- Checkboxes: select if this facility is the organization's-
- Billing Location
- Service Location
- Primary Business Entity
- POS Code (circled): Open the Dropdown menu to select the appropriate POS Code, if applicable.
- Billing Attn (circled): Enter the name of the person to whom billing should be directed.
- US phone numbers should be in the format (000) 111-2222, for display familiarity.
- Tax ID (circled): may be either an EIN or a SSN.
- Email: your organization's public- facing email address
- Accepts Assignment: If the "Billing Location checkbox is checked, you may want to check this one also.
- Color (circled): Click the "[Pick]" link and choose a color for the display of the items for this clinic.
- Multiple facilities may be served by one OpenEMR installation. Color assigns a color to distinguish each facilities' information from the others. For more information on managing multiple sites see the Supplemental Topic Multiple Sites Module
- Some of the less self- evident items:
- Click the Save button (circled at top of panel) to save the settings.
3. Create User Accounts
- Authorize any people who will use this system
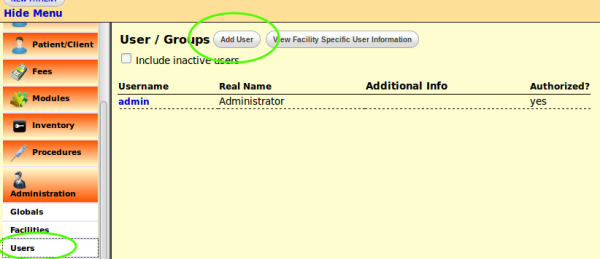
- Open the nav menu item Administration-> Users (circled, lower left)
- This screen shows the controls to add a user account, view user accounts grouped by facility, and a checkbox to show or hide inactive users.
- Authorized users have the ability to schedule appointments in the Calendar under their name.
- At the initial setup only the Administrative user will have been created, named whatever was specified in the setup script. At this point you are that administrator and you have authorization to create additional user accounts.
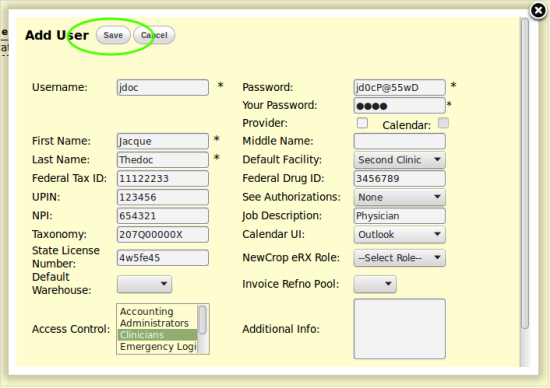
- To create an additional user account, click the 'Add User' button (circled) to display the 'Add User' popup and fill in the requested information.
- Non- self evident items:
- Federal Tax ID: If user is a provider, provide their Tax ID to ensure proper billing for their services
- UPIN and NPI: If a provider, enter those provider's numbers
- Taxonomy : If a provider, enter taxonomy code
- State License Number: If a licensed professional enter license number
- Default Warehouse: If using an inventory system this dropdown menu will list the available 'warehouses'. Select which the user may access.
- Access Contol: select the type of access to OpenEMR this user will be authorized.
- Password: the new user's password; will display in plain text
- Your Password: the password of the person creating the user account, to confirm they are authorized to do so.
- Checkboxes:
- Provider: select if user is a Provider
- Calendar: select if user is allowed to use the calendar, making and changing the schedule
- Active: select if user is presently a member of the practice
- Default Facility: dropdown menu lists all facilities that have been set up (in previous step). Select this user's primary location.
- Federal Drug ID: If a provider, enter that number
- See Authorizations: which user authorizations this user may view: "None", "Only Mine", "All"
- Job Description: appears in the 'Addr Book' search module as "Specialty";
- Calendar UI: format of the calendar that will display when this user logs in: "Outlook", "Original", "Fancy" (see Calendar controls for details)
- NewCrop eRx Role: role titles for NewCrop eRx activities
- Invoice Refno Pool: Use only if the clinic uses the Checkout form and associated Receipts and reports.
- Select the pool of Invoice Reference Numbers this person will take their invoices from. The only list by default is 'Main'; add new pools by editing the list at Administration-> Lists -> Insurance Reference Number Pools.
- Non- self evident items:
- Click the Save button (circled, at top) and see the new username listed on the User/ Groups screen.
- A user's account may be modified by any user authorized to do so, by clicking on the username in the list at the User/ Groups screen.
4. Enter contact information
- For all users and business entities affiliated with this facility
- Open the nav menu item Administration-> Addr Book
- (this module can also be accessed from the Miscellaneous nav menu item)
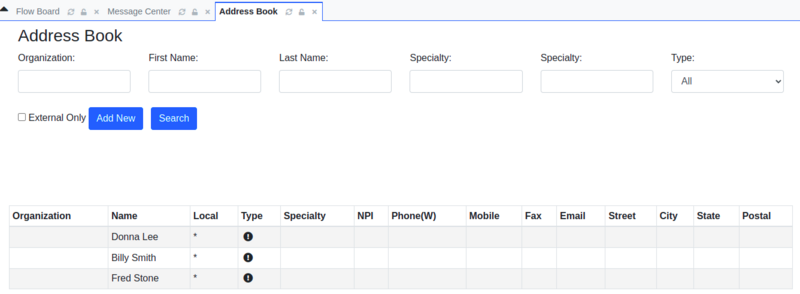
- The Address Book window displays a line of text areas along the top, which are used to search the Address Book contents.
- Immediately below, a grid (circled) shows all entries in the Address Book, which consist of the Contacts and Users/ Groups associated with this installation of OpenEMR. Contacts may be suppliers, business associates, external practitioners, etc.
- Any entry appearing on this list may be edited by clicking on it.
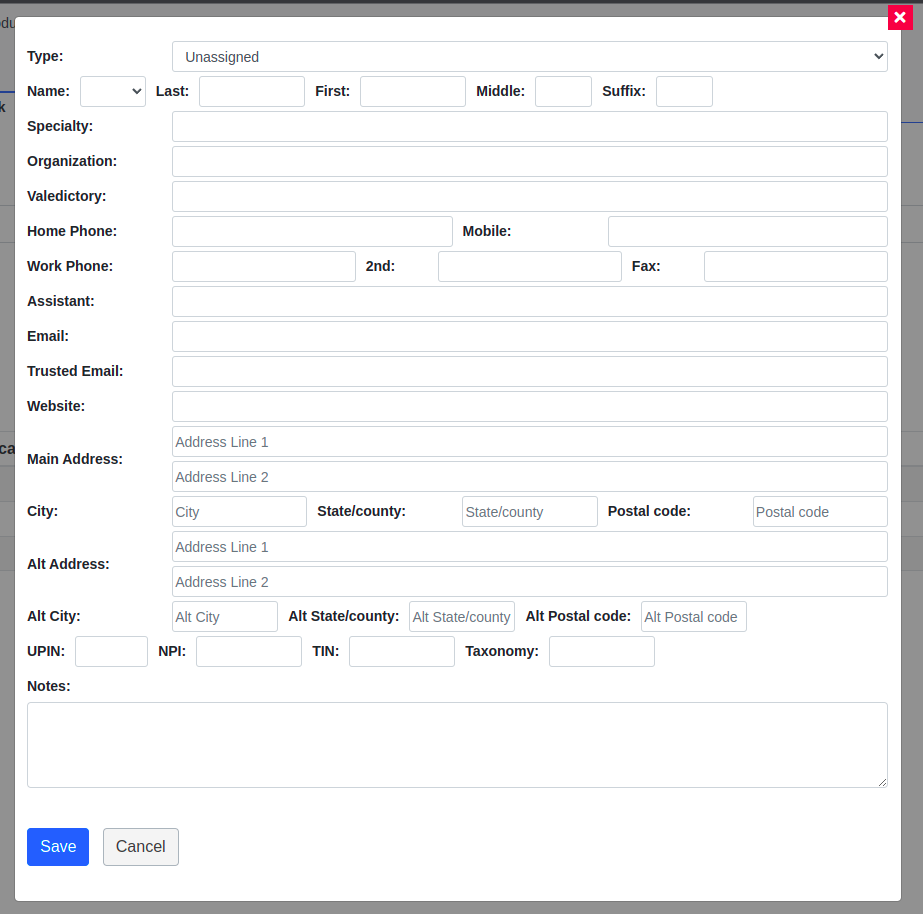
- Remember to click the Save button when finished.
- The less self- evident items:
- Type: dropdown menu lists the different types of contacts.
- The less self- evident items:
- [ADVANCED: the types list may be customized; see Supp Info: "editing lists"]
- Specialty: can be any text; is one of the terms used to search the contacts list
- Valedictory: fully discussed in an enlightening thread in the OpenEMR Help forum; said thread. This field is optional; may be used to record a person's titles or preferred mode of address. It is not used in any of OpenEMR's operations.
- UPIN, NPI; TIN; Taxonomy: see references in step 3 above, 'Create User Accounts'
- Click Save button to save new contact.
Search the Address Book
- This function will search all entries in the Address Book, which includes Contacts and OpenEMR Users and Groups.
- The less self- evident items:
- Specialty searches the Job Description field in an OpenEMR user's profile.
- The less self- evident items:
- Enter one or more search terms in the text areas along the top
- Click the Search button.
- Search returns are listed in the matrix display.
5. Practice Settings
- Access codes and accounts for external pharmacies, insurance companies; also document management functions
- Open the nav menu item Administration-> Practice (circled)
- Click on one of the links across the top of the window to configure that module. Initially, each module will state that none of that type of setting is found; e.g., "No Pharmacies Found"
- Click on the Add a [module] button (circled) for the module you select.
- In the graphic above the Pharmacy module has been selected.
Pharmacies
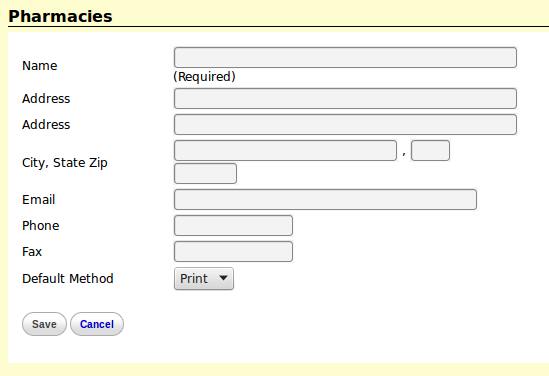
Enter pharmacy identifiers and information.
- Fill in the module data entry panel
- The less self- evident items:
- Default Method: by printed document, email or fax.
- The less self- evident items:
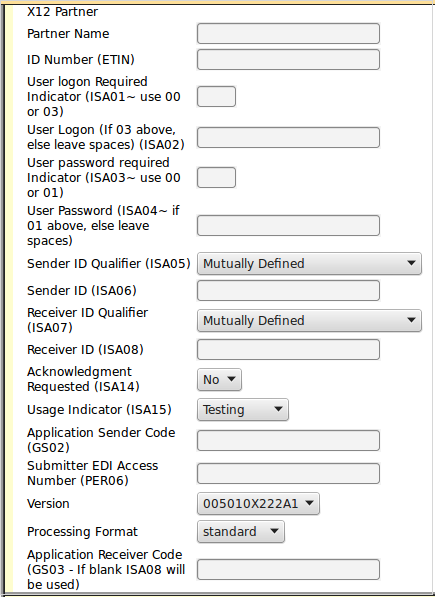
- NOTE: When setting up the clinic, X12 partners must be filled in before the Insurance companies.**
X12 Partners
The entities that will be electronically billed
- The information entered in this screen will be provided by your X12 partners.
- The less self- evident items:
- Version: refers to the version of the X12 837p protocol specification being used. Choose default, 5010, to avoid claim rejection.
- The less self- evident items:
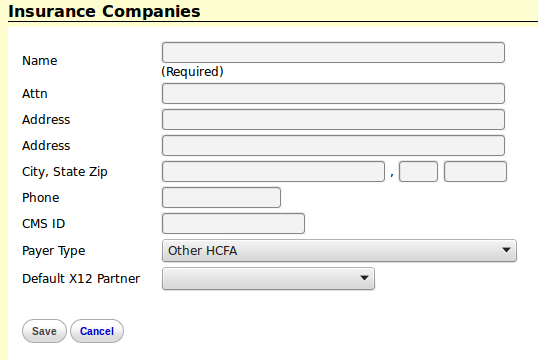
Insurance companies
Register each insurance company the facility has business with.
- ** A separate entry must be made for each plan that has its own billing address even if handled by the same insurance company.**
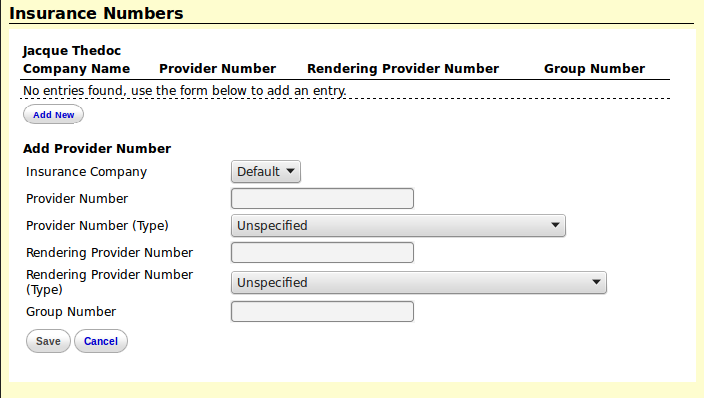
Insurance Numbers
Contains the insurance numbers assigned to your facility's providers by each insurance company.
- The items:
- Insurance Company: dropdown menu will contain the insurance companies that are entered in "Insurance Companies" section above. The "Default" menu item may be used to record numbers for insurance companies not registered with the facility.
- Provider/ Rendering Provider Number: number assigned by this insurance company
- Provider/ Rendering Provider Number (Type): dropdown menu contains list of all possible types of ID numbers and their designation code
- (e.g., "1A Blue Cross Provider Number")
- Group number: Insurance group number
- The items:
Documents
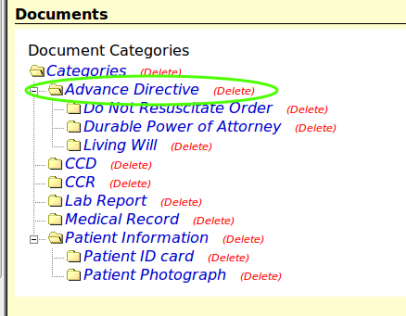
Organizes in a hierarchy the categories of documents that may be uploaded and attached to a patient record.
- Categories refer to the type of documentation that is used to record patient care. The documents themselves are uploaded in the individual patient's summary screen via the Documents link; see [link to module?] for details.
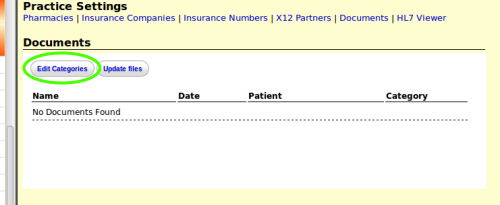
The initial Documents screen will display all documents.
- The term "Categories" does not refer to file type, such as .doc or .jpg. For example, in the Advance Directive category (circled below), any file may be uploaded that contains that sort of content, whether it's a graphic scan of a paper document or a text file email attachment.
- To add a new category click the Edit Categories button (circled above) and see the current list of categories available.
- The categories shown in this graphic are OpenEMR's preconfigured default categories. This list may be changed to suit the needs of individual clinics.
- Click the blue category name ('Advance Directives' is circled) under which the new one will be placed.
- In the resulting text area enter the new category name
- Click Add Category button (circled above)
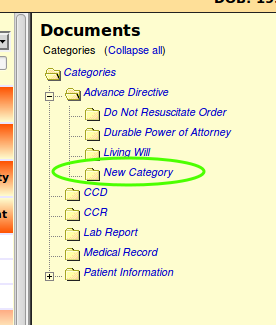
- The new category now is visible in the list.
- See notification that New Category has been added (circled)
- Now the new document category will appear as an option in all patients' Documents section, found on their Summary screen: (circled)
- To delete an unwanted category click on the delete link to its right.
- WARNING: the category will be immediately deleted without asking for confirmation.
HL7Viewer
A simple viewer of HL7 files
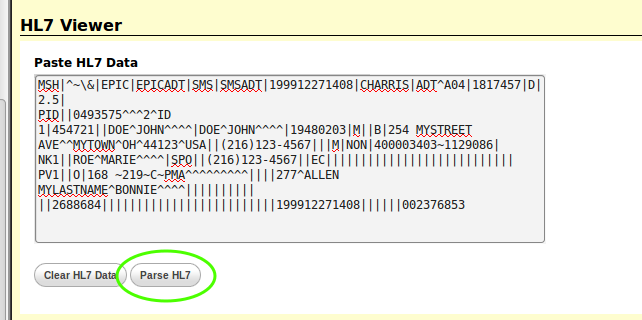
- Open an HL7 file in your preferred text editor.
- Copy and paste the HL7 contents into the 'Paste HL7 Data' window.
- Click Parse HL7 button (circled)
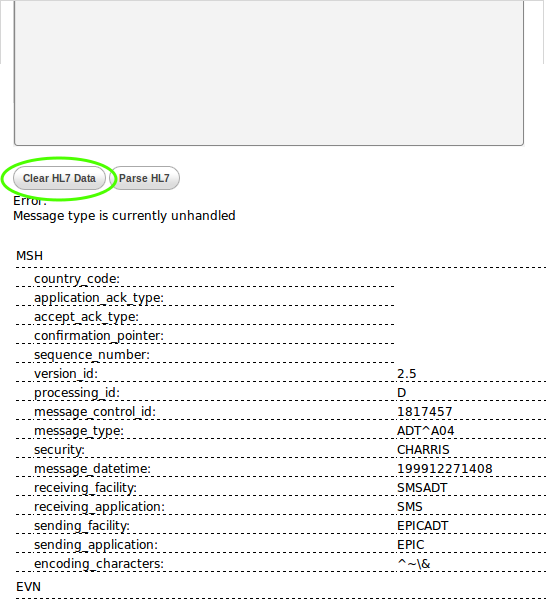
- Read parsed file below text area.
- Click Clear HL7 Data button (circled above) to clear the display.
